Lightroom Mobile: Presets and Profiles
Lesson 46 from: The Streamlined Lightroom WorkflowJared Platt
Lightroom Mobile: Presets and Profiles
Lesson 46 from: The Streamlined Lightroom WorkflowJared Platt
Lesson Info
46. Lightroom Mobile: Presets and Profiles
Lessons
Introduction
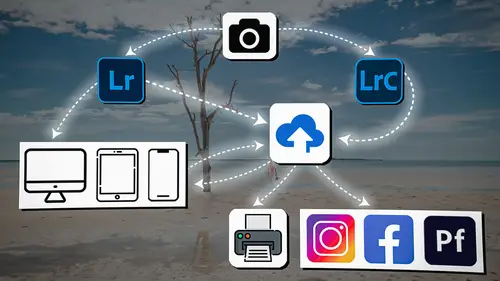
04:12 2Lightroom Ecosystem Overview
07:30 3Lightroom Ecosystem Image Delivery Details
09:21 4Lightroom Introductions
04:03 5Lightroom Application Names
02:33 6Lightroom Classic Getting Started
09:11 7Lightroom Classic: Importing
19:42 8Lightroom Classic: Selecting
09:28Lightroom Classic: Organizing Images
14:05 10Lightroom Classic: Adjusting Images
09:19 11Lightroom Classic: Cleaning Up
04:34 12Lightroom Classic: Sharing Images
22:08 13Lightroom Classic: Archiving Images
17:21 14Lightroom Classic: Workflow Review
06:34 15Lightroom Classic: Bonus - Cloud Files Location
11:16 16Lightroom Classic: Bonus - Fixing Synchronization Errors
06:24 17Lightroom Classic: Cleaning Up the Cloud
14:18 18Lightroom: Introduction
07:20 19Lightroom: Importing Images
03:38 20Lightroom: Browsing Images in Local Storage
11:53 21Lightroom: Organizing Images
06:20 22Lightroom: Copying Images to the Cloud
22:45 23Lightroom: Adjusting Images
07:12 24Lightroom: Masking
03:17 25Lightroom: Making an AI Preset
02:40 26Lightroom: Synchronizing Adjustments and Masks
07:07 27Lightroom: Sorting and Finding Images
14:13 28Lightroom: Sharing Images
14:26 29Lightroom: Archiving Images
11:31 30Lightroom: Workflow Review
05:57 31Lightroom: Importing Presets and Profiles
04:12 32Lightroom Mobile: Workflow Introduction
10:22 33Lightroom Mobile: Settings
08:56 34Lightroom Mobile: Overview
01:50 35Lightroom Mobile: Albums, Collections, and the Cloud
05:07 36Lightroom Mobile: Importing Local Images
05:39 37Lightroom Mobile: Importing Images
11:59 38Lightroom Mobile: Albums and Searching
04:34 39Lightroom Mobile: Selecting Images
06:12 40Lightroom Mobile: Organizing Images
05:34 41Lightroom Mobile: Archiving
11:06 42Lightroom Mobile: Editing Images
11:36 43Lightroom Mobile: Editing Across the Cloud
09:19 44Lightroom Mobile: Sharing Images
14:46 45Lightroom Mobile: Finding the Best Photos Feature
04:41 46Lightroom Mobile: Presets and Profiles
12:44 47Lightroom Mobile: Workflow Review
02:42 48Putting it All Together
10:25Lesson Info
Lightroom Mobile: Presets and Profiles
1 And now what I'm gonna do is I'm going 2 to look at some presets 3 and some profiles to play around with this image 4 and see what we get out of it beyond 5 what it looks like right now. 6 So, and the reason I'm gonna show you this is 7 because I want to show you how Lightroom 8 mobile deals with presets and profiles. 9 So in order to find a preset, you go below the adjustment 10 panel there and click on the little circles, 11 and then you can see that there are different 12 pots of presets. 13 There's recommended presets, 14 which it's gonna analyze the photo, 15 and then it's gonna give you a bunch of presets 16 that it thinks you might want to use. 17 I can use premium presets, which are what came 18 with Lightroom, which are usually quite lame. 19 And then I'm going to use the ones that I've created. 20 And so you can see that I've got lots of different ones. 21 I've got adaptive presets, which by the way, you're going 22 to have access to some of my presets 23 and profiles by ...
owning this course. 24 So look in your course information 25 because there will be some downloadable zip files 26 that are perfect for installing into Lightroom. 27 And I showed you how to install the presets into Lightroom. 28 Those get shared with Lightroom mobile. 29 So on your phone 30 and on your iPad, if you want to have presets inside 31 of your iPad, you can't import them here. 32 You have to import them into Lightroom on your computer, 33 and then they will get to here, which is unfortunate 34 because if you don't have a computer 35 and you only use your iPad, it makes it really difficult 36 to import something into into Lightroom mobile. 37 So they really ought to work on that. 38 That's another one of those things that a lot 39 of people ought to be shouting about. 40 It should be easy to just click on the triple button 41 and say, import preset, 42 draw 'em in from the file area, 43 and it should, there's no reason why we shouldn't be able 44 to do that two years ago, but that's the way it is. 45 So if you want presets in your mobile device, you have 46 to put them here inside of Lightroom on your computer, 47 and they will automatically get here, both presets 48 and profiles. 49 I'm gonna go into my JP curve collection 50 because there's some pretty cool curves in here, 51 and most of 'em are curves that bring it back to color. 52 So I'm gonna skip those 53 and it's nice that I see what it's gonna look like 54 before I touch it. 55 And each one of these has a little triple dot button next 56 to it that allows you to rename it, to delete it, 57 or to update it with current settings. 58 So if you've done something to adjust it 59 and then you come back, you can kind of update that preset. 60 But I'm gonna go into these ones here, this 19th century 61 with grain there. 62 That's kind of cool. See that? 63 So now it looks like it's an older photograph. 64 It's got the grain on it, it's kind of softer. 65 That's kind of cool. I like that. 66 So we're gonna keep that and hit done. 67 So I have saved this thing. I like it. 68 So now I am going to give it a few more stars 69 because I like it better now that I've worked on it. 70 And we're gonna leave that one. 71 And then I'm gonna go to my photo of me, 72 and I'm gonna work on that one for a second. 73 So I'm just gonna brighten it up a little bit, 74 and I'm gonna bring the black back down, 75 bring the shadows up a little bit, go to the color. 76 I'm gonna add some vibrance to the color. 77 I want to protect my skin tones, 78 but I want the blue of my jeans 79 and my shirt to kind of show up. 80 So we're increasing the vibrance. 81 I'm gonna bring the warmth of the photo up a bit, 82 and then I'm gonna go to my 83 my masking feature. 84 And notice that we had already set up this 85 because we did this when we were on the computer 86 and we made it 87 because we couldn't access people inside of Lightroom, 88 inside of Lightroom mobile. 89 But I wanna show you something else. 90 So I'm gonna actually delete this mask, 91 and I want you to see 92 what happens when you use my adaptive presets, 93 which you will have access to. 94 So I'm gonna go into the adaptive JP presets, 95 and I'm going to go to this one that says, 96 brighten people by one. 97 I'm gonna click on that and look at that. 98 It just chose me. 99 And if I click on that little, the little icon next to it, 100 it opens it up and I can change the amount 101 by which it's brightening. 102 But furthermore, once that mask is made, 103 watch what I can do. 104 So I now have a mask, I'm gonna hit done, 105 and I can go to the mask area, 106 and it created a mask based on people. 107 But the adaptive presets that I've built are searching 108 for people with the AI People Finder. 109 And even though Lightroom mobile doesn't have the People 110 Finder built into it, like as an option, it's in it 111 so the People Finder is in it. 112 The AI can find people, it just has 113 to be instructed from a preset. 114 So when we an adaptive preset, it will find the people. 115 So here I found the people, I selected that mask, 116 and now I can do anything I want to this mask 117 so I can change the exposure. 118 I can bring the shadows down a little bit, 119 bring the black down a little bit, so I'm kind of 120 making myself pop outta this a little bit more. 121 And I can change the colorization of it just a little bit. 122 I can change the effects 123 and add a little bit more clarity so 124 that my beard pops out a little bit and hit done. 125 So look at that. 126 I was able to mask myself inside 127 of Lightroom mobile without a People Finder mask 128 because I have the ability to use adaptive presets. 129 And the adaptive presets that I've created specifically 130 for this class are available to you for owning this class. 131 So you're gonna have adaptive presets for Lightroom 132 and Lightroom mobile. 133 And all you have to do is follow the instructions on how 134 to install them in Lightroom on your computer, 135 not not Lightroom Classic, but Lightroom. 136 And it will automatically install them 137 inside of Lightroom mobile. 138 If you want them in Lightroom Classic as well, you have 139 to follow the instructions on installing in Lightroom 140 Classic in order to get them on Lightroom Classic 141 and Lightroom, because once you put 'em in Lightroom, 142 they go to Lightroom mobile, 143 but they don't go to Lightroom Classic. 144 You have to install 'em separately for that. Okay. 145 But you're gonna have access 146 to my adaptive presets as well 147 as my profiles. 148 So let's show you a profile really quickly 149 so you know what that's about. 150 The profiles are up here at the top. 151 So right above all of your adjustments is a profile. 152 And a profile is basically just an under 153 underlying color definitions 154 and contrast definitions for a photo. 155 So if you click on the browse option, you'll see all 156 of these profiles. 157 Some of them come with Lightroom 158 and other ones you have to install. 159 And again, in order to install these, you don't, 160 you can't install them inside of Lightroom 161 mobile, at least not right now. 162 We hope someday they'll allow that to happen. 163 But right now you have to install them 164 on Lightroom on your computer, 165 and then it will automatically upload them 166 into Lightroom mobile. 167 So that's how you install them. 168 But you can see that I've got some here, one's called Black 169 and White Pro by Jared Platt, 170 and the other one's Color Art Pro. 171 So I'm gonna use Color Art Pro 172 because this is a color image. 173 I'm gonna zoom out, and then I'm just gonna kind of play 174 around with these and see, which I like that one. 175 That one looks great. 176 Okay, so once I do that, 177 I have a slider down here that can change this. 178 So that's 0%, and that's 200%. 179 Somewhere in between there is the right amount. 180 So I'm just gonna, this is too hot, this is too cold, 181 and this is just right. 182 Okay, so what's that like 75, 80, 80%, something like that. 183 Okay. So I like that a lot. 184 And I'm just going to go up to the profile area 185 and back out of the profiles. 186 And now I have this underlying cool color look to it. 187 But at the same time, all of the sliders have stayed exactly 188 where I left them because a profile is 189 underneath all of the information. 190 So all the sliders are up on top, 191 and the profile kind of slides in underneath 192 and does adjustments to the color 193 and the contrast without touching a slider. 194 It's awesome. So I love profiles. 195 Profiles are fantastic ways to either choose a film type 196 before you start adjusting the image, 197 or even afterwards, you can kind of look at the image 198 and start playing around with different profiles 199 and see what it does. 200 And then always remember you've got that ability 201 to manipulate the total amount of that profile 202 that you've put into the image. 203 So that's really cool. 204 The last thing I'm gonna do 205 to this image is I'm gonna create a linear gradient, 206 and I'm just gonna drag it across the image like this. 207 And I'm gonna go up to the light area, 208 and I'm gonna bring the shadows down just a bit 209 and the exposure down just a little bit. 210 And every time I bring the exposure down just a little bit, 211 I always find that it gets a little too cold. 212 So I'll go to the color and just warm it up just a tad too. 213 And then I noticed that this bottom area here is a 214 little bright still. 215 So I'll make one more mask 216 and I'm gonna make that a linear gradient as well. 217 Drag it up like this, go to the light, 218 bring the exposure down, shadows down, 219 move this up a bit. 220 Go to the color, bring that temperature up, 221 just a little bit, done. 222 Now I really like the way that image looks, 223 except I don't like the darkness over there. 224 So I need to go back and do one more mask. 225 And this time I'm gonna do a radial gradient 226 because it's kind of a circular area. 227 So I'm gonna just go like this, 228 put myself at the very edge of that gradient, 229 and then go into the light 230 and just start brightening it up just a little bit, 231 maybe it a little bit in the shadows, 232 bring the the black down, 233 and then it does get a little cool in that. 234 So I'm gonna warm it up just just a tad. Good. 235 Okay, now I think that looks great. 236 It's a little bit muted in its color. 237 It's got kind of an interesting color cast to it. 238 That's all from the profile. 239 And then the rest of it is burning 240 and dodging a little bit of clarity on it. 241 It looks great, but I can do this kind of work 242 all day long on the iPad. 243 It's just so comfortable to sit and work on the images. 244 I like sitting in a train 245 or on an airplane working on these. 246 I hate working on a laptop on the airplane. 247 Love working on an iPad on the airplane. 248 So I will plug into the power on the airplane all the way to 249 and from my destinations when I'm traveling, 250 and I will work for hours and hours on the iPad.
Class Materials
Bonus Materials
Ratings and Reviews
Milena Marguenski
After giving up on Adobe long time ago (for apparent reasons). I decided to go back with my recent coming back to photography. I’ve been a heavy Photoshop user but never Lightroom’s. Since I signed up I was straggling to decide between the “new” Lightroom and Lightroom Classic. It was obvious LRC is more versatile but I loved the modern, cleaner look of the Lr. At the end I am a visual person :). Jared’s workshop made my decision easier and cleared up the question I asked Google repeatedly about managing Adobe cloud storage. A very comprehensive, easy to understand and fun course. Can’t wait to rearrange my 20+ years photo library. Thank you, Jared!
Maarten Barckhof
JP knows a lot and can explain very well! I took another course, called Editing and Organizing your Photography in Lightroom Classic. That was very nice. But now, maybe he filmed all courses one after another, but he is less sharp, with so many repetitions... the idea of these online courses is, that you can look back whatever and whenever you want. But having to listen to all repetitions for me it was quite exhausting, sorry about that!
La
Jared Platt is the best educator when it comes to explaining how and when to use each program in the Lightroom ecosystem. He knows and explains extremely well the pros, cons, and tricks of using LrC, Lr, & LrMobile together. Most people teach each independently. Jared teaches in depth knowledge of how they interact --amazing!