Lesson Info
23. Lightroom: Adjusting Images
Lessons
Introduction
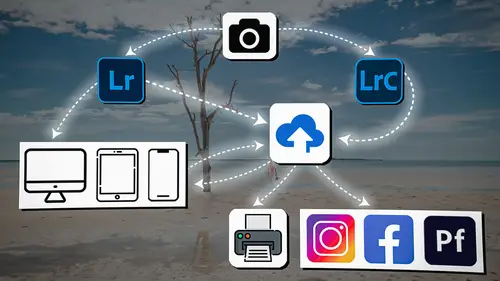
04:12 2Lightroom Ecosystem Overview
07:30 3Lightroom Ecosystem Image Delivery Details
09:21 4Lightroom Introductions
04:03 5Lightroom Application Names
02:33 6Lightroom Classic Getting Started
09:11 7Lightroom Classic: Importing
19:42 8Lightroom Classic: Selecting
09:28Lightroom Classic: Organizing Images
14:05 10Lightroom Classic: Adjusting Images
09:19 11Lightroom Classic: Cleaning Up
04:34 12Lightroom Classic: Sharing Images
22:08 13Lightroom Classic: Archiving Images
17:21 14Lightroom Classic: Workflow Review
06:34 15Lightroom Classic: Bonus - Cloud Files Location
11:16 16Lightroom Classic: Bonus - Fixing Synchronization Errors
06:24 17Lightroom Classic: Cleaning Up the Cloud
14:18 18Lightroom: Introduction
07:20 19Lightroom: Importing Images
03:38 20Lightroom: Browsing Images in Local Storage
11:53 21Lightroom: Organizing Images
06:20 22Lightroom: Copying Images to the Cloud
22:45 23Lightroom: Adjusting Images
07:12 24Lightroom: Masking
03:17 25Lightroom: Making an AI Preset
02:40 26Lightroom: Synchronizing Adjustments and Masks
07:07 27Lightroom: Sorting and Finding Images
14:13 28Lightroom: Sharing Images
14:26 29Lightroom: Archiving Images
11:31 30Lightroom: Workflow Review
05:57 31Lightroom: Importing Presets and Profiles
04:12 32Lightroom Mobile: Workflow Introduction
10:22 33Lightroom Mobile: Settings
08:56 34Lightroom Mobile: Overview
01:50 35Lightroom Mobile: Albums, Collections, and the Cloud
05:07 36Lightroom Mobile: Importing Local Images
05:39 37Lightroom Mobile: Importing Images
11:59 38Lightroom Mobile: Albums and Searching
04:34 39Lightroom Mobile: Selecting Images
06:12 40Lightroom Mobile: Organizing Images
05:34 41Lightroom Mobile: Archiving
11:06 42Lightroom Mobile: Editing Images
11:36 43Lightroom Mobile: Editing Across the Cloud
09:19 44Lightroom Mobile: Sharing Images
14:46 45Lightroom Mobile: Finding the Best Photos Feature
04:41 46Lightroom Mobile: Presets and Profiles
12:44 47Lightroom Mobile: Workflow Review
02:42 48Putting it All Together
10:25Lesson Info
Lightroom: Adjusting Images
1 We now have all of our images here inside of Lightroom. 2 We have all the selects. 3 There's only 83 of them 4 and I want to do some adjusting on them. 5 So remember that if I double-click any of these images, 6 so I'm just gonna double-click say this image here 7 and I'm gonna just cycle through there. 8 That's a good one to start with. 9 I like this image. 10 I'm gonna use this as the hero shot. 11 I'm gonna start working on this image 12 and then we will actually synchronize all of the changes 13 from this image to all the other images. 14 So to start off with, 15 let me just show you a few things 16 that you should be aware of here. 17 Up at the top, 18 that's all the search capabilities and all the filters. 19 Over on the right-hand side, 20 is all of the things you can do to the photo. 21 So up here, 22 on the top of the right-hand panel is the adjustments. 23 This is your presets right here at the top, so presets. 24 These are your adjustments or your edits. 25 This is your ...
crop. 26 This is your Healing Brush or your retouching tool. 27 This is your masking option. 28 And then these are versions or basically history. 29 And then this is all sorts of settings and copies and pastes 30 and stuff like that. 31 So this is just kind of like an extra right-click button. 32 Okay, so that's some things you can do to the photo. 33 Obviously, down here at the bottom is the info panel. 34 We've already discussed that. 35 We also have the keywords panel. 36 And we have the activity. 37 The activity is actually based on web interactions 38 that people have with your images. 39 Because we can actually share them with people. 40 And we'll show you how to do that in a minute. 41 So we're gonna go into the adjustment 42 and we're gonna start working on this image. 43 Now, I really like the dark look on this photograph. 44 And it's really meant to be kind of a soft, darker photo 45 with just this nice, soft light on her. 46 So I'm going to go into my camera profile first. 47 And I can either drop down the camera profile 48 and just hover over things and change the profile, 49 or I can go to the browser. 50 The browser's much easier to see, 51 because now you can open up camera matching 52 and you can kind of see what it's gonna look like 53 before you get to it, 54 or I can go down to my color Art Pro by Jared Platt. 55 Click on that. 56 And by the way, as part of this class, 57 by buying this class, 58 you will also get my color 59 and my black and white Art Pro profiles. 60 So you're gonna get a set of these profiles 61 and I'll show you how to import them here in a second. 62 So this color art profile allows me 63 to look at these first. 64 So I can see 65 what they're gonna kind of look like right off the bat. 66 But I can hover over them as well 67 and I can see what these are going to look like 68 by hovering over them. 69 And I kind of like the thin nature of some of these, 70 but I don't like the blue tone. 71 I like the warm tone. 72 And so I'm gonna choose this warm tone right here, 73 but not because I want to use the entire warm tone. 74 I actually want to take that warm tone. 75 So as soon as I click on any profile 76 that was designed to allow you with the amount slider, 77 'cause each profile has, 78 you can program it to allow the amount slider or not, 79 I've allowed the amount slider, 80 so now I'm gonna take that amount slider 81 and take it to zero. 82 And then I'm just gonna take it up just a little bit. 83 So see how it's warming it up just a bit? 84 And it's thinning it out just slightly. 85 So I'm doing 41%, 86 so that is the underlying color and contrast 87 that I want in the photo. 88 It's like choosing a film stock. 89 So I start with that. 90 And then I'm gonna go into the light area. 91 So the light panel allows me 92 to do all of my basic adjustments. 93 So I'm just gonna bring up the exposure just a little bit 94 and the shadows quite a bit. 95 And then I'm gonna bring the black back down, 96 so that there are some rich shadows in there, rich black. 97 And then I'm gonna take the highlights 98 and the whites down a bit, 99 'cause I don't want it to be too bright. 100 I want it to be nice and soft. 101 And I can click on zoom, 102 so I could just zoom in like this 103 and see it at hundred percent. 104 But I don't wanna see it at a hundred percent. 105 I want to actually hit the Command plus and minus button 106 and that allows me to bring the photo in, 107 so that I can see her and the dress and the shoulders 108 and like I can see it all at the same time. 109 So I just zoom in and out. 110 So that's the Command plus, Command minus. 111 So I'm just gonna move in just enough, 112 so I can see it nice and big. 113 And then I'm gonna play around with the contrast. 114 I'm gonna bring the contrast down just a little bit more, 115 play with the highlights 116 and make sure that they don't get too bright 117 and the whites. 118 There, okay, so now I'm gonna start playing around 119 with the temperature and tint. 120 And notice that instead of going warmer on this, 121 I already have the warmth from this profile 122 and so I'm actually backing out the warmth on this photo 123 and just looking at her skin 124 and just choosing a kind of a muted, warm skin, 125 which is making the background go a little bit blue. 126 And then I'm gonna take the tint, 127 play with that and make sure 128 that I don't have too much green in her skin. 129 Good. 130 And then I can play with the vibrance, 131 which is actually, 132 the vibrance is gonna kind of protect her skin tones a bit. 133 And it's gonna bring up the blue 134 of the background a little bit more. 135 So I like that idea. 136 So I'm bringing up the vibrance a bit. 137 And then I'm gonna take the shadow down just a little bit, 138 all right, sorry, the saturation down, 139 just a little bit, there. 140 I'm really liking what I'm seeing here. 141 Now, I've gone through an entire workshop 142 of every control here inside of Lightroom. 143 I also did one for Lightroom Classic. 144 And so if you want more details about what I'm doing, 145 this class is more about the total workflow 146 and not necessarily about every slider. 147 So I'm gonna work through images here 148 and I'll talk you through them as I do it. 149 But I'm not gonna go through every single control here. 150 That is for the other workshop that I just taught, 151 which is editing and organizing inside of Lightroom 152 and also editing and organizing inside of Lightroom Classic. 153 So if you like the idea 154 of learning every single one of these tools, 155 go to those workshops. 156 'Cause we just filmed them and they're awesome.
Class Materials
Bonus Materials
Ratings and Reviews
Milena Marguenski
After giving up on Adobe long time ago (for apparent reasons). I decided to go back with my recent coming back to photography. I’ve been a heavy Photoshop user but never Lightroom’s. Since I signed up I was straggling to decide between the “new” Lightroom and Lightroom Classic. It was obvious LRC is more versatile but I loved the modern, cleaner look of the Lr. At the end I am a visual person :). Jared’s workshop made my decision easier and cleared up the question I asked Google repeatedly about managing Adobe cloud storage. A very comprehensive, easy to understand and fun course. Can’t wait to rearrange my 20+ years photo library. Thank you, Jared!
Maarten Barckhof
JP knows a lot and can explain very well! I took another course, called Editing and Organizing your Photography in Lightroom Classic. That was very nice. But now, maybe he filmed all courses one after another, but he is less sharp, with so many repetitions... the idea of these online courses is, that you can look back whatever and whenever you want. But having to listen to all repetitions for me it was quite exhausting, sorry about that!
La
Jared Platt is the best educator when it comes to explaining how and when to use each program in the Lightroom ecosystem. He knows and explains extremely well the pros, cons, and tricks of using LrC, Lr, & LrMobile together. Most people teach each independently. Jared teaches in depth knowledge of how they interact --amazing!