Lesson Info
42. Lightroom Mobile: Editing Images
Lessons
Introduction
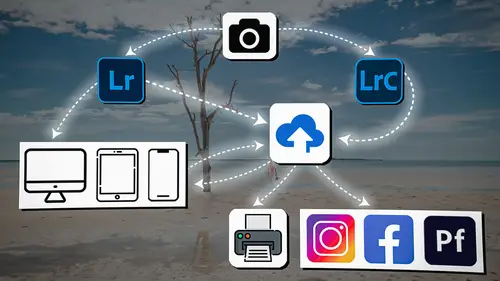
04:12 2Lightroom Ecosystem Overview
07:30 3Lightroom Ecosystem Image Delivery Details
09:21 4Lightroom Introductions
04:03 5Lightroom Application Names
02:33 6Lightroom Classic Getting Started
09:11 7Lightroom Classic: Importing
19:42 8Lightroom Classic: Selecting
09:28Lightroom Classic: Organizing Images
14:05 10Lightroom Classic: Adjusting Images
09:19 11Lightroom Classic: Cleaning Up
04:34 12Lightroom Classic: Sharing Images
22:08 13Lightroom Classic: Archiving Images
17:21 14Lightroom Classic: Workflow Review
06:34 15Lightroom Classic: Bonus - Cloud Files Location
11:16 16Lightroom Classic: Bonus - Fixing Synchronization Errors
06:24 17Lightroom Classic: Cleaning Up the Cloud
14:18 18Lightroom: Introduction
07:20 19Lightroom: Importing Images
03:38 20Lightroom: Browsing Images in Local Storage
11:53 21Lightroom: Organizing Images
06:20 22Lightroom: Copying Images to the Cloud
22:45 23Lightroom: Adjusting Images
07:12 24Lightroom: Masking
03:17 25Lightroom: Making an AI Preset
02:40 26Lightroom: Synchronizing Adjustments and Masks
07:07 27Lightroom: Sorting and Finding Images
14:13 28Lightroom: Sharing Images
14:26 29Lightroom: Archiving Images
11:31 30Lightroom: Workflow Review
05:57 31Lightroom: Importing Presets and Profiles
04:12 32Lightroom Mobile: Workflow Introduction
10:22 33Lightroom Mobile: Settings
08:56 34Lightroom Mobile: Overview
01:50 35Lightroom Mobile: Albums, Collections, and the Cloud
05:07 36Lightroom Mobile: Importing Local Images
05:39 37Lightroom Mobile: Importing Images
11:59 38Lightroom Mobile: Albums and Searching
04:34 39Lightroom Mobile: Selecting Images
06:12 40Lightroom Mobile: Organizing Images
05:34 41Lightroom Mobile: Archiving
11:06 42Lightroom Mobile: Editing Images
11:36 43Lightroom Mobile: Editing Across the Cloud
09:19 44Lightroom Mobile: Sharing Images
14:46 45Lightroom Mobile: Finding the Best Photos Feature
04:41 46Lightroom Mobile: Presets and Profiles
12:44 47Lightroom Mobile: Workflow Review
02:42 48Putting it All Together
10:25Lesson Info
Lightroom Mobile: Editing Images
1 Now you'll notice that once we have deleted these images, 2 now the filter is getting in our way. 3 We can't see all these images. 4 I could go up here and clear the filter by getting rid 5 of one of those, but it's still filtering it out. 6 Or I can just clear the filter 7 and now I'm seeing all of my select images. 8 So let's edit this image. 9 'cause this is one of the coolest images 10 that I shot while I was there. 11 Love it, so I'm gonna first go in 12 and kind of bring the exposure up, 13 so that I get a general correct exposure. 14 And I'm gonna put my glasses on here 15 so I can see the beautiful stone work going on. 16 So, I love everything about this image. 17 So, I'm just getting my exposure right. 18 I'm gonna take my shadows up, not too much, 19 'cause I still want it to be nice and dark, 20 but I love how these mirrors are showing this 21 other side over here. 22 So, I am going to bring the whites down just a little bit, 23 and the highlight down to... 24 I want it ...
to be really dramatic, 25 but I also wanna see things. 26 And so I'm kind of 27 playing with that battle between dramatic and information. 28 So, I want information and I want drama. 29 I think one thing that I could do is go to my mask 30 and I can click on the plus button, do a gradient 31 and drag that gradient down like this. 32 And I can then go into the light area 33 and just start bringing, 34 see how I'm bringing the exposure down just a little bit? 35 That looks pretty good. 36 And then the other thing I wanna do is I wanna negate 37 that from anything that's truly dark. 38 'Cause I don't want the truly dark to get too dark, 39 so I'm just trying to get like the mid tones darker. 40 So what I'm gonna do then is I'm gonna click down here 41 on this plus/minus. 42 So, I've got all of these gradients here, 43 and any kind of mask that I create, 44 I can add or subtract from that mask. 45 So, I'm gonna click the add or subtract, 46 and I'm gonna subtract from that mask, 47 and I'm gonna subtract a luminance range. 48 And then, I'm gonna bring this over to the darker area here. 49 And that's gonna be my luminance range. 50 And then you see that down at the bottom, 51 it gives me this extra luminance range area. 52 And so I can kind of expand 53 or contract the area that's not going to be counted. 54 And so I can go all the way 55 and see if I go all the way, 56 then it won't allow any of it to work. 57 So, when you have two options like that, 58 when you have a gradient 59 and you're subtracting something, 60 you could negate the entire thing that you had just done. 61 And that's what I do by getting rid 62 of the entire luminance range. 63 So, what I'm gonna do is I'm gonna pull 64 that luminance range down to really dark. 65 And then here's the feather that happens 66 between when I'm starting to stop 67 and when I truly stop. 68 So I'm gonna do that to like, maybe... 69 I don't want to go all the way up to the midtones area. 70 I want to be like about a third the way up there. 71 So, now, what's happening is this, I'm gonna hit Apply. 72 So now you've got this gradient that's coming down, 73 but then it's being negated by this. 74 So, the truly dark areas don't get any darker. 75 And that's a good way to create a very specific gradient 76 and mask that is trying to create the top a little darker, 77 but not create too much darkness in the bottom. 78 All right, I like that. 79 The other thing I want to do 80 is create another radial gradient here. 81 And I'm just gonna put it right here 82 in this hallway like this. 83 And then, I'm gonna go into the light area 84 and I'm gonna take the shadows up just a little bit 85 so that you can see whatever's going on back there, 86 which is quite cool. 87 Take the shadows down a little bit, 88 or I mean the black down, but the shadow up a bit. 89 And I'm gonna take the color and I can change that color 90 so I can play around with that color. 91 So, if I have this used fine adjustments on, 92 I can just shift that color ever so slightly, 93 either more green or a little bit warmer. 94 I like it a little bit warmer. 95 And I'm gonna take the saturation down just a little bit 96 so that it's not quite so saturated like that. 97 And I can also change what this, 98 how feathered this is. 99 So, I wanna make sure that's really, really feathered. 100 I'm gonna kind of shrink this down a little bit 101 and make sure that it's mostly taught covering 102 that walkway like that. 103 Good. 104 And then I've got this area over here 105 that I wanna play with. 106 And so, when it comes to this area, 107 I'm gonna make another mask. 108 And this time, I'm gonna go and select... 109 I'm gonna paint with a brush 110 and I'm gonna go, I'm just gonna use two fingers 111 and pull this over the side 112 so that I can totally get a hold of this. 113 And I'm just gonna paint 114 with a brush this entire area here, like this. 115 And I know that doesn't look 116 like a very good painting job, I understand. 117 But I can then subtract from that. 118 I can subtract a luminance range 119 and I'm just gonna subtract out anything that is dark. 120 So you see how it's showing what's left in that selection? 121 So I chose an area and then I went in 122 and chose a luminance range to effect within that area. 123 There, so now it's deleting everything 124 that's from really dark to mid gray. 125 And then it's slowly going from mid gray to white. 126 So most of the effect is happening up here 127 in the true whites. 128 Hit Apply, and now when I play with this mask, 129 I can just kind of see what I can do with that. 130 I can play with just the highlights, just the whites. 131 And this is further changing what I'm affecting. 132 So, the mask is choosing what I'm gonna affect, 133 but then within the mask, I get to choose the areas 134 of tonality that I'm willing to affect. 135 And so, I'm playing around with the highlights 136 and I'm playing around with the white 137 because I don't wanna mess with the black area 138 or anything like that. 139 So, I'm just playing with the highlights 140 'cause that's what I want people to see. 141 The other thing I want to do is play around with the color 142 that's coming in on that, 143 because remember, all of this stuff over here is warmer, 144 and so I want to play with that. 145 So, I'm just gonna go in and warm this up a little bit, 146 add a little bit of magenta to it, 147 a little bit of saturation to it. 148 And then, I'm gonna play with taking this hue 149 just a little bit more to the right. 150 Just keep going a little bit more to the right, 151 a little bit more saturation. 152 I'm just playing with it until I feel like 153 it is no longer this weird bluish tone. 154 Good, that's a pretty great image. I love it. 155 Okay, so this image is really cool. 156 If I just touch it once, I get to see the full thing. 157 I'm gonna put my glasses on again, and I love it. 158 I love all of the texture in it, 159 I love the drama, I love all of the dark areas, 160 and the light areas. 161 I think it's super cool. 162 So, I want to keep this image, 163 but I think there's something else we could do with it. 164 You see how grainy that is? 165 I mean, I'm having to shoot. 166 What is the ISO on this thing? 167 This thing is like, it's a Lumix camera, 168 so it's a pretty small chip. 169 And that chip is causing a lot of grain, a lot of noise, 170 because when you have a small chip, 171 you have less light hitting the chip, 172 which means that you have more noise. 173 And so, it's a pretty noisy camera 174 when you're in dark shadow. 175 And this is at 800 ISO. 176 So 800 ISO on a Panasonic G85 is kind of like 177 3,200, 6,400 on a brand new R5 camera. 178 Okay. So I've gotta fix that. 179 The problem is, is that I only have one option 180 for fixing it here inside of Lightroom mobile. 181 And that is, to go to the detail area 182 and go to noise reduction here. 183 Click on noise reduction, and it gets rid of noise, 184 but it also gets rid of bricks. 185 See that? 186 Not good. 187 So, I'm not a big fan 188 of using the noise reduction in this circumstance. 189 And, unfortunately, the one thing that we are missing, 190 or one of the things, one of the most important things 191 that we're missing inside of Lightroom mobile right now, 192 and if you're watching this six months or a year later, 193 we might actually have this item 194 that I'm gonna talk about. 195 So right, now we're looking at the image 196 in Lightroom mobile. 197 And if I have adjusted everything 198 and then I go over to Lightroom on my computer, 199 I notice that it's not the same. 200 And that's because I have not moved away from this image. 201 So if I go away from the image, once I do that, 202 it solidifies the changes 203 and then it's gonna send them over to the computer 204 so that I can see them. 205 So now, it just changed the adjustments 206 that I made inside of Lightroom on my iPad, 207 and so you see them here in the computer. 208 Now, we are inside of Lightroom 209 and we have all the adjustments that were made. 210 You can see that it's got a lot of grain to it. 211 But if I wanna fix that, I can go up 212 to the menus inside of Lightroom 213 and go down to the detail section in Lightroom. 214 And now, you're going to see 215 that I've got the Denoise option.
Class Materials
Bonus Materials
Ratings and Reviews
Milena Marguenski
After giving up on Adobe long time ago (for apparent reasons). I decided to go back with my recent coming back to photography. I’ve been a heavy Photoshop user but never Lightroom’s. Since I signed up I was straggling to decide between the “new” Lightroom and Lightroom Classic. It was obvious LRC is more versatile but I loved the modern, cleaner look of the Lr. At the end I am a visual person :). Jared’s workshop made my decision easier and cleared up the question I asked Google repeatedly about managing Adobe cloud storage. A very comprehensive, easy to understand and fun course. Can’t wait to rearrange my 20+ years photo library. Thank you, Jared!
Maarten Barckhof
JP knows a lot and can explain very well! I took another course, called Editing and Organizing your Photography in Lightroom Classic. That was very nice. But now, maybe he filmed all courses one after another, but he is less sharp, with so many repetitions... the idea of these online courses is, that you can look back whatever and whenever you want. But having to listen to all repetitions for me it was quite exhausting, sorry about that!
La
Jared Platt is the best educator when it comes to explaining how and when to use each program in the Lightroom ecosystem. He knows and explains extremely well the pros, cons, and tricks of using LrC, Lr, & LrMobile together. Most people teach each independently. Jared teaches in depth knowledge of how they interact --amazing!