Lesson Info
28. Lightroom: Sharing Images
Lessons
Introduction
04:12 2Lightroom Ecosystem Overview
07:30 3Lightroom Ecosystem Image Delivery Details
09:21 4Lightroom Introductions
04:03 5Lightroom Application Names
02:33 6Lightroom Classic Getting Started
09:11 7Lightroom Classic: Importing
19:42 8Lightroom Classic: Selecting
09:28Lightroom Classic: Organizing Images
14:05 10Lightroom Classic: Adjusting Images
09:19 11Lightroom Classic: Cleaning Up
04:34 12Lightroom Classic: Sharing Images
22:08 13Lightroom Classic: Archiving Images
17:21 14Lightroom Classic: Workflow Review
06:34 15Lightroom Classic: Bonus - Cloud Files Location
11:16 16Lightroom Classic: Bonus - Fixing Synchronization Errors
06:24 17Lightroom Classic: Cleaning Up the Cloud
14:18 18Lightroom: Introduction
07:20 19Lightroom: Importing Images
03:38 20Lightroom: Browsing Images in Local Storage
11:53 21Lightroom: Organizing Images
06:20 22Lightroom: Copying Images to the Cloud
22:45 23Lightroom: Adjusting Images
07:12 24Lightroom: Masking
03:17 25Lightroom: Making an AI Preset
02:40 26Lightroom: Synchronizing Adjustments and Masks
07:07 27Lightroom: Sorting and Finding Images
14:13 28Lightroom: Sharing Images
14:26 29Lightroom: Archiving Images
11:31 30Lightroom: Workflow Review
05:57 31Lightroom: Importing Presets and Profiles
04:12 32Lightroom Mobile: Workflow Introduction
10:22 33Lightroom Mobile: Settings
08:56 34Lightroom Mobile: Overview
01:50 35Lightroom Mobile: Albums, Collections, and the Cloud
05:07 36Lightroom Mobile: Importing Local Images
05:39 37Lightroom Mobile: Importing Images
11:59 38Lightroom Mobile: Albums and Searching
04:34 39Lightroom Mobile: Selecting Images
06:12 40Lightroom Mobile: Organizing Images
05:34 41Lightroom Mobile: Archiving
11:06 42Lightroom Mobile: Editing Images
11:36 43Lightroom Mobile: Editing Across the Cloud
09:19 44Lightroom Mobile: Sharing Images
14:46 45Lightroom Mobile: Finding the Best Photos Feature
04:41 46Lightroom Mobile: Presets and Profiles
12:44 47Lightroom Mobile: Workflow Review
02:42 48Putting it All Together
10:25Lesson Info
Lightroom: Sharing Images
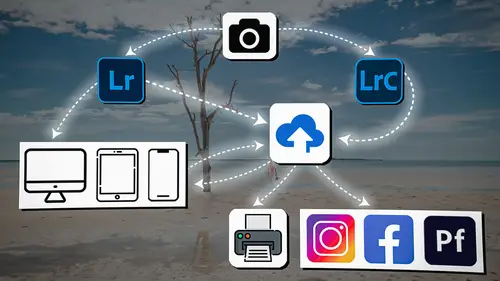
1 We have gone through the process 2 of bringing the images into Lightroom. 3 We reviewed them, we flagged them, we starred them. 4 Then we brought them into the cloud 5 and they got thrown up on the cloud, 6 they got delivered to all of our different devices, 7 including our iPad, iPhone, Lightroom Classic. 8 So they're all over the place. 9 We have a copy here on this drive 10 that we're no longer looking at, 11 but it's the original copy. 12 We have a copy inside of the hard drive 13 where Lightroom is storing all of the originals. 14 We have copy on the cloud. So that's three now. 15 Then we have a copy in Lightroom Classic. That's four. 16 And we don't have a copy on my iPad 17 because I've chosen the preferences in the iPad 18 not to store the original, just 'cause I don't want 19 to fill up a bunch of space on my iPad. 20 So I have four copies of this file, 21 not counting the copy that's on the camera card, 22 'cause that's going to be written over. 23 So I am very safe, whic...
h is fantastic. 24 I feel very safe with all my images every time I put them 25 into Lightroom because they just get copied everywhere. 26 It's fantastic 27 At this point, it's time to... 28 We've adjusted them 29 and now it's time to start sharing these images. 30 So there are several different ways 31 that we can share the images. 32 The first way that we can share the image 33 is simply by clicking on an image. 34 So let's just say that... 35 Let's choose this image, 36 and let me quickly go to the crop tool 37 and renegotiate this crop, 38 'cause we didn't do that on the iPad. 39 There we go. All right. 40 So now that I've got this photo and I want to share it, 41 I'm going to go up to the top right-hand corner, 42 and there is a little box with an arrow pointing up. 43 If I click on that, I have a lot of options for sharing. 44 I can enter my own custom options 45 as to what kind of file I want to send out, 46 or I can just kind of choose a preset here, 47 which is like a small... 48 This is perfect for Instagram. 49 This is a full size for like printing. 50 If I send out the original plus settings, 51 it's actually going to just copy the CR3, the original RAW, 52 and the XNP data, and it's going to send it out 53 wherever I want it to go. 54 And that'll become important later. 55 So for right now, 56 we're just talking about sharing it to people. 57 And so we are going to want to share this 58 to someone for print, let's say. 59 So I'm going to click on Large JPEG. 60 So I click on Large JPEG. It's going to open up a file menu. 61 It's asking me where I want to put it. 62 I'm just going to put it on the desktop in a folder. 63 And I'm going to say, "To Share" 64 and click Create and Export. 65 There we go. It just exported it. 66 You can see that little blue line 67 up in the top left-hand corner. 68 And so now if I hide everything and I go to my desktop, 69 there's a folder in that says "To Share." 70 I click on that image, open it up, and it is shared. 71 Perfect. Okay, so now we know how to share a file. 72 I could do the same thing by highlighting all of them 73 and go to the same menu and export them all as JPEGs. 74 It would send them all to that folder. 75 So that's how we would export a set of files 76 that we would either be using to upload to Instagram 77 or that we would be sending to a client, 78 or just sharing with our friends and family. 79 That's how we create a JPEG for that purpose. 80 The next thing that we can do with these images 81 is we can get a link to them, or invite people to them. 82 We're basically sharing a webpage. 83 And so there's several ways to make a webpage. 84 If I just want to share, say, these four images here... 85 No, let's just do this entire set here. 86 So I want someone to choose which one they want 87 between all eight of these photos. 88 So if I go to the Share option and I go down to get a link, 89 click that, it's creating a webpage based on those four 90 or those eight photos. 91 So there's my link. I'm going to copy that link. 92 So if I open up Chrome and paste that URL, 93 you see that I've only got those eight images. 94 I didn't have to do anything to create this website. 95 It just is. 96 It's already there because all the images 97 are already in the cloud. 98 And so all it did is select those eight images 99 and create a webpage for me. 100 And the great thing is, 101 is that I can then edit that webpage. 102 So I can make subtle adjustments 103 in the way this webpage looks 104 just by, before I share and invite it, 105 I can customize this and I can go in 106 and change the date of it, I can change the author. 107 I can change whether it's a photo grid or column 108 or one-up pictures. 109 I kind of like the column view. 110 I want it to be light instead of dark. 111 Actually these are so dark that maybe it's better 112 to have it a dark background on that. 113 And then if I want to customize it, 114 I click Customize on the Web, 115 and it actually opens up the customization panels for me. 116 And see how nice and big those photos are. 117 And then here's the customization options here. 118 So I can see these images in different views, 119 but if I want to edit the webpage, 120 it's this little artist palette here. 121 And I can click on this little up arrow here, 122 and that allows me to choose to show the title. 123 I can change that title and say, "Indie and Jared Platt," 124 and I can actually create a background cover. 125 So you can see that, behind the photos, 126 there's like a light version. 127 Or I can actually choose a hero image to be at the top, 128 and then if I click on this little icon over here, 129 I can adjust where that crop is. 130 So I click on that and then I can grab this 131 and bring it down, and then apply. 132 So now the hero image is at the top of the page, 133 and then as I scroll down, you see the title of the page 134 and then you see the images from the page there. 135 And that's my webpage. 136 And I can share that page with anybody. 137 They can look at it, 138 and if they're willing to log in... 139 So I'm already logged in, but if they're willing to log in, 140 they can click on an image 141 and they can go in and click Heart. 142 So now it just gave it a vote. 143 And they can click on this little dialogue here, 144 so this little quote bubble, and if I click on that, 145 it opens up a panel on the right-hand side. 146 And I can say, "I love the smile" and hit enter, 147 and see how it says, 148 "Jared Platt just said, 'I love the smile.'" 149 And now if I go back into Lightroom, 150 I'm going to click Done on this. 151 So now if I want to find those images 152 that have been selected, so that have gotten a heart on them 153 or someone's commented on them, 154 all I have to do is go up to the top of the grid here, 155 and you see that there's a Heart option 156 and there's a Comment option. 157 So if I click on Comment, 158 there's the images that have been commented on. 159 If I click on that, I can come over to the comment bubble 160 down here, and I can click on that 161 and it shows me the comments. 162 I can also say, "Show me the ones that have a heart." 163 There's the one that has a heart. 164 So that's how quickly I can find the interaction. 165 So I send those eight images off to somebody 166 and they heart one of them. 167 Now I know which one they like. 168 That's the one I can start editing or working on, 169 or that's the one I print for them for their birthday 170 or whatever it is I'm doing. 171 That's a great way to communicate back and forth. 172 So you can make a webpage just for people to enjoy, 173 or you can make a webpage for people 174 to interact with you about your photos. 175 So when we're making albums, you can see 176 that there's another panel over here called Shared. 177 So albums is where we were. 178 So these are just albums and we make these albums ourselves. 179 But when we create a webpage of any kind, 180 whether it's one-image page or it's eight images on a page, 181 or whether it's your entire portfolio on a page, 182 it's going to create that and it's going to put it 183 in this Shared panel. 184 And then that Shared panel has all of our shared albums 185 that we've made over time. 186 And if you want to get rid of one, 187 you can simply right-click it and you can say, "Delete it." 188 So I've just deleted that entire webpage. 189 I didn't delete the original images 190 or the album that they came from. 191 I just deleted that webpage 192 so that people can't access it if I don't want them to. 193 So I can post it, I can let them see it, 194 and then I can go in and delete that webpage 195 without ever going to the web. 196 And it's gone. It doesn't exist anymore. 197 So if you happen to have memorized that URL just now, 198 and now you're trying to go get to it, it's gone. 199 You can't access it. 200 So I love the option of sharing images inside of Lightroom. 201 I do it all the time with all my clients, 202 and I do it with family and friends as well 203 so that they can see what I'm working on. 204 Even just as easy as, "I want you to see this one picture 205 really quickly," instead of exporting it as a JPEG 206 and then copying it and posting it into a text message 207 or something like that, I can simply go to the Share, 208 click on it, share the JPEG, and send it to them, 209 or just get a link and send it to them 210 and then they get to see it. 211 It's awesome. 212 The other option for sharing 213 is through what we call connections. 214 And you can see that I've got several connections 215 that are active here inside of Lightroom. 216 There's Blurb, which is a bookmaker. 217 There's Adobe Portfolio, which actually is a great way 218 to make your own website. 219 If you are paying for Lightroom, 220 you already own an Adobe Portfolio site 221 and you just may not have used it. 222 So you can drag images right into the Adobe Portfolio 223 from Lightroom and it will put them 224 into your Adobe Portfolio site. 225 And then you can go into Adobe Portfolio 226 and make your own website for free 227 because you already own it. 228 And you can put your own URL on it. So it's fantastic tool. 229 If you don't have a website 230 or if you are paying for a website 231 and you don't really like it, check out Adobe Portfolio 232 because it is a easy way to create a website. 233 It's kind of like a Wix site, 234 but it's connected into all of your files on Lightroom. 235 So this is not a class about Adobe Portfolio. 236 Maybe one day I'll make a class on it, 237 but for now just go check it out. 238 You already own it if you own Lightroom. 239 SmugMug is another website that you can send your images to. 240 But the difference is SmugMug is a site that allows you 241 to create webpage that people can purchase prints from. 242 And actually if they order prints, 243 it goes through White House Custom Color, 244 which is my preferred vendor for printing. 245 But I can also send this image directly 246 to White House Custom Color. 247 Let's say I want to send this image to print. 248 All I have to do is click on that Share button, 249 go down to White House Custom Color, and click on it. 250 And I'm going to name the project, 251 so we'll just call this Indie and hit Continue. 252 It needs me to sign in. 253 And once I sign in to my Adobe account, 254 it's already got it connected 255 'cause I've connected it earlier, 256 and I can choose what I want to print. 257 So let's say I want to do a float wrap. 258 Click on Float Wrap, 259 it's going to find the float wrap options. 260 I can choose my size. Let's say I want to do a 16 by 20. 261 And let's say I want to do paper only 262 and I'm going to review, 263 that's what it would look like on the wall. 264 And the subtotal is $101. And I can share this proof. 265 So now if I just copy this website, it will show 266 what the print is going to look like to my client. 267 And then I can check out and pay for it and ship it. 268 That's it. 269 So that's a really easy way 270 to order a print from a professional printer. 271 And there's a lot of different connections. 272 So if you want to create a book 273 or if you want to create a print 274 or you want to share your images on a website, 275 these are some really great connections. 276 Blurb, White House Custom Colors, SmugMug, 277 and Adobe Portfolio are all really great connectors 278 and great companies. 279 And so if you're working with a company 280 that doesn't have a connection into Lightroom, 281 you should talk to them and ask them to. 282 But companies that really love you, 283 they want to connect into Lightroom 284 because that's where your photos are, 285 and they want to make your life easy.
Class Materials
Bonus Materials
Ratings and Reviews
Milena Marguenski
After giving up on Adobe long time ago (for apparent reasons). I decided to go back with my recent coming back to photography. I’ve been a heavy Photoshop user but never Lightroom’s. Since I signed up I was straggling to decide between the “new” Lightroom and Lightroom Classic. It was obvious LRC is more versatile but I loved the modern, cleaner look of the Lr. At the end I am a visual person :). Jared’s workshop made my decision easier and cleared up the question I asked Google repeatedly about managing Adobe cloud storage. A very comprehensive, easy to understand and fun course. Can’t wait to rearrange my 20+ years photo library. Thank you, Jared!
Maarten Barckhof
JP knows a lot and can explain very well! I took another course, called Editing and Organizing your Photography in Lightroom Classic. That was very nice. But now, maybe he filmed all courses one after another, but he is less sharp, with so many repetitions... the idea of these online courses is, that you can look back whatever and whenever you want. But having to listen to all repetitions for me it was quite exhausting, sorry about that!
La
Jared Platt is the best educator when it comes to explaining how and when to use each program in the Lightroom ecosystem. He knows and explains extremely well the pros, cons, and tricks of using LrC, Lr, & LrMobile together. Most people teach each independently. Jared teaches in depth knowledge of how they interact --amazing!