Lesson Info
29. Lightroom: Archiving Images
Lessons
Introduction
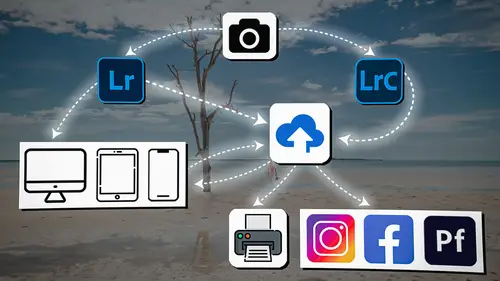
04:12 2Lightroom Ecosystem Overview
07:30 3Lightroom Ecosystem Image Delivery Details
09:21 4Lightroom Introductions
04:03 5Lightroom Application Names
02:33 6Lightroom Classic Getting Started
09:11 7Lightroom Classic: Importing
19:42 8Lightroom Classic: Selecting
09:28Lightroom Classic: Organizing Images
14:05 10Lightroom Classic: Adjusting Images
09:19 11Lightroom Classic: Cleaning Up
04:34 12Lightroom Classic: Sharing Images
22:08 13Lightroom Classic: Archiving Images
17:21 14Lightroom Classic: Workflow Review
06:34 15Lightroom Classic: Bonus - Cloud Files Location
11:16 16Lightroom Classic: Bonus - Fixing Synchronization Errors
06:24 17Lightroom Classic: Cleaning Up the Cloud
14:18 18Lightroom: Introduction
07:20 19Lightroom: Importing Images
03:38 20Lightroom: Browsing Images in Local Storage
11:53 21Lightroom: Organizing Images
06:20 22Lightroom: Copying Images to the Cloud
22:45 23Lightroom: Adjusting Images
07:12 24Lightroom: Masking
03:17 25Lightroom: Making an AI Preset
02:40 26Lightroom: Synchronizing Adjustments and Masks
07:07 27Lightroom: Sorting and Finding Images
14:13 28Lightroom: Sharing Images
14:26 29Lightroom: Archiving Images
11:31 30Lightroom: Workflow Review
05:57 31Lightroom: Importing Presets and Profiles
04:12 32Lightroom Mobile: Workflow Introduction
10:22 33Lightroom Mobile: Settings
08:56 34Lightroom Mobile: Overview
01:50 35Lightroom Mobile: Albums, Collections, and the Cloud
05:07 36Lightroom Mobile: Importing Local Images
05:39 37Lightroom Mobile: Importing Images
11:59 38Lightroom Mobile: Albums and Searching
04:34 39Lightroom Mobile: Selecting Images
06:12 40Lightroom Mobile: Organizing Images
05:34 41Lightroom Mobile: Archiving
11:06 42Lightroom Mobile: Editing Images
11:36 43Lightroom Mobile: Editing Across the Cloud
09:19 44Lightroom Mobile: Sharing Images
14:46 45Lightroom Mobile: Finding the Best Photos Feature
04:41 46Lightroom Mobile: Presets and Profiles
12:44 47Lightroom Mobile: Workflow Review
02:42 48Putting it All Together
10:25Lesson Info
Lightroom: Archiving Images
1 Now what I wanna show you how to do is 2 to archive the project. 3 Now, in this instance, 4 what we've done is we put our originals here 5 so we have a backup of everything. 6 We're not using this backup. 7 This backup was the original instance of the photos. 8 And we went and selected images from here, 9 but we then copied them into the cloud. 10 And so now there's a copy here, 11 and there's a copy inside of Lightroom 12 in the original photos folder. 13 And it's on the cloud. 14 And it's in Lightroom Classic. 15 And it's on our iPad, right? 16 But there's a copy right here of all the originals. 17 What it doesn't have there is all the adjustments we made, 18 because, remember, these are pre-import into Lightroom 19 on the cloud. 20 And so what we need to do is we need to archive this work. 21 And quite frankly, 22 I'm not all that interested in the total rejects here. 23 I'm just interested in these photos that we've selected. 24 So I'm gonna show you how to archive this project...
25 and keep your favorite images. 26 and then get rid of the stuff you're not gonna use 27 because there's no sense in keeping, you know, 28 all 83 photos in the cloud when it's taking up space. 29 If you can only keep, what was it, 30 19 that we really liked. 31 So let's just keep the 19 32 and not worry about the rest of them. 33 Okay, in order for us to archive this, 34 we are going to share it the same way we would share it 35 if we were trying to export JPEGs. 36 But we're gonna go to the Share button, 37 and we're going to choose Original + Settings. 38 When we do this, 39 we have several places that we could put it. 40 You could click on your photo drive 41 and go to like an archives folder. 42 So if you don't have the originals, 43 so let's say you didn't actually make a copy here, 44 and you just imported it directly into Lightroom Cloud, 45 sent it to the cloud, 46 then this archive process means 47 that you're archiving it to a drive 48 that doesn't have the originals. 49 But in our workflow case that we used the original drive, 50 we put all of our originals 51 in kind of a backup storage space, 52 and then we brought them in from there 53 so we have a copy of them, 54 kind of left the rejects back there. 55 But we copied the ones that we kept. 56 That means that we have the originals here. 57 So it makes a lot of sense to put them back here 58 with the other originals. 59 So what we're gonna do is, 60 so instead of having an archive location for them, 61 we're gonna put them in in the photos drive, 62 and we're gonna put them in the original folder. 63 Now remember, the original job has the raw. 64 So we're looking at this drive, 65 and it has a raw folder, 66 and then it has the rejects, 67 and then it has the selects. 68 But we don't want put it in either of those 69 because it's not the rejects. 70 And even though it is the selects, 71 if we were to put it in here, 72 it would make a duplicate. 73 So it would end up calling this number 352-2. 74 And so then you'd have two copies of each of them, 75 and it would get a bit confusing. 76 You're still gonna have two copies 77 because you're gonna put a folder here called archives. 78 So I'm gonna create a new folder inside of the raw folder, 79 and I'm gonna call it the Archive. 80 Now I have an archive, I have a rejects and a selects, 81 and I'm going to export my images to that archive folder. 82 So now I have my selects and my archives, 83 which are duplicative of each other. 84 But the archive has all of the final settings in it, 85 the things that we worked on inside of Lightroom, 86 including the stars, flags, keywords, 87 all that kind of stuff. 88 But the other file, so I'm gonna go back here. 89 So this other file, the selects, 90 just has the original stars and flags 91 that we put on it in the first place. 92 Now you can keep all three of these if you like. 93 If you want to keep the rejects 94 just in case you ever want to go back and reselect, 95 it's fine, but you don't need to. 96 You could delete it. 97 If you want to keep the original selects, you can. 98 But it's duplicative of what's in the archives. 99 So it depends on what you want to keep. 100 If you are a hoarder 101 and you want to keep everything that you've ever shot, 102 then you just archive this whole job 103 and put it on a drive or put it up in a cloud, 104 or keep it on the same drive and just, that's it. 105 That's where it stays. 106 Or you can go in here and select the selects folder 107 and the rejects folder and just hit Command + Delete, done. 108 Now all we have is the archive. 109 That's okay. 110 It's okay to delete it. 111 If you're not gonna use those files, get rid of them. 112 Now, if you're shooting a wedding 113 and you're afraid that someone might come back to you 114 two years later and want those photos, 115 keep it all. 116 They're paying you for it. So keep it. 117 Either way is fine. 118 So I'm gonna hit Command + Undo. 119 So there we go. 120 I'm just keeping them all for now, 121 but you could delete them like that. 122 So now let's go back to Lightroom. 123 We have our final archive copy right here. 124 It's in this drive. It's called archive. 125 It's in the original raw folder. 126 These are all duplicates of what we have in here. 127 So now that means, 128 because we have our archive, because we have our final copy, 129 we can do whatever we want to these images. 130 Inside the portrait portfolio, 131 these are the images I want to keep. 132 I gotta get rid of the ones that I don't want to keep. 133 So I'm gonna go in the portrait here, 134 and I'm going to sort 135 by all of the images that don't have stars, 136 'cause those are the ones I want to get rid of. 137 And I'm gonna click up here 138 on this little greater than, less than, equal to, 139 and I'm just gonna say equal to zero stars. 140 So I'm not choosing any of those. 141 And by doing equal to zero stars, 142 now I've got all of these images 143 that are no longer useful to me. 144 Now, I'm looking at these and realizing 145 that for my purposes, 146 there are a couple that are still useful to me. 147 So I'm gonna click on the ones that are still useful to me. 148 This one, 149 all of these. 150 So I'm just holding the Command key down. 151 And I'm looking for anything that is still useful to me. 152 So I'm choosing my example ones, 153 the ones without the light, with the overhead light, 154 and then with the directional light. 155 For educational purposes, 156 I'm choosing the dark and the light one. 157 So I'm choosing more than I might choose otherwise. 158 And then I see a couple that might be interesting to keep. 159 So I'm just choosing anything that I'm like, 160 "Ah, I don't wanna lose that one." 161 Okay, so then all I have to do is hit the one star, 162 and that's gonna give these an extra star. 163 So now see how they dropped off the search. 164 So now I'm still only looking at images 165 that have zero stars on them. 166 And now that I'm done with that, 167 I can go in and highlight all of these, 168 and I can right click them, 169 and go down to the Delete option. 170 So I could remove them from the album, 171 see how I've got different options. 172 I can remove them from the album, 173 or I can delete the photos. 174 So if you just wanna remove them from the album, 175 choose this one. 176 If you want to delete them, choose this one, 177 or use the hot keys. 178 So I'm gonna click Delete. 179 It's going to confirm because it's saying, 180 "Are you sure? 181 Do you really wanna delete these? 182 Because it's gonna delete them from your album. 183 It's gonna delete them from Lightroom photos. 184 It's gonna delete them from everywhere, 185 except Lightroom Classic," 186 'cause Lightroom Classic holds onto them. 187 It's not gonna let them go. 188 So as long as Lightroom Classic has been open, 189 so your desktop computer has to have Lightroom Classic open 190 the whole time, 191 because these images have to go down to it. 192 So if it's up in the cloud 193 but Lightroom Classic has not been activated in weeks, 194 it won't be in Lightroom Classic, 195 and it'll delete it from the cloud before it gets there. 196 But as long as your desktop computer has been on 197 and Lightroom has been open, 198 it's constantly receiving photos. 199 And they'll just be there. 200 But it's gonna delete it from all the cloud, 201 it's gonna delete it from your iPad. 202 But that's okay because we're just deleting the 48 photos, 203 not all of them. 204 Some of them we're gonna keep forever in the cloud. 205 So we're deleting the ones that we're not interested in. 206 When I hit Delete, they're gone. 207 So now all of those photos are gone, 208 and all I have is the 35. 209 So I'm gonna go back up here 210 and choose the greater than, less than. 211 And I'm gonna go back to this file there. 212 Now we have the images 213 that I'm really interested in keeping. 214 And those are on my cloud. 215 They're up in the cloud. 216 They're still on my iPad. They're still on my phone. 217 They're still over in Lightroom Classic. 218 And they're still here. 219 But I got rid of all of the extraneous stuff. 220 Where are they? Right here. 221 And if for any ever reason 222 I wanted to bring those images back in to Lightroom, 223 all I would have to do, 224 go back to my local storage, go back to that folder, 225 and now you can see I've got this archive folder. 226 Look at that. All the adjustments are there. 227 And all I would have to do is highlight all of those photos. 228 And then I could say, 229 "I want to copy these 83 photos to the cloud." 230 It's gonna tell me if you do this, 231 it's creating a new version 232 of any photo that it already has. 233 And we have some of these photos already in there. 234 And I can tell it to overwrite the metadata if I want to. 235 But if not, I hit Okay, 236 and I will bring all of those images right back in. 237 Or I could just always come over here and look at them 238 and not bring them back into Lightroom 239 and not put them back on the cloud. 240 So the choice is up to me. 241 But I've got the archive, I can always come back to it, 242 but I'm only keeping the stuff 243 that I really am interested in using on a regular basis 244 in the cloud. 245 And I'm saving all that space that's in the cloud.
Class Materials
Bonus Materials
Ratings and Reviews
Milena Marguenski
After giving up on Adobe long time ago (for apparent reasons). I decided to go back with my recent coming back to photography. I’ve been a heavy Photoshop user but never Lightroom’s. Since I signed up I was straggling to decide between the “new” Lightroom and Lightroom Classic. It was obvious LRC is more versatile but I loved the modern, cleaner look of the Lr. At the end I am a visual person :). Jared’s workshop made my decision easier and cleared up the question I asked Google repeatedly about managing Adobe cloud storage. A very comprehensive, easy to understand and fun course. Can’t wait to rearrange my 20+ years photo library. Thank you, Jared!
Maarten Barckhof
JP knows a lot and can explain very well! I took another course, called Editing and Organizing your Photography in Lightroom Classic. That was very nice. But now, maybe he filmed all courses one after another, but he is less sharp, with so many repetitions... the idea of these online courses is, that you can look back whatever and whenever you want. But having to listen to all repetitions for me it was quite exhausting, sorry about that!
La
Jared Platt is the best educator when it comes to explaining how and when to use each program in the Lightroom ecosystem. He knows and explains extremely well the pros, cons, and tricks of using LrC, Lr, & LrMobile together. Most people teach each independently. Jared teaches in depth knowledge of how they interact --amazing!