Lesson Info
9. Lightroom Classic: Organizing Images
Lessons
Introduction
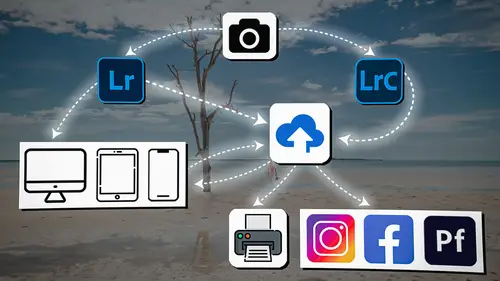
04:12 2Lightroom Ecosystem Overview
07:30 3Lightroom Ecosystem Image Delivery Details
09:21 4Lightroom Introductions
04:03 5Lightroom Application Names
02:33 6Lightroom Classic Getting Started
09:11 7Lightroom Classic: Importing
19:42 8Lightroom Classic: Selecting
09:28Lightroom Classic: Organizing Images
14:05 10Lightroom Classic: Adjusting Images
09:19 11Lightroom Classic: Cleaning Up
04:34 12Lightroom Classic: Sharing Images
22:08 13Lightroom Classic: Archiving Images
17:21 14Lightroom Classic: Workflow Review
06:34 15Lightroom Classic: Bonus - Cloud Files Location
11:16 16Lightroom Classic: Bonus - Fixing Synchronization Errors
06:24 17Lightroom Classic: Cleaning Up the Cloud
14:18 18Lightroom: Introduction
07:20 19Lightroom: Importing Images
03:38 20Lightroom: Browsing Images in Local Storage
11:53 21Lightroom: Organizing Images
06:20 22Lightroom: Copying Images to the Cloud
22:45 23Lightroom: Adjusting Images
07:12 24Lightroom: Masking
03:17 25Lightroom: Making an AI Preset
02:40 26Lightroom: Synchronizing Adjustments and Masks
07:07 27Lightroom: Sorting and Finding Images
14:13 28Lightroom: Sharing Images
14:26 29Lightroom: Archiving Images
11:31 30Lightroom: Workflow Review
05:57 31Lightroom: Importing Presets and Profiles
04:12 32Lightroom Mobile: Workflow Introduction
10:22 33Lightroom Mobile: Settings
08:56 34Lightroom Mobile: Overview
01:50 35Lightroom Mobile: Albums, Collections, and the Cloud
05:07 36Lightroom Mobile: Importing Local Images
05:39 37Lightroom Mobile: Importing Images
11:59 38Lightroom Mobile: Albums and Searching
04:34 39Lightroom Mobile: Selecting Images
06:12 40Lightroom Mobile: Organizing Images
05:34 41Lightroom Mobile: Archiving
11:06 42Lightroom Mobile: Editing Images
11:36 43Lightroom Mobile: Editing Across the Cloud
09:19 44Lightroom Mobile: Sharing Images
14:46 45Lightroom Mobile: Finding the Best Photos Feature
04:41 46Lightroom Mobile: Presets and Profiles
12:44 47Lightroom Mobile: Workflow Review
02:42 48Putting it All Together
10:25Lesson Info
Lightroom Classic: Organizing Images
1 So now that I have selected my images 2 and I have picks and I have rejects, 3 I'm going to highlight all of my picks. 4 So I've filtered by picks, 5 and you can filter down in the the bottom area here, 6 just above the film strip view. 7 Or you can do the same filtering up in the top 8 under the attributes in the library filter. 9 So you see that library filter, there's an there. 10 You can sort by text, you can, you can search by text, 11 you can search by attribute, by metadata, 12 or you can clear the entire search by clicking on none. 13 So we have all these images in front of us. 14 If I go to attributes and I click on the flags, 15 I see only the flagged images. 16 If I hit command A, 17 I select all of those images 18 and now I can organize these images. 19 So I'm gonna right click the self portrait folder 20 and I'm gonna create a new folder inside that folder. 21 And I'm gonna call it select 22 and notice that include selected photos is checked. 23 So we want it to move t...
hese photos into this folder. 24 I'm gonna hit create. 25 And so I've just made a select folder here with four images, 26 and you'll see that in the raw folder 27 the rest of the 29 are there. 28 Now, I could just simply say, okay, 29 the raw folder is the rejects and the selects is here 30 because I kind of move them away from each other. 31 So I could just right click this and I could rename it 32 and say it's rejects. 33 Or if you had other things in that folder, videos 34 or other photos that were kind of internal 35 or behind the scenes kind of photos, 36 things like that, 37 you might want to keep this one as raw 38 and just highlight all of these other images. 39 And you can also sort, 40 so you could go back to the attribute 41 and sort by rejects and unflagged images, 42 highlight all of those 43 and right click the job folder again, 44 create a a folder inside of it 45 and call this rejects, 46 and include the selected photos. 47 Hit Create. 48 So now I have a rejects folder 49 and a selects folder and an empty raw folder. 50 I can right click the empty raw folder 51 and I can just simply remove it. 52 When you remove a completely empty folder, it deletes it, 53 but if there's something in it, 54 even if there's something in it, 55 like a Word document or something, it won't delete it, 56 it will just remove it from Lightroom 57 and it forgets about it. 58 Okay, so now we have our images as rejects and selects. 59 I'm only gonna deal with the select images. 60 The rejects, I don't need to deal with. 61 If for any reason you wanted to go in 62 and do some more keywording, now would be the time to do it. 63 You can highlight all the images 64 and come over to your keywording section. 65 You can add any keywords you want right here. 66 Like for instance, I could add in, 67 let's see, I could add in, oh, I'm wearing a suit 68 and I am a bald male. 69 I'm bald, I'm a male, I'm a man. 70 What else could I write about? 71 Oh, and I'm on a, what would you call a trunk? 72 Okay, so now that's some extra information 73 that I might be able to find this image with. 74 Also, if you wanted to keyword specific areas, 75 like for instance, let's go back up 76 to this wedding really quickly 77 just so we have something to compare to. 78 This has a whole bunch of different types of images in it. 79 And so I've got lots and lots of images of brides and grooms 80 and mothers and portraits and things like that. 81 So I can go to a section like this from here. 82 All the way to say here, 83 that's all portraits. 84 So I can do that in one group. 85 So I'm just remember we added keywords 86 to the entire job when we were coming in on import, 87 but now we can add group portraits as a keyword 88 to a small group of images 89 just by highlighting one image 90 and shift clicking to the end of that section. 91 And then I can go do the same thing. 92 Oh, there's some more group portraits here. 93 So I can click on this 94 and I can scroll through until I get to the end 95 of the group portraits here, 96 which are right there, 97 and I can hit command K. 98 That takes me to the keyword area, 99 and then I can type in group portraits again there. 100 Okay, now the other way that I can do this 101 is I can go down to the toolbar, 102 and if you don't see the toolbar down below the grid, 103 hit the T key for tool 104 and you will, oh, sorry, I'm typing in a keyword. 105 If you want to get out of this keyword area, 106 just hit the escape key and then it goes dark. 107 So now we wanna see the toolbar, 108 just hit the T key and it will appear and disappear. 109 So I'm gonna click on this little spray can tool right here. 110 Click on that and I'm gonna tell it to spray keywords. 111 So I need to tell it what keywords, 112 so I'm gonna say bride comma groom. 113 So if I see a image that has both 114 the bride and the groom in it, 115 I can just spray across those images. 116 And now those both have the keyword bride and groom in them. 117 So there we go. 118 I've done that. 119 If I keep looking for something 120 with the bride and the groom. 121 Now the problem is, is that you're not gonna see 122 a lot of images with the bride and the groom. 123 And so what you really wanna do 124 is just do bride there. 125 So now everywhere you see the bride, 126 you just put, you just click on it, you click and drag, 127 and then everywhere you see the groom 128 later on you come back through. 129 So just do a pass for the bride 130 and then come in and do a pass for the groom 131 and then spray anywhere you see the groom, 132 I see the groom there. 133 And that way if you're kind of scanning through 134 and you see an image with just the groom in it, 135 you can click on that and now you have a keyword for groom. 136 So when you're keywording, 137 you don't necessarily need to keyword 138 things like flowers anymore, 139 because Lightroom Mobile, and Lightroom Web 140 and Lightroom, the new version of Lightroom, 141 can all see things visually. 142 Lightroom Classic can't see visual things. 143 And so the AI in the other versions 144 of Lightroom are much better. 145 And so you're able to actually go in and look for flowers 146 or you can look for buildings 147 or you can look for fields 148 or water or lakes or that kind of stuff. 149 And so really what you need to worry about keywording here 150 are either metaphoric phrases, or places, 151 or people or things that AI 152 wouldn't necessarily know to find 153 or wouldn't be able to search for. 154 And then also very specific things like 155 I knew that my portrait was shot with an A2 and a B10 light. 156 Got to keyword that if I want to be able to find it. 157 I'm not gonna be able to trust AI to figure out 158 what light source made the the photo. 159 So keywording is essential, 160 but it is not as essential as it used to be. 161 So put some keywording into it, 162 put maybe five minutes or so of keywording into your images, 163 but not more than 15 minutes of your time 164 should go into keywording. 165 So somewhere between five and 15 minutes 166 is a good amount of key wording, 167 especially if you're using these really powerful tools. 168 And again, put as many keywords as you can 169 that will describe everything 170 from that set of images when you're importing. 171 And then do blocks of keywording. 172 So keyword, big blocks of things. 173 And like for instance, if you're traveling, you could do, 174 you know, every time you're in a city, keyword that city 175 and then the next city, and then the next city, et cetera. 176 The other thing that you can do 177 when you are in keywording mode 178 is instead of adding just keywords, 179 you could highlight an entire set of images. 180 So I'm actually gonna start right, let's see, 181 I'm gonna start right here. 182 So right here is where the reception begins 183 and I'm gonna go all the way to the end of the reception 184 and highlight everything. 185 Then I'm gonna go to the map module. 186 And in the map module I can keyword 187 the GPS location. 188 Now, I don't know exactly where the GPS location is on this, 189 but I do know where it is on a map. 190 And so I'm looking at Google Maps right now 191 and I know it was in the United States, 192 and so I can search for the Wright house, Mesa, Arizona. 193 There it is, there's the Wright house. 194 And I can take these images 195 and if they are not already geotagged, 196 I can grab the images, 197 and I can grab 'em and drag 'em onto the map where it is, 198 and they will show up there. 199 Now you, you can see that I've already tagged these, 200 so if I hover over any of these, 201 you see that they already have tags on 'em, 202 because back when I shot this wedding, 203 I was actually shooting it with a Canon 5D Mark IV, 204 which had a GPS in it, which was awesome. 205 I loved it. 206 I hate the fact that Canon has gotten rid 207 of GPS on their cameras. 208 And then you have to get your phone. 209 So you have to turn the app on your phone 210 and then you have to tie the phone app, 211 which burns your batteries to the camera and through wifi, 212 and then have it ping the camera 213 and tell you what the GPS is. 214 And both batteries just burn out really fast. 215 So I hate that. 216 I loved the GPS in my Mark IV. 217 So I'm a little disappointed in Canon for that, 218 because I was able to do this. 219 And all of my images were geotagged for years, 220 and now I have to actually go in 221 and drag them to where the geotag is. 222 So if you want to know where your images were taken, 223 you'll notice then when I click on an image, 224 it shows me where that image was taken. 225 But it also shows me the GPS location here, 226 exactly where it is 227 and even what the altitude is for that shot. 228 This is not absolutely critical information 229 for a portrait or wedding photographer, 230 but it is really great for someone 231 who's doing on location portraits 232 or someone who's traveling 233 and doing travel photography 234 or doing hiking photography, adventure photography. 235 Those people, man, make sure you get your GPS location 236 on your photos so that you can either tell people 237 where the photos were or not tell people 238 and then have people hire you 239 because you know where these locations are. 240 So this is a fantastic way to scout your locations. 241 And I do this all the time. 242 In fact, when I'm driving around 243 and I see a really good location, 244 I grab my phone 'cause it has geo tagging on it, 245 and I take a picture with my phone of a really cool location 246 and I'll actually scout it out 247 with my phone rather than with a camera. 248 That way, when I import these into Lightroom, 249 I can actually see the exact location 250 where I was taking these pictures. 251 I didn't have to like jot any notes down 252 about how to get there, 253 because I have them here in my map module. 254 The map module is actually a wonderful, wonderful tool, 255 so get to know it because it is fantastic. 256 Okay, back to our images. 257 We finished keywording them, they have stars on 'em, 258 they have flags on 'em. 259 So for all intents and purposes 260 the metadata on these files is full. 261 We've got all the metadata we need on it. 262 And so at this point we are done 263 with the organizational process 264 that needs to happen to images before we finish the images. 265 So at this point, I kind of move to the next stage 266 of an image life, which is to adjust it, prepare it, 267 get it ready for the client or for me to see it.
Class Materials
Bonus Materials
Ratings and Reviews
Milena Marguenski
After giving up on Adobe long time ago (for apparent reasons). I decided to go back with my recent coming back to photography. I’ve been a heavy Photoshop user but never Lightroom’s. Since I signed up I was straggling to decide between the “new” Lightroom and Lightroom Classic. It was obvious LRC is more versatile but I loved the modern, cleaner look of the Lr. At the end I am a visual person :). Jared’s workshop made my decision easier and cleared up the question I asked Google repeatedly about managing Adobe cloud storage. A very comprehensive, easy to understand and fun course. Can’t wait to rearrange my 20+ years photo library. Thank you, Jared!
Maarten Barckhof
JP knows a lot and can explain very well! I took another course, called Editing and Organizing your Photography in Lightroom Classic. That was very nice. But now, maybe he filmed all courses one after another, but he is less sharp, with so many repetitions... the idea of these online courses is, that you can look back whatever and whenever you want. But having to listen to all repetitions for me it was quite exhausting, sorry about that!
La
Jared Platt is the best educator when it comes to explaining how and when to use each program in the Lightroom ecosystem. He knows and explains extremely well the pros, cons, and tricks of using LrC, Lr, & LrMobile together. Most people teach each independently. Jared teaches in depth knowledge of how they interact --amazing!