Processing Project: Crashing Waves on the Rocks
Lesson 37 from: Landscape Photography: Start to FinishMatt Kloskowski
Processing Project: Crashing Waves on the Rocks
Lesson 37 from: Landscape Photography: Start to FinishMatt Kloskowski
Lesson Info
37. Processing Project: Crashing Waves on the Rocks
Lessons
Course Introduction
08:52 25 Things Every Landscape Photographer Should Know
23:32 3Camera Gear
11:26 4Gear Q & A
33:04 5On Location: Weather & Safety
18:55 6On Location Pre-Visualzation Sutro Baths
07:29 7On Location: Camera Settings
21:59 8On Location: Composition
27:09Matt Klowskowski - My Story
06:28 10On Location: Bracketing
15:15 11On Location: Artistic Choices
16:12 12On Location: Pre-Visualzation Marshall's Beach
06:09 13On Location: Long Exposure
15:05 14On Location: iPhone
17:31 15On Location: Wrap Location
02:15 16Location Challenges: How to Shoot in Open Sun with No Clouds
01:52 17Location Challenges: How to shoot Cloudy, Stormy, & Blah Weather
01:50 18Location Challenges: How to shoot Beaches
01:27 19Location Challenges: How to shoot Waterfalls
01:40 20Location Challenges: How to shoot Panorama Vista Scenes
01:38 21Location Challenges: How to shoot Lakes
02:11 22Location Challenges: How to shoot Mountains
02:24 23Location Challenges: How to shoot Deserts
01:29 24Location Challenges: How to shoot City Skylines
01:44 25Location Challenges: How to shoot Snow
02:53 26Location Challenges: How to shoot Backlit Situations
06:56 27Outdoor Landscape Workflow & Organization
31:38 28Basic Editing in Lightroom: Part 1
44:17 29Basic Editing in Lightroom: Part 2
26:52 30Lightroom and Photoshop: Intermediate Techniques Pt. 1
30:35 31Lightroom and Photoshop: Intermediate Techniques Pt. 2
12:31 32HDR for Landscape Photography
07:54 33Panoramas for Landscape Photography
18:14 34How to shoot Landscape with Adobe Photoshop in Mind
21:14 35Sky Replacement in Photoshop
18:48 36Processing Project: Stormy Mountains
09:12 37Processing Project: Crashing Waves on the Rocks
10:01 38Processing Student Raw Images
41:03 39Final Q&A
14:17Lesson Info
Processing Project: Crashing Waves on the Rocks
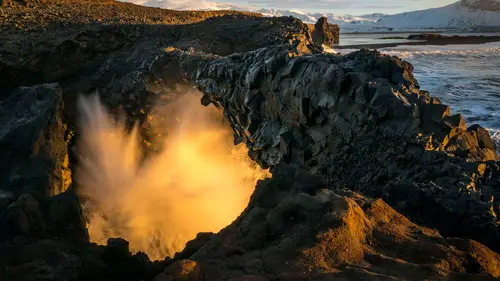
Alright, so let's go in and the cover photo for this class. Cover photo for this class would be in a folder, I didn't make it a collection because I didn't, called Iceland, and let's see here, yes, I got to see the Aurora. Alright, so you wanna know something about the Aurora? So we went with a group, my wife came too, and it was pretty cool. We went with, eight people total, eight or nine people, but what was cool is, group of people, we split all the costs. So everybody got themselves to Iceland, which there was like crazy, the flights from D.C. were like $400. But we split the costs. We got all the rental cars, all the gas, everything like that, fees to get into places, we split the costs. So it was very, very affordable. My wife came with me. This is where this is all going. My wife came with me. And the first night, she was so excited to come out and shoot it, and I set up her camera and I showed her how to shoot, and everything like that. And she, the second night, I was like, "H...
oney, it's out again!" "You wanna go?" And she was like, "Eh, you guys go." I'm like, "Really, why?" She was like, "I feel like it's kinda cheating." I'm like, "What do you mean?" She's like, "Well, I can kinda see it, "but you don't really see it until you take the shot. It's like the Milky Way." That's the way I can explain it, it's like the Milky Way. You know, on a really good night in a really good place, you can look up and see the Milky Way. But then you take your 30-second exposure of the Milky Way. It's like Wow! It's kinda the same thing. Now, it does get stronger. They have this Kp-Factor, whatever, that Were you in Iceland? You didn't go to Iceland. You're thinking of Russ. Russ! We did this before. (laughs) We've been through this before. Anyway, they've got a factor where the lights are more pronounced and the higher the number, the more you can see them with your naked eye. We didn't necessarily have that, but you can still see it. So you can look up, you can see it, you can see it move, but you don't see it like you see it in the photos. That's just something that I thought was interesting. 'Cause the second night, she was like, "Ah, I'm not going out." Okay, so let's go in and hit the develop module here. That's the Before photo. Just so you know, I played with exposure. I thought that one was pretty cool, too, you know? Kinda let the exposure run a little bit, like after the wave, and all the water came after. So here is my raw photo, guys. Nothing done to it, I'm hitting reset. So let's see if I can remember what I did to it. I think the first thing I did was I did some cropping. So, why did I crop this? I wanted to make that appear a bigger part of the photo. So cropped it more like that. So go over here: shadows, highlights, maybe boost the exposure. Whites: option or alt click. Blacks: like so. I'm thinking I want some warmth to it. A little bit of clarity. So, look at the difference, what saturation does to the glow here. It's like, I barely have to move it. So, that's what kind of gave me more of that yellow. Once I warmed it, once I added a little bit of saturation. That's Before, that's After. Let's see here: so we'll go down to detail. Get some sharpening on there. Lens corrections: it's already turned on, so we're good there. I'm looking at this line back here. It kinda looks just a hair tilted to me, so I'm just gonna back off of it there. Let's go turn on our spot removal tool. Visualize spots, oh god. (audience chuckles) Wow. Alright, again, I don't know that I'm going to do all of them. I always say that and I always end up going back and doing every single one. I'm not gonna do it this time. You guys get the idea: remove spots. I gotta get a couple of them though; they're gonna bug me. Did I say I wasn't gonna get them? So I got most of them. So we've got our sky. Gotta do a little darkening on the sky. Let's go to the graduated filter presets. I'm gonna try Sunglow. I'm gonna try Sunshine. Hmm, not bad. Let's go, you wanna try Blue Sky? Ooh, we're close, we're close, we're close. But too dark. And just so you know, the Blue Sky one adds temperature. We saw before, negative exposure, shadows, so it was a little too dark, and honestly, it added blue and that color down there, I'm gonna actually go and just remove that. I think that's what's really holding us back on having it be too much. Let's move it up a little bit there, too. So that's looking good for a sky. I am, I'm gonna be a stickler about it, and I'm gonna go to the brush erase and erase it from there. I don't mind so much over here, there's nice, warm sun on it; I don't wannna kill it. You know? Alright, so let's see: that's Before, that's After. And I think we'll finish it up with vignette. We'll be a little bit different on this one and add a vignette to it. Not too much of one, though. I don't think we really need it. And then, as I look at it, I mean I'm thinking, maybe pull back on the shadows, maybe the whites, open that up a little bit more, just to make it brighter. I know it looks bright on your guys' screen, but that's looking pretty good, though. So let's see: that's Before, After. Before, After. So that is the, that's the cover photo. It's a fun one; it's kinda cool to see like, remember that little saturation move? It's amazing what it did to the yellow in the water. I don't know, what got me looking at this photo, was how the water was glowing yellow. And it's funny that in the photo, it doesn't necessarily come across that way. But it's like when I turned around and I saw that, that was like wow, light's coming through there. That was the advantage of going on a trip like that with friends, because I was actually shooting the other way, and I looked at my buddy, he's shooting that way, I was like, oh, and here's a big wave coming through, so, it was a lot of fun. So that's our Before and After, and don't forget, guys, whether you're using presets, whether you're using a plug-in, whatever, don't get so caught up on, don't get so caught up on the settings that you normally add. Run through it. You know, look at the navigator panel, and see if you see something that jumps out to you. I'm not, but just in case you were. You know, I hate to take the color away from this, but this could be a cool black and white photo, too. View: it's got black and white potential. Yeah, 'cause it's got, yeah, exactly, it's got contrast. So, it's got black and white potential to it. Like I say, I hate to take away the color from a photo that had such beautiful color in it, but we could do some fun stuff with a black and white on that one as well.
Class Materials
Bonus Materials
Ratings and Reviews
Christian Ruvolo
Mat Kloskowski class is really amazing, full of very useful tipps and inspiration. Wonderful pictures by him help to understand the explanations an I am learning A LOT from him!!! Thank you for the class!!! TOP!!!!
Louie
I love Matt's teaching style, humor, honesty, friendliness. I love On1 and all the other demos and critiques he does. He makes me enjoy the craft/art of photography much more and is a great inspiration.
a Creativelive Student
This class was for beginners and I believe Matt did a great job of giving students an great introduction to landscape photography. More on the practical than technical side, but that seems appropriate for an intro class. He comes across as a "real" guy who loves what he does and is eager to share his knowledge. Those new to photography will get a lot of helpful information and tips in this course.