Panoramas for Landscape Photography
Lesson 33 from: Landscape Photography: Start to FinishMatt Kloskowski
Panoramas for Landscape Photography
Lesson 33 from: Landscape Photography: Start to FinishMatt Kloskowski
Lesson Info
33. Panoramas for Landscape Photography
Lessons
Course Introduction
08:52 25 Things Every Landscape Photographer Should Know
23:32 3Camera Gear
11:26 4Gear Q & A
33:04 5On Location: Weather & Safety
18:55 6On Location Pre-Visualzation Sutro Baths
07:29 7On Location: Camera Settings
21:59 8On Location: Composition
27:09Matt Klowskowski - My Story
06:28 10On Location: Bracketing
15:15 11On Location: Artistic Choices
16:12 12On Location: Pre-Visualzation Marshall's Beach
06:09 13On Location: Long Exposure
15:05 14On Location: iPhone
17:31 15On Location: Wrap Location
02:15 16Location Challenges: How to Shoot in Open Sun with No Clouds
01:52 17Location Challenges: How to shoot Cloudy, Stormy, & Blah Weather
01:50 18Location Challenges: How to shoot Beaches
01:27 19Location Challenges: How to shoot Waterfalls
01:40 20Location Challenges: How to shoot Panorama Vista Scenes
01:38 21Location Challenges: How to shoot Lakes
02:11 22Location Challenges: How to shoot Mountains
02:24 23Location Challenges: How to shoot Deserts
01:29 24Location Challenges: How to shoot City Skylines
01:44 25Location Challenges: How to shoot Snow
02:53 26Location Challenges: How to shoot Backlit Situations
06:56 27Outdoor Landscape Workflow & Organization
31:38 28Basic Editing in Lightroom: Part 1
44:17 29Basic Editing in Lightroom: Part 2
26:52 30Lightroom and Photoshop: Intermediate Techniques Pt. 1
30:35 31Lightroom and Photoshop: Intermediate Techniques Pt. 2
12:31 32HDR for Landscape Photography
07:54 33Panoramas for Landscape Photography
18:14 34How to shoot Landscape with Adobe Photoshop in Mind
21:14 35Sky Replacement in Photoshop
18:48 36Processing Project: Stormy Mountains
09:12 37Processing Project: Crashing Waves on the Rocks
10:01 38Processing Student Raw Images
41:03 39Final Q&A
14:17Lesson Info
Panoramas for Landscape Photography
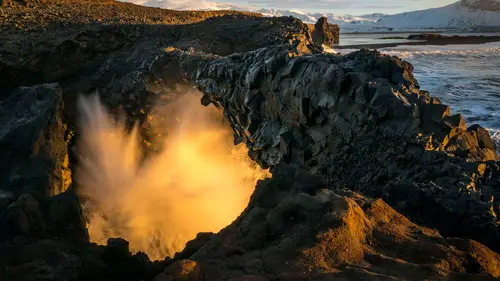
Matt, do you shoot any panos? Why yes, Justin. (laughing) I'm pretty sure we wouldn't be doin' this video if I didn't shoot panos. (laughing) So, yeah, I do, they're fun! No, we're gonna keep rollin'! We're gonna keep going? We're going, we're going, we're goin' with it. Okay! So they're fun to shoot, you know. I don't know that I print 'em out a lot, but sometimes it's just fun to do. And if you do print them out, they're awesome because it's very different. You know, normally we see a fairly square, sometimes rectangle photo, where a pano is just wide. So a lot of creative possibilities. They're pretty easy to shoot, too. So what do you look for when you wanna find a pano? I'm lookin' for a scene that I can't really get everything that I want into one shot. Even with a wide angle lens, I can't get what I want into it. And then I'm also lookin' for a scene that's fairly, fairly compressed in height. Where this one's great, because if you look at what we have, what we're really...
after is the bridge, the rocks, the water, the hills behind us. The sky is crap, the sand is all trampled with footprints, so there's really nothing interesting up and down. But everything goin' across, we can keep shooting, we can get a really nice shot. So that's kind of what I'm lookin' for to it. The other thing that we can use panos for is you can get more print resolution out of it. If I just throw on a 16-35 and I wanna get that whole scene, and I shoot it and then I crop it, I lose a lot of resolution. But if I create a pano like I'm about to do, I'll be able to print it a lot bigger. Awesome. All right, some tips for creatin' a pano. First thing we wanna do here is, people get to be real sticklers about panos. I like to do it really simple, all right? So number one, you're gonna notice I don't have a pano ball head. I'm not too worried about it. They have these official ball heads that are supposed to, you know, keep everything perfect. If you want to invest in 'em and you're gonna get that much into pano photography, great, go ahead and do it. They'll make your life a little bit easier in post-production, and you'll see that when we take a look at these photos. But for what I'm about to do here, this is gonna work just fine. The other thing is, you'll see people get to be real sticklers about whether you shoot 'em tall or vertical or whatever. I'm usually shooting in landscape horizontal mode. I usually don't change it for a pano. You're gettin' really picky when it comes to print size. If you shoot it tall, technically you can get more together, and you'll actually get a larger file from it. This is gonna be plenty big. It's a 42 megapixel camera, it's gonna do the job. And then from there, the only thing you really wanna watch out for is that you overlap by about 20%, which means have 20% that was in that first photo, when you shift over to the next photo, make sure that 20% is still in the other side of the frame. And that's gonna give whatever software you usin' to stitch it together a lot easier time to do it. So I'll go ahead and I'll shoot this one here. I'm gonna start on the right-hand side. It doesn't matter what side you start on. I'll start at the right. So I'll shoot that photo, and then what I'm gonna do is I'm just gonna take by ball head, kinda move over. I'm looking, and I see this rock, and I see the edge of that rock is about at that point where I wanna make sure I have it in the next shot, so as I move this over, I'm gonna make sure I keep a good bit of that in the shot, and then I'm gonna go take another one. All right, so now what I'm gonna do is move the camera over to the left and make sure that that rock that's on that one side is now on the other side. I'll take another shot, and then I'll do the same thing. So I'll kinda make a mental note of where I can see the left side of the photo and just make sure that that is now in the right side of the photo. And take one more. So as long as you align those three photos, as long as there's something in one photo that's in the other photo, when you get into Lightroom or Photoshop later on, it's gonna be really easy to stitch together, and you'll have a really large print when you put all three of 'em together. You'll be able to print that thing as big as you want to. Justin, what do you think? Ah, yeah. You likin' the panos? Absolutely, so I love doing panoramas. Something I've had trouble with in the past, and I'm wondering how you address it in this kind of scene is, so you have the one shot, and the water or maybe the birds are in one place and then you recompose for the next one, and the water's in a slightly different place. And I've had Lightroom have some trouble matching those up in the past where, you know, the clouds moved or the water's moved or something like that. How do you think it's gonna turn out here? Do you think it won't be a problem, or how do you see it? (chuckles) It's a good question. It happens a lot. I have some post-processing tricks that we can talk about when we get into that. Okay. Sometimes Lightroom does. Photoshop, believe it or not, will usually stitch it together. If that ever happens, Photoshop will usually be able to do it pretty well. Okay. And if all else fails, sometimes we have to go manual and actually, you know, actually go in there and take what it could stitch together and then maybe take an extra shot, move it in manually on its own layer, and actually frame it in that way. But it's a little bit tough, when it does happen, sometimes, I shouldn't say sometimes, there's actually a lot of post-processing that we're gonna have to do to get it to fix. So I think we'll be okay for this. Okay. 'Cause I think the water's gonna be smooth enough, but you know how we'll know? When we get into Photoshop. Sounds good! Okay, so if you noticed when I did the pano, you noticed how crooked my camera, it's 'cause I was leanin' over. So I actually stopped after, and I took a whole nother shot. You saw the beginning of the photo, or the beginning of the video (laughs), we just, I was like, Justin, ask me about panos. And he comes out and he's like, "So do you do panos?" I'm like, yes, or we probably wouldn't be doing this video if I didn't. It was just funny 'cause they were gonna cut, and I'm like, no, no, no, we're rollin', we're goin' with this stuff. So here are the three shots that I took. There's two, and there's three. I could have taken more if I wanted to go across more. So you can go across as far as you wanna go. But this is good enough for this one. Let's go ahead in Lightroom, and I'm gonna Shift+Click to select all three of those photos. You just go up here to the Photo menu, down to Photo Merge, and then go to Panorama. Here's what's cool about this. So whenever I used to teach doin' panos, I used to tell people like, export three JPEGs that are small resolution 'cause pano stitching takes so much time. And what happens is that you stitch it together and you're like, "Ah, that looks like crap. "I don't like it," and you just spent like five minutes waiting for it to stitch. Seriously, you guys, look how fast this happens. And remember, my computer's not even happy with me today. So on a happy day, it'd happen. But look how fast that was. So it makes kinda shooting panos and testing out whether or not they'll work a lot easier 'cause they stitch together, it's not stitched yet, but the preview happens super fast. Remember how I talked about the official pano heads. What the official pano heads do is they really keep you aligned going across. They kinda keep the camera to what they call like nodal point, and they keep everything goin' aligned across. What happens as a result of not doing that is you get what we have here. You get all this crap goin' on on the sides. So the reason why I don't worry about it, have you guys seen Boundary Warp yet? You haven't seen it? Watch this, ready? That's pretty cool, isn't it? I love it. So if, you know, if I wasn't a stickler for a pano head and all that stuff before, I've become even less of one now. It's pretty cool. So just go over here and crank up, if you don't do that, then you can just hit Auto Crop, and it'll crop all that stuff out. But I mean, almost every photo I throw at this, it works really good. So let's go ahead and merge it. Almost happenin', I wish we had music. I'm gonna make music next time. I'm gonna make the Jeopardy! music. That'd be perfect. Insert music here. It's gonna do the same thing here, I'll talk, it's gonna do the same thing that the HDR did, it's just gonna create us a DNG file that is apparently gonna be three times as large (laughs) as the other ones were. There we go! Yeah, well I am curious how big this is gonna be. We're gonna look. Show in Finder. Holy crap! (students laughing) Well, my job, I was shootin' with the A7R II which is an 85 megapixel file to start with. Multiply that times three. Yes, you got about, it's almost exact, isn't it, it really is. So there's our pano. Let's go ahead and probably, you know what? I mean, sometimes, guys, sometimes the best thing for me is, I know I said sometimes I would suggest beginners use 'em, but sometimes really the easiest thing is I just kinda run through Workflow. Daylight, Cloudy, I kinda, oop! I'm likin' Cloudy! I don't want it any brighter, I don't want it any darker. Subtle Toning or Normal? Let's go Normal, there we go. All that did was, if you look over here, all it's doin' is movin' shadows and highlights. I'm gonna do Normal with Darker Sky. Nope, I like the other way. HDR Strong. Nope, still like it the other way. Clarity and Contrast, it'll boost a little contrast in there. Saturation Boost. We did start to see a little bit of blue in the sky there. It was nice. Got a couple of Polarizer. What that'll do is boost the blues a little bit. And so you've watched me manually add the Vignette. So I'll to in there and do that, I'll go Light. But all that was was the basic panel. The blues came from the HSL where I went to Luminance and just pulled them down for the Polarizer effect. And then the Vignette. Lookin' pretty good. Let's see here. I don't know, I think that's probably along the lines of what Justin was talkin' about is, you know, we have a wave crashing and then we have what looks like a wave already crashed here. So that's gonna be tough, I mean, we could pull this over into Photoshop, I could probably pretty easily, I'll let it, we got a couple minutes here, I could probably pretty easily make that wave not look like it was cut off. I don't know what I could do about the wave going across and then stopping and smooth water coming up. So that would be a little bit of a harder one to kinda mess with. So let's see. For this one, I would probably just take my Spot Healing Brush, set it to Content-Aware, and just paint and see if just blends the two together. So I mean, that's an option. We could go in here and kinda tweak it a little bit. Probably good for the Patch Tool. So I could probably try to tweak that a little bit. At least that part of the wave looks like it's fading in. This, I don't know what we'd do. I could try takin' the Patch Tool. No, I'd wanna do the opposite. I'd want to select that and then drag it over here and cross my fingers. Eh, I don't know quite what I'd do. Let's try the Healing Brush again, see if it fills it in, yeah. So and you know the easiest way to get rid of that over here? Crop it. (students laughing) Or do what I did before again. But seriously, you know what, guys? I mean, I didn't expect to do that. I know we know that I did it, but I don't think anybody else would call that out, you know? You'd have to be pretty picky to call that out, and I don't think, I don't think, nor anybody who didn't know that we did it would actually see it. So again, we're usually using the Patch Tool to fill in an area, but I actually just did the opposite, right? I just selected the empty area and told it patch with the area I wanted to fill into it. Don't discount the Patch Tool. It is an amazing tool, it's a really good fixer-upper for landscapes. I'd probably clean up, my rule on little things like this is I clean 'em up because I don't want you to wonder what that is. That's a, everybody knows that's a rock. I don't want people walkin' up to, what the, I don't want people walkin' up to the photo wondering is that a piece of dust on my picture frame? Is that a spot on the photo? Is it a bird, is it a rock? So I get pretty meticulous about cleaning up these things, and it's not, it has nothing to do with trying to overly, trying to overly make a photo pristine. It has to do with removing distractions to somebody that might be looking at it hanging up on the wall. I just don't want somebody to wonder. I don't want 'em to have to get up close and like, I don't want 'em to think, what is that spot, so I remove it, okay? So a couple, we'll start there, and we'll go back. So one of the problems I run into when I do panos is banding, especially in the sky where you have, you know, a sun brighter on one side, and then as you go across the image, the exposure is different. Any suggestions for that? I've seen it happen with a polarizer, but you're saying just a regular, just goin' across the pano in the sky? The only thing that I could suggest would be if you could make a selection, and we'll talk about makin' some selections later, but you'd make a selection of the sky. If there's clouds in it, it's tough to do, but if it's a clear sky, you can blur it, and it'll start to, it'll blur those lines. If it is, another thing is take that Patch Tool, make a selection, and a larger selection of the area, and drag it one way or the other, too. Back there. On the Patch Tool, did you set the feather on that? Mm-mmm. Mmm? No. (laughs) So that was maybe some of the reason why that banding was occurring? Yeah, yeah, probably a little bit there. One over here? So Matt, when you're actually shooting these things, in this instance, your light was very static across. If you had, and to hers, if you had the sun over here and it's really bright, if you have a very contrasty scene, do you make changes in-camera as you're shooting your panos? Or are you just shooting on the same settings clear across and then dealing with it later? That's a good question. I used to, I used to make, when you Shop panos, you used to have to kinda lock everything down in manual mode almost, because the pano stitching technology that was there would go haywire. Pano stitching has come a long way. So I let the camera on Auto Mode, and I let it do its thing, and if one photo is darker than another photo, I don't do any pre-processing, it matches 'em together really well.
Class Materials
Bonus Materials
Ratings and Reviews
Christian Ruvolo
Mat Kloskowski class is really amazing, full of very useful tipps and inspiration. Wonderful pictures by him help to understand the explanations an I am learning A LOT from him!!! Thank you for the class!!! TOP!!!!
Louie
I love Matt's teaching style, humor, honesty, friendliness. I love On1 and all the other demos and critiques he does. He makes me enjoy the craft/art of photography much more and is a great inspiration.
a Creativelive Student
This class was for beginners and I believe Matt did a great job of giving students an great introduction to landscape photography. More on the practical than technical side, but that seems appropriate for an intro class. He comes across as a "real" guy who loves what he does and is eager to share his knowledge. Those new to photography will get a lot of helpful information and tips in this course.