Lessons
Class Introduction
02:51 2Gear: Camera, Flash, and Triggers
27:05 3Gear: Modifiers
11:03 4Camera and Flash Settings
20:12 5Building Exposure For Outdoor Photography
22:12 6Shooting in Direct Sun
23:32 7Shooting on an Overcast Day
18:28 8On-Camera Flash
15:23Lesson Info
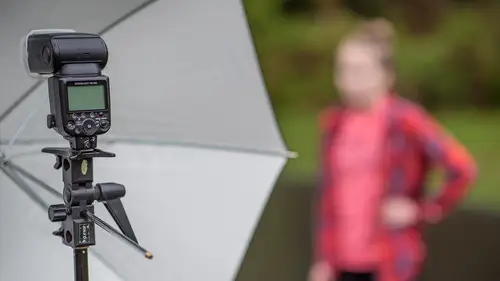
Shooting on an Overcast Day
Well, the next thing that I want to do is I want to talk about overcast days. Now, I love shooting on overcast days. The reason why is that because the light is soft, it's gentle. And my flashes don't have to work as hard, I don't have to overpower the sun, 'cause the light overall is dimmer, it's lower, so my flashes have an easier time. That means I can shoot more flashes per second, you know, my batteries last longer, so I love overcast. The downside of overcast, though, is that visually, it's not as appealing. There's something about the sun that humans respond to. We like the sun. That warmth, that feel, that kind of cut, that edge in photography. You don't get that on a cloudy day. So, I think of cloudy day photography, and with my flashes, is my flashes are what's adding the edge, the oomph, the charisma to the photograph, okay? So, yeah, all those things I just said, it's much lower contrast. In a lot of times it doesn't matter if the subject is in the shade or they're undernea...
th the tree, or they're out in the field. Generally, the lighting is about the same. One of the things that we have to worry about, though, on an overcast day, is the shadow underneath the eyes, okay? A lot of times, it's subtle, but it's significant. I call them raccoon eyes. The reason why we have to think about that is because the light is from overhead, and all the light basically falls straight down on the subject. So, in a second, we're gonna turn on the house lights, and I will show you what this looks like. So your goal, as a flash photographer, is to fill in those shadows, and create a nice spark in the eyes. So, this is what we have here, this is Raimi. He's one of our parkour athletes. Later on, we're gonna show you guys. We did some sports and action photos with the guys doing flips in the air, but here he's just standing for me at Gasworks Park. Cloudy day, and in fact, we're in this kind of structure, so the light is even lower and dimmer, and he wasn't getting any catch lights in the eyes. He had a very dark shadow under his face. I threw in a softbox, and you can see we've now lit up underneath his eyes. I also processed this a little bit, made it just ever so slightly edgy, a little bit grungy, 'cause that's kind of what he is, he's an urban athlete, and I thought that would look good for him. So, let me show you a shoot here in the studio on how to deal with overcast days, cool? Alright, I need a different model. You'll do it? (applauds) Alright. Let's turn on the house lights again, the overhead fluorescents. And you're basically gonna stand in the same spot, about right here, in the dock, and I'm just gonna move this away. Um, let's see. What I wanna show now, I'm gonna stand next to you. Yep, that's right. And I just wanna show that the light is all coming from overhead, okay? Coming from overhead. And if she looks up to the light, we fill in the shadows, but if she looks down straight, you start getting shadows underneath her eyes. And a lot of portraitists say, "Hey, I'm an available light photographer." And if you are, then you need to use a reflector to do here I'm gonna do with the flash. In fact, let me just show this real quick, since I can. I'm instructing, so I can do this. So, this is what we could do, is we could bring in the reflector here. Put your head down just ever so slightly, yeah. And as I bring this in, you can see it really illuminates her face. It's quite simple to get a nice look on a cloudy day with just a reflector. So that's the $30 solution, and then what I'm gonna be looking at is if I'm, if I stand up over here, which actually, I'm gonna do. Go ahead and look at me. I'm now looking in her face to see if I'm getting catch lights in the eyes. Now, here's the thing. The thing with the reflector though, is the reflector has to be under her face, right? That means the catch light's gonna be low on the eye. And if you're a catch light nerd, a catch light junkie kind of like I am, you don't want the only catch light to be down low. A lot of times, you want the catch light to be up higher, kind of like in the 10 o'clock or 2 o'clock position. Well, if it's a cloudy day and I want to reflect light onto her face, that means the light's gotta be like, up here, and that isn't gonna work with a reflector 'cause no light's bouncing off of it. So, the reflector only gets you so far on a cloudy day. So, let's get all the way with our flash, cool? (clears throat) So, on a cloudy day, it doesn't really matter, the position of the subject. Subject can be here, there, you know, sitting, standing. You don't have to worry about shade, sunshine, grassy field, 'cause the light's coming equally everywhere. So, really what I'm doing on a cloudy day is I'm just paying very close attention to the background. You know, does the background look good? Do I have some bridge in the background? Is that what I want? Or do I have flowers back there? In this case, the background is spectacular. You have this great panorama scene of blinds, so it's gorgeous. Gorgeous! Same thing as I did before. I want to take, just to be repetitive here, I'm gonna build the exposure. So, I like building my exposure by turning my flash off, so I can just do that with this little switch on the camera. Turn my flash off. And since it's a cloudy day, I just want to probably include a little more light. I want to include the background to be a little bit more vibrant, so that's a longer shutter speed. So, I'm at, I'm gonna go to 1/60th of a second. Make that background nice and bright. And here we go, are you ready? One, two, three. (shutter clicks) Great. Let's look at that photo. Yeah, this, okay, so, I can already tell when you (laughs) Yeah, I'll tell you to smile next time. I can already see in this photo it's a little bit dingy, a little bit dark, nothing to do with our beautiful model, but everything to do with me, the photographer. So, I want to add a little bit more light. So, how do we do that? Shutter speed, okay? So, I'm gonna add some more shutter speed. Well, now, when I'm adding more shutter speed, what am I running up against? 'Cause I'm currently at 1/60th of a second, yeah. I'm running up against a blurry photo, you know? So, if I go down to 1/30th, now I gotta start thinking about turning on my lens vibration reduction or image stabilization, maybe think about going to a tripod, something along those lines. But I'm gonna risk it, I'm turning my VR on. Just make sure that's active, and it is active. And again, this is a shot with no flash. Okay, this time you can smile. (shutter clicks) Oh, nice smile, good job. And I think I was moving. Yeah, it's a little soft 'cause I did that a little bit fast. But the point is, I got a little bit brighter and I'm happy with that. And since I'm at 1/30th of a second, and I'm feeling like I need even more light, my next option is ISO. So, bump up my ISO one more stop. And the cool thing about all of these modern cameras is you can shoot ISO 1600 all day long and still get fantastic images. So, 1600, 3200, no problem. Alright, here we go. One, two, three. (shutter clicks) Nice! Alright, so now, oh yeah. So now, the ambient light, I'm feeling good. Yeah, actually, that might be a little bright. I'm gonna end up dropping it down just a little bit, but I'm happy with the way the ambient light is, the nice, bright background. Okay, now I'm gonna add in the flash. So, turn this bugger on, and wait 'til I get a green light here on the camera, and green light up here on the flash, and then I always do a visual check on the flash itself and make sure it says manual mode or TTL mode, and it currently says manual mode so I'm happy about that. I'm gonna position the light appropriately for her height. Okay, I'm gonna have you bring your right shoulder towards me a little bit. Go ahead and rotate your feet, yeah, great. And remember, I said I kinda want that catch light to be in the 10 o'clock or the 2 o'clock position. Bring it down just a little bit. That'll work. And I think I, the last thing we did, we were at 1/16th power. Yeah, 1/16th power, so we'll leave it there at 1/16th power. Okay, here we go. This one's for real, make it count. One, two three. (shutter clicks) (flash beeps) Okay, I'm always listening for that beep, making sure it fired. Ooh! Not good! So, I never do that actually, when the client's outside. I never go "Ooh! Not good." (laughs softly) I go, "Hah!" Let's make another shot with a little more adjustment. Okay, so, what did I do? Well, I allowed a lot more ambient light into the camera, and I'm at 1/16th power. I also increased my ISO, so my settings are way different than before on a sunny day. So, now, I have to really reduce the power of the flash. And we'll do that right now. So, I was at 1/16th power, and you can see from that example photo we just took, that was way too much. So, I'm gonna go down to probably 1/64th power, and we'll probably even end up less than that. Probably end up at a 1/128th power. Okay, so I hit "OK", and we take that shot. This one's really, really for real. (shutter clicks) (flash beeps) Hm! Okay? Oh, yeah, more better, it's already looking better. And if I zoom in, zoom in. This might be a little uncomfortable for you, but, yeah. So, we got a nice catch light, kind of up in that 10 o'clock position. Fantastic! And, as I fine tune, you know, I'm thinking it's still a little bright, and then maybe the background's a little bright, so I'm gonna reduce my shutter speed, I'm sorry, increase my shutter speed. So, I was at 1/30th, now I'm gonna go, say, to, let's go to 1/50th. And I'm gonna reduce that power again on my flash. I think the flash is still too bright. And we'll go 1/64th minus two-thirds of a stop, so that's almost to 1/128th power, so very little flash. Okay, here we go! One, two, (shutter clicks) and a half! (laughs) Sweet. Much more natural. We still have the nice ambient light exposure for the background, and I've got a nice catch light in her eye, and the shot just looks, it looks natural. It doesn't look like flash was the predominant feature, you know, compared to, let's go back here a few pictures. You know, maybe, well, this was our starting point. Obviously, we got a problem. (laughs) And then we kinda fixed the problem, but even that photo right there is still too bright in my opinion. It's obvious flash was used. Until you get to this point, subtle, gentle, and kind. So, thank you! You get a high five as well. (hands clap) (laughs) Fantastic. Okay, so Kenna, let's answer some questions on ambient light photography. Alright, well, we do have a number of questions coming in about glasses. Okay. And reflections on glasses, using flash photography, and how to get rid of them, how to approach that. Okay, glasses, perfect. So, you saw in this example here, we've got reflections. Glasses are the bane of all photographers. Yup. So, if the person that you're shooting doesn't like, if the glasses aren't a part of them, like, if that's not part of their persona, their look, the easiest solution is take them off, okay? But, people like me, like, I don't wear contacts, and so if I saw a photo of me right now without glasses, it'd be like, that isn't me. So, sometimes you have to live with it. Here's the thing. You know, take a shot, take a look. You'll hear me say that a lot. Take a shot. Do we have reflections? Yes, we do. So, a little move, just a little tiny move from here to here can solve all of the issues, it's okay. So, if I go here to the monitor, you see that we do have some reflection here, up in this part of the glasses, but it's not blocking her eye, which is okay in my opinion. It's okay to have a little bit of reflection as long as it's not blocking the eyeball. I probably should've taken one more and had her turn her nose just a little bit, and then I've dealt with that. Another little tip I have for you is if you take the glasses, and you just tilt them up like this, if they have longer hair, you won't see that in the final photo. And when you look forward, it's hard to see that it's actually tilted, but what that does is it causes the reflection to go down, down towards the ground. So, I actually like to tilt them up a little bit. It works better with people with a little bit more hair, little longer hair. And then, the next thing is, your lighting positioning. Positioning the lights a little bit higher for people with glasses can help prevent the reflection on the glasses. When the person doesn't have glasses, then the light can be lower, 'cause you don't have to worry about, well, the glasses' reflection. So, when glasses, a little bit higher on the light. Yeah, great question. I noticed that the first two in the studio people were probably the extremes of skin coloring that you can possibly get. How much does that play into your flash power? Or does it at all? Yeah, so, the fundamental aspect of her question is, hey, how do I expose differently for, let's say, Caucasian, versus Latino, versus African American, okay? And the truth is that the reflectivity of your skin is actually quite significantly different. So, a Caucasian reflects two to three more stops of light, two or three stops more light, than an African American, than a really dark, I'm thinking like Seal, you know? The artist Seal, very dark-skinned, versus, I don't know, the artist Mike Hagen, you know? I never get outside, I'm very pale and white. So, how do we deal with that? Well, the truth is that the exposure for both races is about the same. The manual settings would be the same, because you want the white skin to reflect more light. It's what it does. White skin does reflect more light than dark skin, okay? So, the shot that I took of you, of whatever that was, 1/64th power, will also work for Xavier at 1/64th power, because naturally, Xavier's skin reflects less light back to the camera, and we want it to be that way. So, the way to think about flash photography is imagine the world, or imagine your subject as a gray card, and if you expose the gray card for gray, then everything else falls into place. So, the white person, Caucasian person's gonna reflect more light naturally, fine. And the dark skinned person's also gonna reflect less light naturally, fine. So, that said, sometimes, again, I'm harkening back to this event that I shot. It was just, it's fresh in my memory 'cause I shot it just two or three days ago. There's a guy that I shot, he was an ex-running back. He actually was a running back for Notre Dame, I think. Very dark-skinned guy. And I was photographing him, and then right after that, I went and photographed this lady, who was a Caucasian gal. I actually had to add a little bit more light for the running back, 'cause he was absorbing a ton of light. And so, the same exposure that normally would've worked for, how does this sound? A lighter-skinned black guy (laughs) didn't work for him 'cause he was so dark. So, sometimes I had to add a little bit more. But, be careful that you don't do it too much. You don't want, you don't want your black guys to be washed out. It's their skin color you want, so. That was a lot of answer for a simple question. Just pay close attention, does it look natural? I think that's the key. Does the reflecting back on the camera, does the reflectance from your flash look natural? If it doesn't, well, then it's so easy. You just add a little more flash or take a little away. Kind of brought up interesting things. I shoot a lot of events, too, and when you have two people of different skin tones, with post in consideration, is it better to use flash to lighter or darker skin tone, or what would you use? Well, my rule of thumb is expose for the highlights, develop for the shadows. So what that means in real life is, let's say a white guy and he's dating a black gal. So, you want to expose so the white guy's skin isn't blinking, so, just kind of a little bit at the upper limit of the exposure, and then in Lightroom or Photoshop, I bring up the shadows. So, I'll use the shadow slider, or I'll use the brush tool, and I'll paint over the darker skin individual to bring them out of the shadows.
Class Materials
Bonus Materials with Purchase
Ratings and Reviews
Brandon Couch
This is the second class I've taken with Mike and it was amazing! So easy to understand even when you get into the "tech" side of how flashes work but especially when using them outside and how easy it is. I would totally recommend this class to anyone wanting to take amazing images outside with one flash. He even makes bare bulb flash look awesome. Such a great course!
SunSoBright
Mike Hagen has become one of favorite instructors. His instruction and question answers are clear and concise and he has a real world approach. He has a friendly and approachable personality. Best of all during this course he works by himself which makes you feel you too can accomplish the shoot on your own. Mike demonstrates a practical approach with affordable equipment as he is aware many photographers starting off do not have a huge budget. In his other course on using your first flash he also had several gear set suggestions based on budget which was so thoughtful and helpful. I hope Mike does some more advanced courses as well and I will keep watch for his name on the course schedule. A definite thumbs up for photographers starting off using flash.
Laura K.
I have watched a couple of Mike Hagen's classes, and hope Creative Live will bring him back to teach more. He is a fantastic, thorough, easy-to-understand instructor. He doesn't assume viewers already know certain things. He is humble and diligent and truly wants students to understand and learn the things he is teaching. He breaks things down and explains things better than most, and he doesn't hold back on details. Mike also provides helpful handouts/written materials to supplement his videos. I really like his classes and teaching style, and hope to be seeing more from him in the future.