Lessons
Class Introduction
02:51 2Gear: Camera, Flash, and Triggers
27:05 3Gear: Modifiers
11:03 4Camera and Flash Settings
20:12 5Building Exposure For Outdoor Photography
22:12 6Shooting in Direct Sun
23:32 7Shooting on an Overcast Day
18:28 8On-Camera Flash
15:23Lesson Info
Shooting in Direct Sun
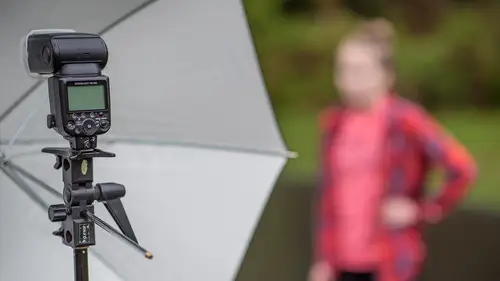
I'm excited about this next segment, 'cause this is uh, there's a lot of nitty gritty here. There's a lot of very useful content that I'm gonna be sharing next and that is shooting on a sunny day, shooting on a cloudy day, and then talking about on camera flash versus off camera flash. So the first thing I have is talking about shooting when the sun is out. You've heard all, you've all heard this term before, overpowering the sun with your flash. Can you do it? And I remember when I first kinda got into flash photography, I'm like really? The sun's pretty bright. Can you really overpower the sun? And the answer is yes, even with one little flash, you can shoot your, you can make your exposures, your ISO, your aperture, your shutter speed, and your flash power, you can make it all just so so that you can work with the sun. In fact, given enough flash power you can even make the ambient light almost completely black on a bright, sunny day and illuminate your subject. So that's what I wan...
na show you how to do. Now, little bit of truth telling, when we did the pre-shoot, we scheduled the pre-shoot months and months in advance and of course it was bright and sunny the day before and it was bright and sunny the day after, but the day we did the pre-shoot it was cloudy. So I didn't do a pre-shoot photo in the outdoors, rather I did my own shoot photo in the outdoors and that's what I wanna show you here. So here I'll be using a different models than our parkour athletes who are with me up in Seattle. So let's talk about a few basic tenants of shooting on a sunny day. So the first one is that shutter speed thing again. We're always fighting that maximum shutter speed sync. And it's about a 1/250th of a second, okay? When it's sunny out, though, a lot of time there's just, even at ISO 100 and at f5.6 and at a 1/250th of a second, there's too much ambient light. So we have to find a way a lot of times to decrease the amount of ambient light coming into the camera. And we do that through using either an ND filter, or we use it using high-speed sync where we can actually go beyond a 1/250th of a second. So those we're gonna teach those actually in the third segment of the day, I'm gonna show you how we use an ND filter or the high-speed sync. For the examples that I have showing here next, this photo, this was taken with just literally my D500 kit lens, and on a bright and sunny day. So I was just shooting a behind the scenes photo here just to show you the general set up, so don't mind the smile. (laughs) The smile is it's a bright, sunny day and that's one of the problems with working outside is the person is almost always squinting. So we're gonna talk about how do we arrange the person so that they're not always squinting all the time? But here you can see basically, we've got a model, we've got a guitar, I'm using a light stand and an umbrella and my flash. It's that simple. And if you look at it closely, if you start breaking down the light, you can actually see the rim light over the shoulder and the rim light off of the legs and the rim light on the hair. So that tells you right away the direction the sun is coming from for this image. I'll talk about this a lot today, especially in this segment, is that in general the rule is you want the sun to be behind the subject, okay? If the sun is behind the subject, it creates a nice rim and then you're flash is gonna be opposite the sun, filling in the shadows and creating the nice catch light in the eyes. And I'll show you an image here in I think three or four slides that shows you when you do this wrong what that looks like. Okay, so this photo on the right side was taken with no flash. The photo on the left side was taken with flash. And right away you start, you actually probably have to look kinda closely at it to see you know was flash used? You can see the photo on the left is a little bit brighter, little bit snappier, but it's really subtle, isn't it? Very subtle. In fact, that's the way I like my flash photography. I don't always like my photos to look like a flash was used. I want the flash to be gentle, kind, soft, and just produce a nice little catch light here in the eyes, okay? So this is real, this is a very subtle use. In general I think my settings here were 1/250th of a second, probably ISO 100 or ISO 50, very low. And then you can see the background is quite a far distance away, so it's nice and blurry. I like that. Okay here's another example of just a little bit wider angle. Earlier in the previous segment, I think you were asking about, you know the background, is the background in the shade? Is the background in the sun? Well in this case the background is actually in shade, I've got sun filtering through the trees, but I chose for this example to have the background dark. And that was a creative choice. When the background's dark, you can then light the subject so the subject stands out from the background visually and also from a brightness perspective. So the photo on the left is no flash, you can see she's sad. No flash, sad. The photo on the right, with flash. (laughs) Flashes bring smiles to everybody's face. And you can see this is just a nice kick of light, just a little bit more oomph, pizazz. A little more modeling. A little catch light in the eye. Fantastic. So let's break this shot down a little bit. So you can see I used fill flash. You can see that this is an umbrella. It's actually a silver umbrella. What do you notice about the sun? Well here the sun is striking the side of her face. So you um, I didn't have the sun directly at her back. Is it bad? No. Is it good? Nah. The point is, is it's there. And so just recognizing that the flash is striking the side of the face, understanding how to fix it if it is a problem. Maybe, seriously maybe the person has a mole or maybe they've got some hair growing out of their ear, you know something that wouldn't look that great. So now you know the solution. The solution is just to turn the more away from the sun to prevent it from happening. In this case I don't mind it that much. It's hitting her ear and her earring. Those things are okay. More importantly, though, and the neat thing about putting the sun behind, you get a free rim light. It's like having another piece of lighting equipment in your studio that you didn't have to pay for. And that's what you get when you shoot on a sunny day, is you get a free rim light. So put the sun behind the head. Or, these are or's. Or move the subject to the shade. Put the subject in the shade with the background in the sun. So I'm imagining, let's go to the beach. Let's go to San Diego, California and let's put the subject underneath a palm tree so they're in the shade, but then you've got the boats or the beach or whatever there in the background. Then you're gonna bring your flash up so that person is balanced well with the ambient light in the background. Another option is maybe you are on like an open plain where there's no trees, there's no buildings to cause shadow. In those cases, you might need to use a scrim to shield them from the direct sunlight. Here's an example. Let's pretend that we're at the, let's go to the Space Needle. So we're at the Space Needle and we wanna shoot a portrait from this position and the Space Needle's behind them. And you have to use this positioning for the photo that you want. Well, unfortunately for this photo, the sun is shining on your subject's face. In that case, you have to use a scrim. You know you gotta block the light from the sun, so that it's only nice, soft, diffused light. Then you bring in your flash to cause the shaping and the modeling that you're after. So sometimes you can't physically get the subject turned away from the sun. That's where the scrim comes into play. So a scrim is an advanced tool, but it's not a complicated tool. Like most things in photography, it just takes a little practice, a little trial and error, and then you'll put it to work in the real world and you'll get great results. Let's look at what happens when you don't position the sun behind them. Again, frowny face, squinty eye. (laughs) Right? So here the sun is shining across their body, right? So on the guitar it's blowing out the details on the guitar. Right here underneath her eye on her cheek, that's all blown out. Not a good positioning for the ambient light. So literally by having her turn her back to the sun and then me going around and shooting with the sun behind her, it fixes almost all of those problems. Sometimes if your subject has, a female subject primarily, if she has longer hair and it's not like up in ponytails like this. Sometimes the longer hair can actually shield the face from the sun, so you have a little bit more room to work with with the positioning of the body. They can turn this way and still not get the sun on the face, but I'm always watching that very closely. And back to your question earlier, watching out for those blinkies. Making sure you don't blow out any critical surfaces. Like skin, face, that type of thing. If you're a wedding photographer, generally you don't wanna blow out anything on the front of the dress. 'Cause it's all sequins and the bride paid a lot of money for that dress and she doesn't, she wants to see the detail. So just be careful you're not getting sun in the wrong places. So let's do a quick example. Let's shoot with the sun here in the studio. And let me, is that where we're at? Yeah, so the next thing after this will be the cloudy day. So I wanna just do a quick example. I need an audience volunteer. Anybody volunteer? You'll do it? (claps) Alright, come on over. And let's turn the light on. You want me to grab it? Okay, and I'm gonna have you stand about right here so, what was your name again? Xavier. Xavier? I'm Mike. Nice to meet you. Thanks, man. Alright so go ahead and stand about right here and, yeah, stand just about right like that. Perfect, this is a good starting point. And before, before we get shooting, I gotta move some of my gear over here. And move my tethering computer over so I can show the results of this. Alright Xavier. So let's see what, what I wanna show on camera here first of all, I'm gonna walk up close to ya. We got the sun behind you and you ca see the sun is striking across the front of his body, okay? So if you just turn this shoulder towards me. You can turn again, even more, there we go. And now we can see, we don't really have a camera on that side. Actually we will once I move this umbrella out of the way. And now we can see this side of Xavier is in shade and we're getting this nice rim light off the shoulder. As simple as moving and rotating to where the sun is, it's that simple seriously. So real quick, just have, I'm gonna have you rotate again this way. Keep coming around. Keep coming around. Alright, cool. So I'm gonna take my first picture, my first shot with no flash, okay? I'm building that exposure, right? Make sure I'm tethered. Things look good. Alright, cool. So I'm gonna start building my exposure and I'm gonna do it with Xavier in the bad, in the poor light. He's oriented in the wrong way, but just to show you what's going on. This isn't the real sun, obviously, so my ISO's gonna be a little but higher. So I'm gonna start my ISO at ISO 800, okay? ISO 800. If I was outside that would be much more like 100, but since this is studio light we've gotta be a little bit higher. I'm gonna be at f5. and I'm gonna start out at 1/250th of a second. Make sure I'm zeroed out there. So I'm at 1/250th of a second. As I point the camera, as I point the camera over towards Xavier, I'm looking at the metering there and what I'm seeing is that my exposure overall is at about 0, so that means the overall scene's about medium brightness. Alright so we'll take a quick test shot. Here we go. Let's see what that looks like as it comes into the computer system. There we go. Alright, so you can see how much ambient light is in the background, how much light is on Xavier. Okay Xavier, I'm gonna have you turn your right shoulder towards me so basically we're blocking out the sun. Even more, perfect. And same shot again now, except no sun on the front of his body. Alright one, two, three. (shutter clicks) Alright, super. So there's the shot. So that's what the ambient light looks like. Okay, so quick mental check for you. What would I do if I wanted more ambient light in the background? Shutter speed, right? So let's do that. You know the background in this case is the white wall and the window shades, but let's just pretend it's all pretty and we want more ambient light. So I need a longer shutter speed. I'm currently at a 1/250th. Let's just bring that up to, or let's bring it down to 1/60th. So a 1/250th, a 1/125th, a 1/60th. That is two stops brighter for my ambient light. Same picture, no flash. One, two, three. (shutter clicks) Alright, good job Xavier. Oops. Let's look at the computer. Get the results of that. And they're, perfect. So here's the previous shot, dark. And there is the next shot, brighter. We're overpowering the sun. We're starting that whole process of how much of the sun do I want to influence that photo, okay? And so in this case in the second photo, I wanted more sun, I want more oomph from the sun. Alright now I'm gonna go turn on the flask, okay? And we have a little camera rigged up inside the flash itself so you guys can see what I'm doing. So over here on my Nikon flash, it's currently set to off, and I'm gonna set it for remote. And again, this is just the Nikon system. The Cannon's different, Fuji's different, they're all different. And now what we see here is it says remote mode. I'm in manual exposure, okay manual exposure. I'm in channel five and group A. And it's just sitting there waiting for me to do something with it. So if we go back to here now, on my camera, let's just go see what my settings are from my camera menu. Now remember I'm controlling this through the radio system. So I go flash control, flash group options, group A, I'm currently at manual output, and I'm at 1/16th power. I dunno, is that good? Sure, it's a good starting point. So let's take a picture. Alright I'm gonna move the flash in closer to Xavier. Alright so Xavier, are you a smiler or are you more of a serious guy? What's you're kinda-- Smiler. You're a smiler? Yeah. Good, I like smilers. Alright Xavier, here we go. One, two, three. (shutter clicks) Alright and we look at that image. Cool, not too shabby. So that was just a guess. So starting out I just said 1/16th power, and it looks like the exposure for his face is about right. Now there's some things that are annoying me a little bit. Xavier doesn't have a lot of hair on his head, so in order to solve that problem, you know we get a bit of shine here, I have to actually shoot at a steeper angle to the sun, or more like completely opposite of the sun. So I'm gonna move my studio a little bit over here. So now the sun is literally right behind him. I'm gonna have you bring that shoulder towards me a little bit more. Yep, good. And the background's not real pretty here, but that's okay. Here we go, one, two, three. (shutter clicks) Nice. Now we've, see by moving the sun behind him completely, we don't get the whole shine off the top of the head which is really important I think a lot of times. So we've minimized the impact of that, I'm not gonna, I'm gonna call it an issue. (laughs) The photo issue. You know some people have longer hair and so it would, we'd need to move 'em this way maybe to get a little bit of sun. The whole point is, is that by just positioning his body, working with the existing light, we can really get the photo we're after. Now if I want to completely overpower the sun. If I want that background to drop away, 'cause right now we have some yellow tape on the stairwell, you know imagine this is an alleyway, right? It's an alleyway in the city and there's something, I dunno maybe there's some graffiti in the background you don't want. Well how do we eliminate that? Shutter speed. So, we'll go here on the camera. I'm currently at 1/60th. Now all I need to do is increase my shutter speed back up to the maximum sync speed of 1/250th. And we'll take that shot again and now the background should drop out pretty well. Alright, here we go. One, two, three. (shutter clicks) Nice smile. I'm liking it. Well, okay. Not super dark, but you can see increasing the shutter speed up to 1/250th of a second, the background is two stops darker. One of the things that's happening, is we are getting some spillage, some spill over from this umbrella. So another solution is move him farther away from the background or do high speed sync. A much faster shutter speed. Or, the last we could do, ISO. I could bring my ISO down. I'm currently at ISO 800, I can go down to 400 or 200. So, I won't do all that, but I just wanna make the point that you guys can control the light, you can work with the sun, and still produce fantastic results. Literally, all I have, this could be a $29 flash and a $30 umbrella. So $150, $180 bucks you've got yourself the ability to overpower the sun. Pretty cool. Thank you, man. (hands slap) (Mike laughs) Okay, let's go, actually let's just take a quick question or two, if there are, because working with the sun is a big deal. And what I'm gonna do is I'm gonna go over here and then we're gonna go to the cloudy setup. And I'll take off my camera. Question that had come in earlier, was do you ever use LED lights outdoors? Great, love this question. And I think a lot of times the genesis of this type of question is cost. You know, sometimes you can get constant lighting, like LEDs, florescence, incandescent lights, and they don't cost as much as a flash and a strobe system. And the answer is you have to have some pretty honking, high powered LEDs to work outside. And to buy the type of LEDs like on the TV set, like if you watch the 7am American shows that are on TV, they have these huge, very high powered LED setups. You're not gonna be able to afford those and they're just not practical. So my general, my direction for you would be don't use those for outdoor flash photography unless you can invest a lot of money in powerful systems. One more just kind of clarifying what you just taught us here, and Jose Vincent Photo had asked, how do you shoot strongly back lit subjects, so when that sun, when you moved so that the sun was behind Xavier, with your camera in aperture priority mode and your flash in TTL? Okay, great. Yeah, so there's no right answer for what exposure mode that you use in the camera. You know manual, aperture, program, shutter priority versus TTL and manual. It all works, some of them are just more consistent than others. So let me talk about why I choose manual mode for a lot of my flash photography. Manual mode, by its very nature, is stable. When you set your ISO, when you set your shutter speed, and when you set your aperture, nothing is variable. So those are all fixed. TTL, on the other hand, so TTL flash exposure and TTL camera exposure are variable and they react dramatically to what the subject is wearing and what the background is doing. So for example, this last week I shot an event, that fundraiser event. When I photographed someone at the event and they were wearing a white shirt, I was in TTL mode, that subject's face went very dark because TTL reacts from that and goes oh it's white! And I wanna make it gray, right? It's white and I wanna make it gray. TTL puts out less light. And then I photographed this guy who was wearing an all black suit and he was a black guy, and so now what the TTL system does is it goes, oh, that's all black and I need to make it gray. So what does it do? Way over exposes. So his face was blown out. So TTL has its own kind of idiosyncrasies that you have to kind of learn to work with. What I find is a lot of time for this type of work, working in manual mode helps you understand what's happening. And as crazy as it sounds, I think you have to be a more advanced photographer to do well with TTL than you do to work well with manual exposure mode. You know manual exposure mode is so, you just change one thing and then you see the results. In TTL it's like, what sorcery is going on behind the scenes? How come its so bright this time? And how come its so dark that time? So that's my suggestion.
Class Materials
Bonus Materials with Purchase
Ratings and Reviews
Brandon Couch
This is the second class I've taken with Mike and it was amazing! So easy to understand even when you get into the "tech" side of how flashes work but especially when using them outside and how easy it is. I would totally recommend this class to anyone wanting to take amazing images outside with one flash. He even makes bare bulb flash look awesome. Such a great course!
SunSoBright
Mike Hagen has become one of favorite instructors. His instruction and question answers are clear and concise and he has a real world approach. He has a friendly and approachable personality. Best of all during this course he works by himself which makes you feel you too can accomplish the shoot on your own. Mike demonstrates a practical approach with affordable equipment as he is aware many photographers starting off do not have a huge budget. In his other course on using your first flash he also had several gear set suggestions based on budget which was so thoughtful and helpful. I hope Mike does some more advanced courses as well and I will keep watch for his name on the course schedule. A definite thumbs up for photographers starting off using flash.
Laura K.
I have watched a couple of Mike Hagen's classes, and hope Creative Live will bring him back to teach more. He is a fantastic, thorough, easy-to-understand instructor. He doesn't assume viewers already know certain things. He is humble and diligent and truly wants students to understand and learn the things he is teaching. He breaks things down and explains things better than most, and he doesn't hold back on details. Mike also provides helpful handouts/written materials to supplement his videos. I really like his classes and teaching style, and hope to be seeing more from him in the future.