Lessons
Class Introduction
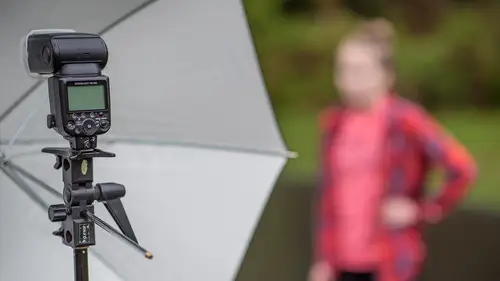
02:51 2Gear: Camera, Flash, and Triggers
27:05 3Gear: Modifiers
11:03 4Camera and Flash Settings
20:12 5Building Exposure For Outdoor Photography
22:12 6Shooting in Direct Sun
23:32 7Shooting on an Overcast Day
18:28 8On-Camera Flash
15:23Lesson Info
Neutral Density Filters
You now have the basics. You've got everything you need to know to start out doing your outdoor flash photography. Now this next segment is really maybe what I would call troubleshooting and adding a little bit of extra pizazz to your photography. So we're gonna talk about high speed sync, we're gonna talk about neutral density filters, and then using gels, I wanna explain why gels are a good thing to help, especially when you're doing portraiture with people. So the first presentation that I have here is about ND filters, okay. So let's talk about ND filters. I'm gonna introduce the concept of ND filters first, I'm gonna show you what the filter looks like. And then we'll go into our video, our on location video. So, already you know that your camera has a maximum shutter sync, shutter speed sync. In other words, the fastest speed that your camera will work with a flash is probably 1/250 of a second, okay. Some of the Nikon cameras and some of the Canon cameras also have a lower thres...
hold at 1/200 of a second. I've even seen some, I don't remember which brand, but some cameras had a 1/180 of a second maximum sync speed. Well as we've already been discussing, what happens when the light's too bright, okay? You have to find a way to keep that shutter speed down to a 1/250 of a second. Well, we've already talked about ISO, right, you can drop your ISO down to as low as it'll go. We talked about aperture, we talked about shutter speed. You know, getting, reaching up to that limit. Someone asked me this quick question and I'm gonna repeat your question. And that was can I just use exposure compensation? Can I use exposure compensation to change the brightness of the scene? And the answer is no. Cause once you've reached your limit of shutter speed, you can't change your exposure any more especially with your shutter speed. Cause once you're at 1/250, if you bring your exposure compensation down, the way that it does that is it just increases your shutter speed to a 1/320 or a 1/400 or a 1/500 of a second. So the only solution is to find a way to limit the amount of light coming into the camera. Actually that's one solution. The other solution that we're gonna talk to, in two videos down the road, is about doing high speed sync. Okay. So first of all, neutral density filters. Let me, I'm gonna grab my filter and I'm gonna come right back here. So I've got two different brands, and I just, I bought these on, I bought one of them from my favorite camera store online, and the other I bought from Amazon. And I just wanted to, as I was experimenting with these, I've owned them for, some filters like these for a number of years, but I recently wanted to see what would a really inexpensive filter do. Does it work? Is it worth the money? So these are neutral density filters and more specifically they're variable neutral density filters. And we'll see here in the video that when I twist it, it gets brighter or darker based on where the position is. So, really how they work is kind of like a polarizer, in fact technically, they're kind of two polarizers stacked together and it gives you this variable neutral density effect. The concept here is the light comes into the camera and then you reduce the amount of light until you see that your shutter speed is down to a 1/250 of a second, okay. Buy this, as we'll talk in the video, I talk about buying the right size for your camera, or the right size for your lens. This is a little bit higher quality one. This is made by a company called Vivitar, I think I paid, I'm gonna guess $50 for this one. Here's another one made by a company I've never actually heard of before, Fotga. And I think I paid $12 for this one. But you get what you pay for. You all know this, in lenses and optical quality, you get what you pay for. I want you, when we watch this video, I want you to see that there's actually a color shift that happens as well. A lot of the, the neutral part of this, means that there is no color cast associated with it. The density part of it means that it gets darker. So ideally, they don't induce a color shift. But the reality is that they do induce a color shift. And you'll see it if you watch closely in this video. I want you to watch for that. So, the Fotga has a much stronger color shift than the Vivitar. And the Vivitar, you know there is higher quality neutral density's than Vivitar. The higher quality ones are going to be in the hundreds of dollars. But as I've just shown here, for 50 bucks, you get a pretty good quality neutral density filter will work for most of your work. So with that said, let's go into the video, and let's learn about how this works in real life. So what do you do if your flashes don't support high speed sync. Let's say the flashes you are using aren't proprietary, in other words, they're not like a Nikon flash, or a Canon flash, so it allows you to shoot above a 1/250 of a second. In that case, you're stuck to shooting 1/250. In other words, you can't shoot a or a 1000th of a second. You have to stay below a 250th. Well how do you do that if you still want to shoot f/2.8. Well the way that you do it is you use one of these. This is called the variable neutral density filter. Let me show you the edge here, and what we've got is as we rotate the front element, you can change the brightness level from very dark to basically full light transmission. Okay. This allows me to vary how much light come in though the lens, and so basically what I am maybe doing as I take the shot, I'm going to be rotating this down until I get to a 250th of a second. Once I get to a 250th of a second, I'll leave the lens set up just like that and then I'll take my shot, just like standard sync or standard shutter speed synchronization. So let me run through that in the real world. I'll take a couple pictures with the variable neutral density filter. It just screws on to the front of your camera on the front of your lens. Get the right size filter for whatever lens that you have. This is a 72 millimeter filter. I'm sorry, a 77 millimeter filter. And when I start framing these things up, I'm going to frame it so it lets in as much light as possible. That allows me to focus. It allows me to compose. And then as I'm setting the exposure, I'll have to be actually looking through the camera so I won't be able to show you what the shutter speed and aperture settings are, but I'll call them out. Alright, so here we start. We'll start here. I'm at f/2.8. And currently, I'm at 1/2,000 of a second. Okay. I'm going to start reducing the brightness, bringing the brightness down, I'm just rotating the front element, and as I am doing that, I am rotating my shutter control until I get to about a 250th of a second. So I'm kind of doing this delectate balance between shutter speed, and how much light I allow in from the front. I'm at a 250th of a second. I'm going to rotate the front dial until my exposure zeros out. Alright, cool. And now I'm just going to take a quick test shot. Back to that building the exposure that I have been taking about all day. I'm gonna take a test shot with no flash. Okay, here we go, one, two, three. (shutter clicks) Look at the results. Allrighty, we've got decent color, or decent brightness. Maybe it needs to be a little bit brighter. So how do we get it brighter? Well, I'm gonna take some off of my variable neutral density filter. Alright, there we go. Now it looks to be about plus one. It's a bright background and about plus one on the exposure is where I want to be. Alright, here we go. Another test shot. (shutter clicks) Cool, got some kayaks over your shoulder. Nice ambiance there in the background. I am happy with that for my base exposure. I am still at 250th of a second. So now I am going to turn my flash on, looking for a communication, we're all green. And we'll just take a quick test shot. Alright, here we go for real. One, two, three. (shutter clicks) Nice. So now I'm looking at before with no flash and after with the flash. And the flash did fire, but the flash fired is pretty high. It's pretty bright. So, now I'm going to go into my, to the menu system and reduce the power of that flash. I was at 1/8 power. I'm gonna bring that down to, oh, maybe I'll start with a 16th power. Another test shot here. Great. One, two, three. (shutter clicks) That's looking better. It's still looking a little hot, so I'm going to dial it down one more time, to 1/32 power. And I bet that's where we're gonna end up. Okay. Here we go. One, two, three. (shutter clicks) And then I'm going to another tight, tighter. One, two, three. (shutter clicks) You've got this great smile, man. You just, permasmile. I love it. Really nice image. The lighting is subtle. It blends in with the environment and the ambient light. It's just a really great looking on location flash photo. So thanks. So, neutral density filter, very easy way to control the amount of ambient light coming into your camera. The people that need this type of filter are those whose cameras don't support high speed sync. Okay. So if your camera doesn't support high speed sync, usually I'll say, more consumer oriented cameras don't support the high speed sync function. So cameras less than, I don't know, $700 U.S. dollars, somewhere around there, that and below, don't really support the high speed sync. Prosumer cameras and obviously pro cameras do support high speed sync. So if you're limited to that shutter speed, 250th, you're gonna use this. And I don't know if it was entirely clear exactly what I was doing there on set, or on location, so let me describe that. So I set my camera shutter speed to 1/250 of a second. That is the first thing I did. Set it to 1/250. Then I rotate my variable neutral density filter until I see the exposure line drop down to the zero point. At that point, I'm at 1/250 and my exposure is set for the same. So does that make sense? I just set my shutter speed first, and then rotated this to bring in the amount of light to get to zero on my exposure line. And then back to a question earlier today. How do you decide how bright or how dark you want that background? Well that's a creative choice. So I can go a little bit less light, a little bit more light, depending on what I want that background to look like. Okay, so let's look at this photo here. Our parkour athlete. I shot this at f/2.8, so here I used a Nikon 24-70 f/2.8 lens. I shot f/2.8 because I wanted the background to go all blurry. So that opens up the camera two more stops of light from f/5.6, right. And so that's just a lot more light coming in. And so there is no way, I think for this picture it, the ambient light exposure would have been like, oh I don't know, I think it was 1/2,000 of a second. So rotated this, got it nice and dark for the background then used the flash for the foreground. I did a little bit of post processing in Lightroom, but just a little bit. Sometimes, what I like to do, and you can see this a little bit in the image. Can you see how the background is kind of blue and then he is warm? I do that on purpose. It kind of helps the person stand out. Warm and cool colors are complimentary colors. They look really well together, look nice together. So I think the actual exposure, if we saw from the video earlier on, did you see how there is kind of an orange cast overall? Did you notice that color cast? And that is because this filter isn't truly neutral in color. Yeah, there is a little bit of a color cast. And you almost always will find that with neutral density filters. You have to pay a ton of money to get a filter that doesn't give you a little bit of color cast. But that is why we shoot RAW. RAW allows us to do white balance, allows us to kind of fine tune the colors of the image after the fact. Right on. So let's open up for questions real quick, if there are any questions on this filter and it's application. Question up front. Hi, I have a variable neutral density filter and when I sometimes use it, I get, and this might be a little bit off topic, but I get sort of a-- X Pattern Yes. Thank you, I was finding it difficult to explain. Yes. What is it? What's that from and how can you eliminate that from happening? Okay, perfect. If you look at this closely, you'll see that it has a maximum setting and a minimum setting, okay. The minimum setting there is no darkening. Well, there's probably a little bit, but there's no real reduction in light transmission. When you go to the maximum setting, remember I have said that this behaves like a polarizing filter, what you get is you get kind of this weird polarization effect. I don't know if you've ever worn polarized sunglasses while looking through your camera with a polarized filter. Has anyone ever done this before? It's really crazy. It like wigs you out. That's why I don't wear polarized sunglasses anymore in my photography, because when I'm using a polarizing lens you get these weird cross patterns. So that' what happening when you go all the way to the maximum or even past maximum, that's where these problems start coming into play. So never go, my rule of thumb with these types of filter is I never actually go to the maximum arrow position. I usually will stay, for whatever it's worth, this side of it, you know. And you won't generally get that x-pattern. So even though it says maybe this is, maybe you bought a 10 stop neutral density filter, you know it will go up to a maximum of 10, I very rarely actually go there because I know that I will sometimes get this funky patterns. And seeing the reviews, seeing these filter reviews online, from these, like Amazon reviews, people always give them thumbs down because they produce these x-patterns. Well they generally are actually going too far, too far in the rotation. Another way to prevent those x-patterns is to spend more money (chuckling). The $20 filter is going to have these problems well before the $100 filter. So, as always, you get what you pay for. One question that had come in from JoAnn on ND Filters and she was wondering if that's something you would use to get a blurred background? Yes, and so like here, in this example, the blurry background has, it's not because the filter. The blurry background is because of the aperture I am using. So, you know, if it was a filter effect, if it was a soft filter, then our model would be blurry as well. Everything would be blurry. So, yes, to answer your question, the way that you get the background to go out of focus is to use the big aperture. And then adding all that together, the big aperture means more light comes to the camera, which means my shutter speed is too high, which means I have to drop down the shutter speed and use this neutral density filter. In general, you want to set the scene up before you put the filter on. Make sure you're client is standing, or make sure the flowers where it's going to be, and the tripod is positioned and the lights are in position. Because once you rotate that filter, you can't see through it anymore. You can't look through you're camera. And your camera's auto-focus system may not work. So, basically do everything first. Get the focus set, the position set, the framing set, and then rotate your filter to get the ambient light to the right level, okay. Set up focus compose, then rotate the filter until you reach the 250th of a second. After now, after you've done that, now you're gonna do just like I described earlier today, you're gonna increase the flash power to compensate for the reduction from the rotated filter. So before you might have had to have used, let's say, 16th power on your flash, but now with the ND filter, you have to go more like half power or maybe even full power. Cause this basically sucks, takes all the light from outside the camera and prevents it from coming in the camera. So you'll probably have to double or even triple your flash power when using these. So sometimes I, when I start using these, I start thinking I probably have to start gaying together two flashes rather than one.
Class Materials
Bonus Materials with Purchase
Ratings and Reviews
Brandon Couch
This is the second class I've taken with Mike and it was amazing! So easy to understand even when you get into the "tech" side of how flashes work but especially when using them outside and how easy it is. I would totally recommend this class to anyone wanting to take amazing images outside with one flash. He even makes bare bulb flash look awesome. Such a great course!
SunSoBright
Mike Hagen has become one of favorite instructors. His instruction and question answers are clear and concise and he has a real world approach. He has a friendly and approachable personality. Best of all during this course he works by himself which makes you feel you too can accomplish the shoot on your own. Mike demonstrates a practical approach with affordable equipment as he is aware many photographers starting off do not have a huge budget. In his other course on using your first flash he also had several gear set suggestions based on budget which was so thoughtful and helpful. I hope Mike does some more advanced courses as well and I will keep watch for his name on the course schedule. A definite thumbs up for photographers starting off using flash.
Laura K.
I have watched a couple of Mike Hagen's classes, and hope Creative Live will bring him back to teach more. He is a fantastic, thorough, easy-to-understand instructor. He doesn't assume viewers already know certain things. He is humble and diligent and truly wants students to understand and learn the things he is teaching. He breaks things down and explains things better than most, and he doesn't hold back on details. Mike also provides helpful handouts/written materials to supplement his videos. I really like his classes and teaching style, and hope to be seeing more from him in the future.