Lessons
Class Introduction
02:51 2Gear: Camera, Flash, and Triggers
27:05 3Gear: Modifiers
11:03 4Camera and Flash Settings
20:12 5Building Exposure For Outdoor Photography
22:12 6Shooting in Direct Sun
23:32 7Shooting on an Overcast Day
18:28 8On-Camera Flash
15:23Lesson Info
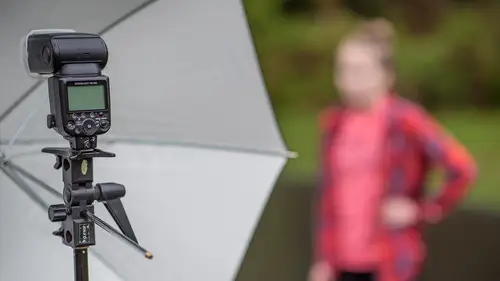
Off-Camera Flash
This is really where it's gonna be at. You're gonna want to do off-camera flash. So, we've got another great video here showing you an umbrella and a soft box and a reflector. So, let's talk about off-camera flash, and that's really where it's at. That's where most professionals and most aspiring amateurs want to be, you wanna be off-camera flash, because that gives you a lot of control over the direction of light, the quality of light. In positioning the subject, you know, off-camera flash is really where it's at. So, what I've got here, I've got an umbrella, got a light stand, and I've got a flash, and so let's just talk through a couple of these things here real quick, so that you'll understand what you might need for off-camera flash photography. First thing is the light stand. I have a bunch of light stands, and what I've found over the years is that taller is better. This stand is basically a nine-foot, maybe it's an eight-foot, it's an eight or nine-foot light stand, and I find ...
for most of my outdoor work, I want at least eight foot-tall light stand. That allows me to extend the light very, very high. Also, if I'm working with a tall subject like Bergen here, he's about six-two, six-three, somewhere in that range, I need that light to go up much higher than he is, so that the catch light looks properly positioned, so make sure that you get a stand that's at least eight feet tall. Nine to ten feet is even better. The next thing I have here is called a flash bracket, a light stand flash umbrella bracket. So, it basically attaches here to the top of the light stand, and then the umbrella goes right through there in the shaft. You can see how that works. I then have a plastic mount for my flash that mounts right there on top of the stand. This plastic mount comes with most of your flashes when you buy 'em retail, so that's not an extra purchase. And then the umbrella here, I basically have a Profoto, this is called a medium-size umbrella. You can see it's silver. When I'm in the studio, indoors, I like using white, because white is kinder, gentler, softer, but when I'm outdoors, I need a lot of light reflected back onto the subject, because a lot of times, I'm fighting the sun and I'm working with really bright conditions. These little flashes, these little strobes, don't have a lot of power, a lot of energy, so I need as much light reflected back onto the subject as possible, so outdoor flash, I love using the silver umbrellas. So now, let's talk about positioning. Bergen is nice and tall, so I've got this flash up. I did a test shot just a minute ago, and what I found was I wasn't getting a lot of catch light in his eye, because I actually had the umbrella too high, so I brought the umbrella down a little bit so I can get a nice little catch light in his eye. Back to building the exposure, I'm gonna start building that exposure now, so aim the camera toward Bergen. I'm looking at my ISO, I'm at 100. I'm looking at my aperture, it's at F-five-six. Looking at my shutter speed, and I'm at 160th of a second. That's a pretty good starting point. I'm gonna take a picture without the flash and just see what that looks like. So, I turn off the flash there. All right, test shot, one, two, three. (shutter clicking) Look at the results, and the background looks a little bit bright for me, just a little bit bright, so I'm going to make the background darker by increasing the shutter speed to a 250th of a second, and remember, I don't wanna go above a 250th of a second, because then I'd be fighting the synchronization speed, the maximum synchronization speed. So, we'll take one more test shot there, one, two, three. (shutter clicking) Cool, man. Good, much darker, much better, I'm happy with that. Now it's time to add in the flash, so I'm gonna turn on my flash, and let's go into the menu system. I'll show you how I have that flash set. My remote flash is on manual mode, and I'm at one 16th power. I don't know if that's good or bad, so we'll just start there. I'm guess we'll probably end up at about a 16th, maybe a 32nd, we'll see. All right, now we'll take the portrait. All right, Bergen, I'm gonna have you bring this shoulder in just a little bit, cool. And look right here at the camera, and one, two, three. (shutter clicking) All right, look at the result, and I'm just gonna compare the previous shot I took with no flash, with this one where I took with the flash, and I'm looking at the eyes, and absolutely, we've got a much better look. I'm gonna zoom in, looking at his catch lights, if we've got good catch lights. We have okay catch lights, not great, so I might want to lower the flash down a little bit more to get a little bit better flash catch lights. Gonna drop it maybe a couple inches, about there. All right. And here we go again. All right, one, two, three. (shutter clicking) Good, gimme a smile this time. (shutter clicking) All right, Mom would be proud. One, two, three. (shutter clicking) All right, now I zoom in, look at the eyes, looking at the eyes for those catch lights, and I'm gonna say it's not quite enough, not quite enough flash power, so I'll go back to the menu, and I'm gonna increase the power to one eighth, so I was at one 16th, now I'm gonna go to one eighth, so that's one stop more flash power, so, in other words, twice as much light from the flash. All right, here we go, one, two, three. (shutter clicking) And I'll shoot vertical. One, two, three. (shutter clicking) All right, cool. In my opinion, that's a little bit better, a little bit more vibrant, snappier, better catch lights in the eye, and just because I can, I'm gonna take one more shot with a little more power, just to see what that's gonna look like. A lot of times, it's hard to tell when you're out in the field on these little screens. We'll know more when we get back to the studio. Push okay, I'm at a quarter power now. All right, one, two, three. (shutter clicking) And that was too much, so from an eighth to a quarter was definitely too much, so probably where I'll end up is probably like a quarter minus two-thirds of a stop or a quarter minus a third, and just for fun we'll try that one more time, so go quarter minus two-thirds, or minus point seven, and we'll take this last shot with the umbrella. Okay, one, two, three. (shutter clicking) Cool, man! Yeah, I'm happy with that, that's a good look. Well, one of the things that we're noticing, that I'm noticing is it'd be nice to have a little bit of fill on the other side of his face, so now, you can see that the umbrella and the flash is on my right, it'd be nice to have a fill on my left, so I'm gonna bring in a reflector to show you how to use a reflector with an umbrella in the field. So, when you're using off-camera flash, a lot of times you have one light source, a single flash and an umbrella, like I have here, but we wanted to mimic multiple light sources, and if you're on a budget, one of the easiest ways to mimic multiple light sources is to use a reflector, so I've brought in a reflector here, this is just like a standard 42 inch or a 45 inch reflector, and I've brought it in. You can see how tight I am, I'm nice and tight here. I've got basically this little tiny studio, and you can see I've got my subject, Bergen, he's back here, he's kind of like, inside the whole setup. He's in between the lights. The key light, or the main light, is here with the umbrella, and then the fill is gonna be this reflector. The fill is almost always on the shaded side of the face, and there's a million different ways you can do this. You can have the fill light down low with the umbrella up high as more of like a clamshell light. What I have here is more like a split light setup, where the light is split, it's coming from one side, and then reflecting off of the other. Just to make things easy so you can understand, we're just gonna work with the split light setting right now. Close counts, you'll hear me say this a lot in my photography. You gotta get this stuff, all the diffusion, all of the light sources, in close to the subject. Otherwise, you lose the size benefit of the diffusion. The softer or the closer the diffusion is to the subject, the softer the light is, so close counts. So, I think we're ready to take a shot. I'm just gonna double-check my settings here real quick, just to remind everyone where we're at. I'm at F-five-six, I'm at a 250th of a second, that's my maximum shutter sync speed, and I'm at ISO 100. I've been using remote flash. I'll go into my menu system here real quick, just to double-check where my flash settings are. I'm in manual mode for that remote flash, and I'm at a quarter power and minus two-thirds from a quarter power, so that's almost an eighth power, and we're ready to take a test shot, so let's see how this works. You ready, Bergen? I'm ready. All right, cool. Here we go. One, two, three. (shutter clicking) Cool. And let me look at the results of that image. It's a nice-lookin' shot. I'm gonna zoom in, check his eyes, make sure our catch lights are good to go. Nice catch lights, yeah, real nice. Now, I've got a little space to work with. A lot of times, I like my reflector to be in very, very close to the subject, so I'm actually gonna do that. I'm actually gonna move the reflector in ever so slightly closer. There we go. It feels a little bit close, doesn't it? A little bit. A little bit uncomfortable, but as long as you have the subject just kind of focus on you and pay attention to you, very quickly the studio equipment just fades away. All righty, here we go, ready for the next one? Yeah. All right, one, two, three. (shutter clicking) And one, two, three. Let's shoot a vertical picture. I'm gonna have you bring your right arm forward, right. Nice, one, two, three. (shutter clicking) Excellent. I'm gonna zoom in real quickly and look at the quality of light in his face. It's a nice look, really nice look. I'm also checking focus, just making sure that I've nailed the focus on his eyes. Nothing worse than out-of-focus portraits. Let me look at my horizontal image. Real nice. All right, there you have it, shooting with a reflector and an umbrella. So, let's talk about soft boxes and why they're different than umbrellas. Soft boxes allow a different shape of light. You know, umbrellas are round, give a nice round catch light. Soft boxes allow us to do kind of a square catch light. But another advantage of soft boxes is it allows us to really control the direction of light and to prevent light from spilling off into areas we don't want the light to go. So, what I have here is called a speed ring, but it's specifically designed to work with your little strobes, your little Nikon and Canon strobes. So, I've got the standard light stand, and then attached to the light stand, you've got this speed ring. It's called a speed light speed ring, and you can see the way that it works is that the soft box, the metal stays go right into the speed ring right there, and then the flash attaches to what's called a cold shoe. Another cool thing about this specific brand, this is a Profoto soft box, is you can rotate the soft box very quickly and very easily to get different looks. One of the reasons I love Profoto gear is because it gives us all of this flexibility and capability, and it's just very durable. On the other side of it, let me rotate it around, you can see that we basically just have a white diffusion panel. So, the flash is shining into the soft box, and then through the white diffusion panel. Soft boxes tend to eat up a lot of energy, they suck up a lot of light, and they diffuse the light over a pretty big surface area, so just keep this in mind, that when you're shooting outdoors, especially on a sunny day, you may not have enough oomph or enough energy from the flash. You may have to use two flashes in the soft box. In this case today, I only have one flash. It's a cloudy day, this one flash is gonna work just fine. All right, so how about positioning the soft box? We got Remy here, Remy's about six feet tall or so, and so I want the soft box to be about six foot six inches high. I like the soft box to be slightly higher than the eyes, so I'm gonna bring this up, about like that, and then I'm gonna tip it down so it's kinda pointed towards his head, and what I do is I imagine there's kind of like a rod going through the soft box, shining to the subject, and then Remy, what I'm gonna do is I'm gonna actually stand in front of you just so I can make sure the positioning is good. Sure. Great, just like to line it so it looks about right. Cool. Going to build that exposure again, so let's just double-check my settings. I'm at F-five-six, I'm at a one 160th of a second, I'm at ISO 100, and that looks about right. We'll just take a quick test shot. Actually, I'm gonna take one shot without the flash and one shot with the flash. All right, one, two, three. (shutter clicking) Nice smile, great. All right, his eyes are a little bit dark, so we'll add the flash in and brighten 'em up. I got a green light there, means it's communicating wirelessly to the flash, and I'm just gonna double-check my power. I'm at manual output at one 16th power, okay. Here we go. Gimme a nice smile, one, two, three. (shutter clicking) Sweet. Look at that result, I'll look in the eyes for the catch light, yeah, we've got a nice catch light. So, here's what I'm noticing, though, that at one 16th power, it's a little bit hot on his face. His face looks a little bit too bright. I'm gonna decrease the power a little bit. Go into the menu, go to my group flash options, and I'm at 16th, so I need to drop it down. I'm gonna drop it down by a full stop and go to one 32nd power. That cuts the amount of light by half. All right, here we go again, one, two, three. (shutter clicking) Nice. That's a little bit better. Now, here's one of the things that I wanna talk about next. We're outdoors, and the light is changing from when we started shooting just about an hour ago. It's much brighter. I need to be thinking about that as I'm putting together these exposures. The ambient light already, I think, is too bright for this photo, so I want to increase my shutter speed, faster shutter speed to make the ambient light darker, and that will help him stand out a little bit more from the background. So, I'm gonna go from one 160th of a second up to one 250th of a second, and that's to drop down the ambient light brightness. Here we go again. (shutter clicking) Nice, nice job. Okay, cool, I feel better about that. I dropped the ambient light down, the background's a little bit darker, but now I feel like I wanna add in a little more flash to bring his face up a little bit more, so again, we'll do that, and we'll go into the group flash options, and go back up to a 16th power, push okay. All right, here we go. Nice job, buddy, one, two, three. (shutter clicking) Oh, yeah, okay, cool. That's a really nice-looking image, I'm happy with that. All right, cool, so we've already shot some of the pictures with just a soft box, and now I wanna bring in a reflector, and just like before, how I talked about keeping things close, I wanna do the same thing in this scenario, but one more thing that we need to think about is when we're shooting with the soft box, the light is very controlled. In other words, the light doesn't really diffuse out like it does in an umbrella, so we have to be much more precise about the angles and the reflections of all of our products here, our soft box and the reflector. So, I'm gonna start by rotating the soft box towards Remy. There we go. Basically keep that the same as it was before. Now, with the reflector, I'm gonna bring that around front and make a nice, tight studio. And these are all sandbagged, which is good, but it can make it a little bit harder to move around. Nice and tight. So, this tightness will make the portrait look really nice, really soft. All right, everything else is the same as before. Basically, I'm at ISO 100, I'm at F-five-six, I'm at a 250th of a second, which means my background's gonna be a little bit darker, which is what I'm after. My flash setting is still at, I think, one 16th power. Yep, I'm at one 16th power, and we'll take our first shot. All right, Remy, here we go. One, two, three. (shutter clicking) Great. Look at the results of that image. Just doin' a quick chimp. Aw, yeah, nice look on the face, great. I'm gonna increase the power a little bit. He's wearin' a black sweatshirt, and so I maybe wanna bring in a little bit more detail on the black sweatshirt. Let's just see what that looks like. I'll bring this up now to, let's go to an eighth power. Hit okay, and we'll take this next picture at one-eighth power, right on. One, two, three. (shutter clicking) Great. And I brought it up to one-eighth and I quickly realized that was probably too much. It's a little bit too hot. As you can see in this image, there's too much reflection off of his face and off of his cheeks, so that was the wrong move, but that's the cool thing about digital. You can take a shot, take a look, you don't like it, you reduce the power or increase the power. All right, I'm gonna do one more quick change here. I'm gonna rotate the soft box to the side just to see if we can get a little bit different look to the photo. Yeah, and I'm gonna shoot right through the gap, right through the gap. I'm gonna decrease the power back down to a 16th. Alrighty, here we go, I think this'll be our last shot here with the reflector, one, two, three. (shutter clicking) Yeah, it's still a little hot even now, so I'm gonna drop it down one more stop, bring it down to a 32nd power. Okay, I promise this will be the last one. Famous last words. Cool, man. (shutter clicking) Thank you. Well, you can see that setting up these shots in the real world takes a little trial and error, and you know, as I'm watching it back, I'm kinda feeling like yeah, it's a try this, do that, try this, do that, look at it and change, but that's the way it really works in real life. Hopefully, you can get this stuff worked out before your client is on set with you, so it's nice to be able to have someone else with you to test and practice on, so that when the client finally comes, you're ready to go and you can just start taking pictures. Once you get the basics out of the way, though, you're golden, you're gonna get great shots. Those were really fantastic looking shots of Remy. Off-camera flash gives you much more control, much more ability to decide where the light's from, what the shape of light is gonna be. I used two modifiers in this example. I used umbrellas and soft boxes, and in my opinion, you don't need to spend a whole lot more money on other stuff until you need a specialty type of product. You can get 95, 99 percent of your work done with just an umbrella and a soft box, and it produces a nice, professional look, and it elevates you above others who aren't using this equipment, and it's not that complicated. I think you saw, as I'm setting that up, you're like, "Yeah, I can do that. "That's just ISO 100, that's just F-five-six, "and that's a 250th of a second. "I know these terms, they work," and then adding in flash at a 16th power, great photos. So, a couple of ideas for flash setups, and I do just two real simple light setups. One is an off-axis light setup. Off-axis is literally the flash here and the camera there, so a little bit off-axis, so that's one, and then off-axis with a reflector, okay? So, by adding in the reflector, you can get another look to that. And then the other is what we call a clamshell, or on-axis, and to do this, I'm just gonna run over here real quick to this little demo area, and let's pretend that the camera is back there, so on-axis is this, so if the camera's shooting like this, the camera is basically right next to the light stand or right next to the post, and then we can pull in a reflector underneath here as well, so this basically is gonna catch right on the top of the eye, and another little fill down below. This is called clamshell lighting. Both are great looks, and depending on the person, depending on their face shape, depending on their body, depending on if they have a good side or a bad side, you may elect to do either on-axis lighting or off-axis lighting. If the subject is in shade, we need to think about the direction where the ambient light is coming from, so let's imagine this. Let's imagine you're in a city, and you've moved your subject into the shade of a building, but behind the subject, the sun is shining from right to left, something like that, so the sun direction in the background is going this way. So, where should you put the flash if the subject is in the shade? Well, generally, you wanna match the direction of the background light with the flash, so if the subject is in the shade, you want the light to appear as if it's all coming from the same direction. That's different, though, if the subject's in the sun. If the subject is in the sun, remember we did that before, where the sun's kind of back here, then the flash is directly opposite of that. So, does that kind of make sense? The subject in the shade, have the light come from the same direction as the background light. If the subject is in the sun, well, then it's opposite the sun. And the reason why we do that is because it just looks odd if the subject's in the shade, the background light's going that way, and then your flash light's going that way. There's just something that appears weird about that. And then, if it's an overcast day, well, then you get to choose. Where is the light coming from? It's all on you. All right, just a quick, as we finish up here for this segment. Just to kinda go through, you know, the photos that we saw were the raw, unprocessed photos, and I just like to show, with a little bit more work in Lightroom or post-processing, what those might look like, so here's just added a little bit of contrast, a little bit of color, a little bit of vibrance, actually, in Lightroom. This was off-camera flash using the umbrella at one 250th of a second, F-five-six, and ISO 100, and here's a vertical composition of that. Really nice, I like the feel of that photo, and we got a smile out of him, which makes me happy. He's a good, handsome kid. More of a serious guy, though. And then, that's what the catch light looks like with an umbrella, and a nice lighting across his face. I'm really happy with the image. And then, here's just another image where I just converted it to black and white, just to give a different look, and I think that one was the soft box photo. Yeah, that's the soft box, and again, ISO 100, F-five-six, and a one 250th of a second. So, cool, well, here's where we're at. We've gone through the basics. Right now, you know everything you need to know to do great off-camera flash photography outside, okay? Well, you know almost everything you need to know, 'cause there's a few things that we have to learn, specifically around, well, what do we do if it's really bright outside? You know, what if I can't shoot at a 250th of a second? So, when we comeback from break, what I'm gonna do is I'm gonna talk about neutral density filters, I'm gonna talk about high-speed sync, and then, in the last segment, we're gonna get into some sports and action photography, kinda put it all together for what initially feels like a very complicated shoot, but you're gonna see it's actually not that complicated at all, so that's the plan for this afternoon.
Class Materials
Bonus Materials with Purchase
Ratings and Reviews
Brandon Couch
This is the second class I've taken with Mike and it was amazing! So easy to understand even when you get into the "tech" side of how flashes work but especially when using them outside and how easy it is. I would totally recommend this class to anyone wanting to take amazing images outside with one flash. He even makes bare bulb flash look awesome. Such a great course!
SunSoBright
Mike Hagen has become one of favorite instructors. His instruction and question answers are clear and concise and he has a real world approach. He has a friendly and approachable personality. Best of all during this course he works by himself which makes you feel you too can accomplish the shoot on your own. Mike demonstrates a practical approach with affordable equipment as he is aware many photographers starting off do not have a huge budget. In his other course on using your first flash he also had several gear set suggestions based on budget which was so thoughtful and helpful. I hope Mike does some more advanced courses as well and I will keep watch for his name on the course schedule. A definite thumbs up for photographers starting off using flash.
Laura K.
I have watched a couple of Mike Hagen's classes, and hope Creative Live will bring him back to teach more. He is a fantastic, thorough, easy-to-understand instructor. He doesn't assume viewers already know certain things. He is humble and diligent and truly wants students to understand and learn the things he is teaching. He breaks things down and explains things better than most, and he doesn't hold back on details. Mike also provides helpful handouts/written materials to supplement his videos. I really like his classes and teaching style, and hope to be seeing more from him in the future.