Use Collections for Your Photos
Lesson 9 from: Mobile Workflow with Adobe Creative CloudJared Platt
Use Collections for Your Photos
Lesson 9 from: Mobile Workflow with Adobe Creative CloudJared Platt
Lessons
Class Introduction
08:53 2Camera Settings on Location
06:08 3Take Notes & Edit in Camera
05:58 4Mobile Gear Review
18:42 5Location Shooting Guidelines
03:51 6Adobe Creative Cloud® Mobile Framework Overview
24:46 7Adobe Creative Cloud® Tools
09:50 8Lightroom Mobile® Settings
16:26Use Collections for Your Photos
23:58 10Select & Organize in Lightroom Mobile®
15:23 11Edit in Lightroom Mobile®
23:30 12Dehaze Filters & HDR in Lightroom Mobile®
40:44 13Edit Images in Lightroom® on the Desktop
23:51 14Edit Images & Basic Searches in Lightroom® Web
13:14 15Create Panoramas in Lightroom®
07:01 16Edit Video in Lightroom®
12:00 17Questions on Lightroom® & Lightroom® Web
14:54 18Workflow: Working with Clients on Location
12:48 19The Mobile Master Workflow Part 1
23:08 20Workflow: Outsource for Professional Photographers
20:36 21The Mobile Master Workflow: Part 2
32:35 22Questions on Mobile Master Workflow
16:29 23Use Feedback & Share Collections in Lightroom Mobile®
03:39 24Comment & Favorite Images
14:18 25Share in Portfolio & BeHance
11:46 26Editing Tips In Lightroom®
18:08 27Workflow: Traveling Photographer Using Geotags
19:38 28Use Easy Trails For Non-Geo Locations
15:03 29Clean up, Organize & Archive your Mobile Photos
38:45 30Collect Images for Sharing
04:45 31Tell Stories with Animoto®
08:17 32Working With Adobe Sparks Post®
10:07 33Using Adobe Sparks Page®
15:38 34Create a Slideshow with Adobe Premiere Clip®
34:27Lesson Info
Use Collections for Your Photos
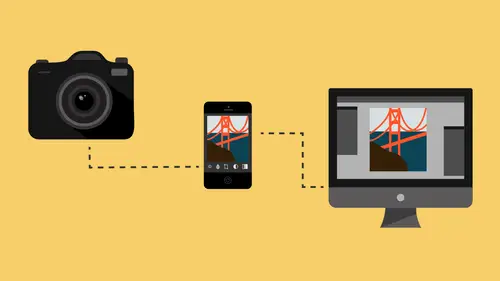
We're gonna talk about we institute these collections, how we get them moving up and down. How do we actually get the cloud to see that we want these photos to be available to us all the time? So that takes place, and before we talk about that I've gotta talk about the difference between a folder and a collection. A folder, and you can see right over here in the left-hand side of the left panel there's a working catalog. That's this drive right here. If I go below that, there's one called working drive SSD. That's this one. It's a working drive. That's where all my photos go. And it's a solid-state. So all of these two drives that are in here are both solid-state. Why? Because I travel with them. So I don't want bumping and moving to be cause of a damage. So they're solid-state drives in here. It's not huge. They're just 500 gigabyte solid-state drives. 'Cause it's just for me to have safety duplicates when I'm on the road. So the images that we shot of our model are gonna go from the ...
phone, to the cloud, to the computer, into this drive. And that's the repository until I decided what to do with them, until I organize them. So once I organize them they will be in here in a job folder for that client. And that's where they'll rest. The information about the photos and the smart previews will still be here in the catalog and, of course, on the cloud, right? So that information will still stay in these two places, the cloud and here. But when we go to look for the original photos, it's going to be in this drive or the drive at home if I'm at home doing it. Okay? All right. So that is a folder. A folder is a real place. It's a place on a physical location here. It's physically here. It's in a drive. And you can see that I've got other drives in this catalog. For instance, see that 2016 archive right there? That 2016 archive is a, that is a old drive for 2016 images that I'm done with and they've been archived. But a client comes back and says hey, I want you to do something. And so I say here's the archive, 2015. Here's archive 2016. So Curtis wedding and then a family portrait, both of those people contact me and say hey, I'm ready to have you print something. All I have to do if I wanna work on it is go and import that same old catalog back in my working catalog and I can work on it from this system. I don't even have to open up that catalog. I just go here and I say file, import from another catalog, and then I point to the catalog that's on the old, just plug the archive drive in, and I import it. I work on it here. So now the catalog, which is already smart and already has all these sharing capabilities, I can just plug it in and tell it hey, share all this to my mobile. I'll work on it on the road. And then when I get back I can unshare it to the mobile. It'll pull it all off the clouds, 'cause I don't want it out there anymore, and then I can just eject that job. Goes away. See how this is like a little work station? Things come in, you work on 'em, they leave. Right? Yeah. So you reexport the catalog back to the archive once you're done with all of that? [Presenter] - Yeah Okay. So, and I always, so I'll reexport that catalog as a new one. So then I'll have the old one, and then I'll have a new one. So it'll be like this is my, you know, album edits or whatever for it, and I'll just export that. And then I'll just, and then once I'm done with it, so if I'm done with this 2016, then I would just right-click it once I'm done, and I would first export it as a catalog back to the original archive drive, you know, back to that same folder, and then I would remove it. And then it disappears, and then once there's no more folders from the archive drive inside my folders area, then the whole drive will just disappear because there's nothing on it. It's inside of this catalog. So folders are real places. They have to be plugged in. You have to see them. The lightroom puts things, if you move stuff around, it moves it in the folders themselves. So if I move something from here to here, it will physically move this photo from this drive over to this drive because I physically moved it in a folder. That is not that case with a collection. A collection is down here below. These collections are fake. They're not real, they're virtual. You can have the same photo in 30 different collections and there's still only one photo. Conversely, you could have 15 different collections and you could put one photo from this folder and then another photo from that folder and another, you could have photos from 30 different folders in one collection and it wouldn't move them, they would all still be in those folders everywhere across your hard drive, but they would look like they were in one folder 'cause it's a collection. Collections are the only way to sync to the cloud. So what you do is you create collections for the purpose of doing jobs, sharing, et cetera. So let me just show you what I've done here. Now, I created a collection set and all collection stuff is done by clicking this little plus button right up here next to the collection. If you click on it you can create a collection, a smart collection, or just a collection set. Now, smart collections right now do not sync to the cloud. So don't think you're gonna be able to make a smart collection and sync to the cloud. I don't know why that is, because it would be awesome if it did. But I think the thinking is is that you might make a smart collection that has a billion photos in it because of the way you did it, and you wouldn't know you were syncing that many images to the cloud and it would just be turning and then you'd be calling Adobe saying their product is weird because it's syncing 10,000 images to the cloud and you didn't want that. And they'd be like well, you made a smart collection, and there's 10,000 images that you didn't know about in the smart collection 'cause you don't know how to make smart collections. So a collection is what you do. So if you wanted to make a smart collection to find the images you're looking for and then drag them into a collection, that would be the way to do it. So actual collections are what sync to the cloud. So you can create a collection, but you can also create a collection set. And that's just a folder that contains a lot of collections. So what you see here is I actually created, let me shrink this down quite a bit. There. Okay, so I created a creative live mobile photography workflow set of collections. And then I gave you a bunch, and see how they're all, they've got a code at the beginning of them. It's MW. That's for mobile workflow. The reason that I put them that way is because unfortunately the sets don't go over to Lightroom Mobile. So let's go to my iPad for a second and you can see on the iPad that there's actually no organizational structure here. It's just all in alphabetical order. Now, I could go up to the top and say organize it by, you know, sort import date or photo count or online status, but I want it to be in sets, but I can't. And so what I've done is I've said okay, well, if I put all of 'em MW they'll all fit together. So see how MW is all in the same area. And if I really want something to be at the top so it's really accessible, I'll just name it space space space and then DSLR import. You see how that's at the top? And then I've got my, I've got another collection over here on my phone, which is actually running out of batteries 'cause I left it here open all night. So on my phone I've got another collection and that collection is coming in as images for posting right here, 02, and then here's one from the phone that's 001 iPhone captures. You see that one? So anything I capture from my iPhone will end up inside of this collection on the phone, on the iPad, and here on the computer. So if I really want something to show up at the top, just put a number at the front. Otherwise, for instance, I also have a set of portfolio stuff. And notice that I say portfolio, documentary portfolio, portfolio kids. That way it all is together. So if I'm ever looking for portfolio stuff, then I go back to my iPad and I can see all of my portfolio stuff is together right next to my prog work website images. Okay. So let's go back to collections then. So let's make a collection and what you'll notice is that all of the images that we shot today go into a very special collection, and it's a collection that Lightroom will make on it's own. So the second you do something on your iPad and start sending it back to your regular Lightroom, once that happens, Lightroom will make this folder called from LR mobile. That set will be made on its own. You don't even have to make it. It'll just happen. And then from then on out, everything that comes from the cloud to your system will end up in that set and it will be named based on the collections that you make here. So going back to my iPad, if I wanna create a collection set from the iPad, and at the top right-hand corner you can see a plus, if I click the plus button I can name the collection. So let's name this collection and let's just call it favorites, right? And hit okay. So now it made a collection here. So now that collection, if I were to take, I really like this image right here. So if I were to take this image and say I wanna copy that into my favorites folder and hit okay, now I've got a collection in here with favorites. So that 004 right here, that has a favorites in it. And it already synced it up to the cloud, so then when we come back over here to the computer and we go to our, where's our front light? There it is. Okay? And see that favorites is already there? And that photo is there. Now, once you have images in your iPad and images in your computer and on the cloud because they're already already there. Everything's already there. If I move stuff around and copy things from place to place in collections, it takes no time. It doesn't have to send that photo back. All it does is send information of like 30 kilobytes. Then it says hey, take that image number whatever and put it also in this collection. Boom, done. So that's why it happens so quickly. But it brings it down. And so the collections that you make here get put in from Lightroom Mobile. But any collection, doesn't matter where you are, see how all of these collections are outside of that from Lightroom Mobile? They can be synced up no problem. And they'll just show up in Lightroom Mobile. But the ones that you make in Lightroom Mobile, those are the ones that come down into this area. So if you're ever looking for something you just made on your phone or on your iPad, it's inside of the from Lightroom Mobile folder set. And it's not in, this is, I made this one. This one right here that says mobile, I made that. Lightroom made this. And then I put this into there, 'cause you can kind of like drill 'em down as far as you want. You can have folders within folders within folders within folders. So that's how they get synced. Now, let's talk about making one here, because we want to instigate creating 'em here on the computer. Because most of the time, and we've been talking about a lot of like incoming, most of the time it's outgoing. Most of the time, you're gonna put your images in the computer where they belong and then they're gonna be broadcast out to Lightroom Mobile. Most of the time that's the way it's gonna happen. And then you're just gonna use this for sharing. You'll be like oh, I'm gonna share this. I'm gonna share that. You're just gonna, you're just gonna use 'em for broadcasting and sharing and looking at 'em and playing with them and wasting time. That's what you're gonna be doing most of the time. Okay. So what I'm gonna do is I'm gonna create a collection. So I go up to the collection area and I hit create a collection, and inside the collection I'm going to choose where it's gonna be first. So let's put this inside of our folder called creative live mobile photography workflow. And then I get to choose some things. So let's zoom in here and see what we can choose. So, first off, if I include the selected photo, then I'm going to make, not a duplicate, but I'm gonna make another, not a version, I'm gonna make a reference to it. So if I click a selected photo and I leave this unchecked, it will just take this image and make another reference to it here. And if I change this one, it will change here. And if I change this one, it will change here because it's the same photo. It's just two references to it. If I instead make a virtual copy, then this one will be the original and this one will be a virtual, which means it's still not actually in existence. It's still looking at this original one, but I can have different settings. I can turn this one to black and white. This one can be color. And if I change this one, it won't change this one. So it's important to think about that when you're making a collection. Do I want any adjustments I make on this one to go everywhere or do I want to have autonomy on this photo set? So sometimes like you might wanna make a slideshow for a client. And you've already got all the images adjusted and whatever and they're perfect the way they are. But then you're gonna make a slideshow and you wanna do some like, you wanna do the whole thing in black and white or you wanna adjust them without changing the original ones 'cause those are the ones that are going on the album and they're perfect for print. So at that point you would then highlight all the images you want to send to this collection and you would take them and make virtual copies so that you could then tweak them for a different use case. Otherwise, don't click this. So those are the two possibilities. I'm not going to include the selected photos, and I can set this as a target location. If I set it as a target location, then I don't have to grab an image and drag it there. I can literally hit the B key for boy, that's amazing, and then if I hit B it will just throw it in there 'cause it targets it. It says this is the place I want all things to go when you hit the B key. So I'm gonna set it as a target location. And then this is the most important one: sync with Lightroom Mobile. So once I do that, I'm gonna call this one boy, is that amazing. And then I'm gonna hit create. So now I've got a boy, is that amazing right there. See that plus sign? That plus sign indicates that it's the target. That's the target. All things that you click B on will go to the target. If I want to change the target, I can right-click another collection and go to set as target collection. And once I've set it as the target collection, see how the plus changes? So I can target one collection and throw stuff in it and then target another one and throw stuff in it, and it won't remove the other stuff. It's just like you're moving the target. Shoot, shoot, shoot. Move the target. Shoot, shoot, shoot. Those images stay over there. Those images stay over there. So it's just a way of throwing stuff into the right barrels. So I'm gonna right-click this, make sure that we set that as the target location, and then I want you to see one other thing. Do you see that little sideways lightning bolt? That means it's being synchronized with Lightroom Mobile. If I wanna turn that off, I just simply click on it. And now see how it's a square? So now it's not being synchronized. That's as much work as you have to do to synchronize with Lightroom Mobile. You can either click it or unclick it. That's it. Synced or not synced. Now, one other thing that you can do, and this is what we did with the collection that people on the web are looking at right now, we right-clicked that collection. Oh, it has to be one that's being synchronized right now. So I'm gonna synchronize this back up. And then I'm gonna right-click it. And I'm gonna go down to the Lightroom Mobile links. And so see how it says synchronize with Lightroom Mobile? Once you do that, I can make that collection public. Once I make it public, then I can right-click it, go here, and I can view it on the web or I can, oh, I didn't make it public. Oh, probably because there's no image in it, but... Anyway, so what we're gonna do here is I'm actually gonna delete this collection because we don't actually want this collection. So let's delete that. And what we're gonna do is we're gonna go to our collection that everybody's looking at. So that collection is right here. Mobile photography workflow. So I'm gonna right-click that one and I'm gonna make that the target collection. Now you're gonna see how easy it is to start adding stuff. So everybody on the web is getting really excited. They're look oh, goodie, we're gonna start to see things. Okay, so I don't know. Maybe that, is that the right voice for the people on the web? Okay, all right, so... So I'm gonna click on there and these are the images that people are seeing currently, but notice that they don't get to see all of those because we only show them what we want them to see. So in this case, I want them to see this because this is one of my favorite photos that I took in a while. So I'm gonna click on this and now they can see that one. Because I set up the rules for how this mobile gallery is being seen and I didn't allow them to see anything except for picked images. Okay, so and you can also see that there are people commenting on things. See that? So that tells you that there are comments to be seen. And if I go to my iPad, I can also see those comments. So if I go to our mobile photography workflow here, there's a little, right at the top right-hand corner do you see that little quote area? If I click on that it shows me all of the comments that are being made. So let's take a look. So I like that photo. Lane likes this photo. William likes this one. So if I click on it, I wanna see which one he liked, I just click on the photo and it takes me to the photo that he liked. And I can see the activity on this photo down, if you look down here at the bottom left-hand corner, I can click on the activity there and I can see, and I'm gonna like my own photo. Is that narcissistic or... Okay, all right. So I like my own photo. And if I wanna communicate with William I can say thanks, Willy. I hope he doesn't mind me calling him Willy, but I don't wanna type William. So see that? So now I'm communicating with William because he liked my photo. Now, if he didn't like my photo then I wouldn't communicate with him. Then I would unfriend him. And that it narcissistic. (audience laughs) Okay, all right. So we're back here on our computer and we're gonna go to, remember, we gotta go to our mobile collection here, the from Lightroom Mobile, and we're gonna click on our DSLR imports, and we're gonna look for our three star images. And this is the image that we wanna work on. So now we're gonna go into the develop module, and let's start working on this image. The first thing that I'm gonna do is I'm going to use a preset. So I wanna show you this so that you get a sense of what can be done. 'Cause hopefully people know what presets are and they're well-past the whole I don't know anything about Lightroom. But if you don't know anything about Lightroom, I have intro to Lightroom courses here, all sorts of Lightroom courses. But presets are a super easy way of taking three or four or 20 settings and putting 'em into a photo really quickly. And so I'm just gonna go to a set of presets that I actually am giving as part of the course. And they are these little black and white ones. No, not these. Where are they? Gotta find 'em. Classic black and white sampler. Okay, so I'm gonna do a classic black and white and I'm gonna tone it. So I'm gonna click on the black and white, and you'll see that what it did is it actually changed the tone curve. See how it changed that tone curve? And then I'm going to click on the toned black and white, and now you'll see that it actually changed the tone curve here. See how it put a point in the red area there and it took the blues down a little bit? So it did a lot of work inside of the tone area to create this look. It's not a, it's not done inside of the tone, split toning. It is inside of this tone curve. So once I've done that, that's gonna be available inside of Lightroom Web. And so people now can go see that if they go to the website and they click on here and they look at this and refresh it. There it's black and white. It's probably still. Anyway, in a minute they'll see that come in and then they can look at it. But the beauty of that is that now I have, even if I can't control those aspects on Lightroom Web, which I can, but even if I couldn't, I can always copy the information and paste it to something else. And we'll show you that editing when we, yeah, when we get back.
Class Materials
Free Download
Bonus Materials with Purchase
Ratings and Reviews
JIll C.
I was able to participate in the live taping of this course in the CL San Francisco studios, and it was a great experience. Jared is an enthusiastic, entertaining and very knowledgeable trainer as well as an accomplished photographer. He not only understood every aspect of the Lightroom mobile technology, but was able to advise us on how to adapt it to our needs and develop an efficient workflow to leverage the capabilities of this emerging technology. There are complexities of the interface between your mobile devices, the LR Mobile Cloud, and your primary computer that would be challenging to figure out on your own, and I highly recommend this course as a way to provide a clear picture and help you develop a path to adopt this very useful technology. Whether you're a high volume professional photographer or an avid hobbyist, you will find ways to incorporate LR mobile into your workflow as a result of this very informative course.
Tracey Lee
Great course for those who are new to Adobe mobile products or for those who want to understand how to implement an organised and efficient Adobe Mobile Lightroom Workflow. I was in the live audience and over two days Jared covers everything from beginner to advanced in a logical sequence with clear demonstrations, excellent supporting visual materials, detailed Q and A and a fun and engaging delivery. I'm really excited about what is possible! Definitely worth buying and watching from start to finish.
Rick
This class is ESSENTIAL for anyone in photography. Jared's teaching style, humor and sheer knowledge have me so excited about everything I can do with Lightroom Mobile and all the FREE Adobe CC for products that go along with it. I am currently reorganizing my entire LR catalog in order to utilize these tools for my past, current and future work. I cannot emphasize enough the amazing value of this class. I was lucky enough to be in the audience for this class and had such a fun time. So many aha moments. He really knows how to make a seemingly complex subject simple and easy to use.