Lessons
Course Introduction
1Welcome to Class
00:50 2Why Are Smartphone Cameras Awesome?
02:10 3The Course Challenge: Capture Your Day in 5 Photos
09:03Camera Basics for Mobile & Smartphone Photography
4Intro to Camera Basics
01:14 5Exposure
03:56 6Focal Length
01:46Depth of Field
02:49 8Lighting
02:04 9Flash
01:15 10Resolution
01:50 11HDR Mode
02:33Mobile & iPhone Photography Basics - 3 Creative Keys to a Great Photo
12Intro to Photography Basics
00:37 13Improve Your Photos with Composition
04:29 14Improve Your Photos with Lighting
03:09 15Improve Your Photos with Story
02:40Let's Practice iPhone Photography! Real World Photography Lessons
16Intro to Our Photo Demonstrations
00:42 17Choosing the Right Lens
04:11 18Composition Practice
03:36 19Composing a Subject in Multiple Ways
05:57 20Long Exposure Practice
06:30 21Panoramic Practice
03:35 22Portrait Practice
09:14 23Getting a Blurrier Background without Portrait Mode
03:50Key Advanced Mobile & iPhone Photography Features
24Intro to Advanced Features
00:23 25Panoramic Mode
02:24 26Portrait Mode
02:16 27Selfie Mode
02:02 28Timelapse Mode
03:31Editing and Apps for Mobile & iPhone Photography
29Intro to Editing Section
00:40 30Storing Your Photos
02:23 31Our Favorite Apps
02:07 32Basic Photo Editing Method
27:52 33Editing with the Lightroom App
04:41 34Editing with the Snapseed App
03:34 35Editing with the VSCO App
04:00Sharing Your Photos
36Intro to Sharing
00:38 37Posting on Social Media
03:32 38Printing Your Photos
03:55Course Conclusion
39Thank You Video
00:49Lesson Info
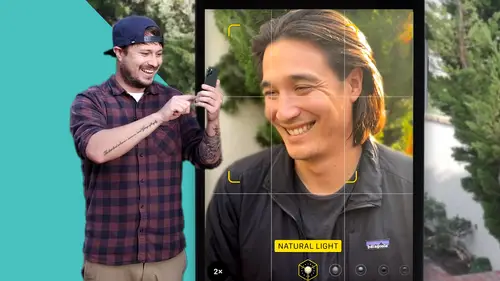
Portrait Mode
Portrait mode is something that when I first saw it, I was really amazed by the idea that I could have such a sort of cinematic, you know, dynamic looking professional photo from the phone. Uh is just, yeah, it is incredible to see. Now as we talked about this sort of depth of field created is computer generated. It is not actually from a lens or from the F stop that's creating this depth of field. It's that it is seeing that there's a person in frame or the subject and there's stuff behind it. And so it blurs that out and you can even go in and adjust in portrait mode on some cameras. Now, the amount of blur you want. So how out of focus is the background and that's really what we're talking about when it comes to portrait mode. It's that we're focusing on a subject and everything else in the frame becomes blurry or out of focus. So that, you know, the the portrait, the person is the main and clear subject of the photo. Now there's a few times that I see portrait mode not working grea...
t. Sometimes if you're taking it of not a person. For example, the algorithm can't really figure out what it's supposed to focus on and what it shouldn't. And so you can tell there's several of these splotchy areas around it that are some out of focus and some info. So the main thing when using portion mode is to really make sure that it looks good while you're taking the photo, um you can do this by just sort of checking. So the outline of your subject making sure that everything looks like. You know, there's a clear line between what's in focus and what is being blurred by the camera. Now, the only way to really work around this is to sort of move your subject, move your camera, find the sweet spot when it looks like the background is blurred and just the subject is uh in focus and this is really gonna shine when you're more or less you know, focused here serve like this shot. This would do really well as a a portrait mode photo. So that's the basic, just a portrait mode. I really think that this is a cool feature of a lot of smartphones and something that you should play with uh down the road because it can make your images look as if you're using a very high end camera, even though it's just your smartphone.
Ratings and Reviews
user-d195e3
Good course for everyone starting out and needed to have some more basic info beyond the common snap shot. I had wished for more info on using mobile in the more professional field like when switching from camera to mobile. Additional lenses and flashes and things like that. But this course was obviously not targeted at this. So overall still a nice brush up.
Joanna
Definitely geared to beginners, but the class has a lot of good information. As an advanced camera photographer still trying to get to know my phone camera better, I learned a few things I didn't know (like you can use portrait mode for selfies, what hyper lapse is and the VSCO app). Nice job!
Barbara
Great class. Well organized and clearly presented. Would be very good for beginners and mid level users. highly recommend.