Lessons
Course Introduction
1Welcome to Class
00:50 2Why Are Smartphone Cameras Awesome?
02:10 3The Course Challenge: Capture Your Day in 5 Photos
09:03Camera Basics for Mobile & Smartphone Photography
4Intro to Camera Basics
01:14 5Exposure
03:56 6Focal Length
01:46Depth of Field
02:49 8Lighting
02:04 9Flash
01:15 10Resolution
01:50 11HDR Mode
02:33Mobile & iPhone Photography Basics - 3 Creative Keys to a Great Photo
12Intro to Photography Basics
00:37 13Improve Your Photos with Composition
04:29 14Improve Your Photos with Lighting
03:09 15Improve Your Photos with Story
02:40Let's Practice iPhone Photography! Real World Photography Lessons
16Intro to Our Photo Demonstrations
00:42 17Choosing the Right Lens
04:11 18Composition Practice
03:36 19Composing a Subject in Multiple Ways
05:57 20Long Exposure Practice
06:30 21Panoramic Practice
03:35 22Portrait Practice
09:14 23Getting a Blurrier Background without Portrait Mode
03:50Key Advanced Mobile & iPhone Photography Features
24Intro to Advanced Features
00:23 25Panoramic Mode
02:24 26Portrait Mode
02:16 27Selfie Mode
02:02 28Timelapse Mode
03:31Editing and Apps for Mobile & iPhone Photography
29Intro to Editing Section
00:40 30Storing Your Photos
02:23 31Our Favorite Apps
02:07 32Basic Photo Editing Method
27:52 33Editing with the Lightroom App
04:41 34Editing with the Snapseed App
03:34 35Editing with the VSCO App
04:00Sharing Your Photos
36Intro to Sharing
00:38 37Posting on Social Media
03:32 38Printing Your Photos
03:55Course Conclusion
39Thank You Video
00:49Lesson Info
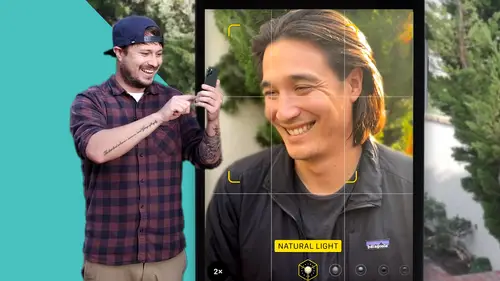
Portrait Practice
We're here out in the field and I wanted to show you uh some tips and tricks for taking portraits with your phone. Now, when you're, you know, when you have a mobile phone with you all the time and you're hanging out, um a lot of times you're taking pictures of your friends and family and such. So let's take a picture of Sam and uh I'll show you some cool tips and tricks to do this. So first of all, I have him sitting, we're in shade so we don't have to worry about exposing. And right now I'm in the middle uh lens right now on the camera. Now we get a full body photo which we can take, but it's not as, you know, I don't know, intimate. It's not saying a lot, let's move in a little closer and see. It's, it's a little tough when we get too close because we see, we start to see some Boeing and you know, when you look down on someone or have a weird shape, it kind of distorts the image a little bit. You can see his body is a little uh you know, it becomes smaller towards the bottom. Um We'...
ll have him sit up, we'll have him smile, smile, Sam. Cool. So I'm, I'm, I'm more facing down on him because it's a little more of a flattering position to take a portrait. We could be like this and take a portrait. It says a little bit, something different. He's a little bit more, I don't know, menacing or a little bit more uh in your face a little bit harder. And now this is never really the best flattering shot. Sam looked down at the camera so he knows it's a bad angle. So he's not looking down. So looking down, not the most flattering of angles. So I would say off the bat being right on level or just a little bit above is usually the best angle. Smile, Sam and then we also have him, he's already automatically doing it because Sam is such a good model and a photographer. But typically people are gonna have their face straight towards the lens, right. This is the normal shot that your friends are gonna do now to adjust that you wanna pose them just a little bit. So Sam, yeah. Can you turn your right shoulder towards me? Can you move your head this way? A little bit to your left and keep your eyes on me and tilt your head down just a little bit. There you go. Big smiles. Yes. See. So now that's like that's a really quick way to pose again, taking them off kilter, right, bring one shoulder towards you, taking their face away, but keeping their eyes on you and smile and sometimes heads tilting down just, just a little bit is good. Now, um, a lot of aesthetic sometimes if you're doing a higher end models will have him look, Sam. Can you look right at camera? Just open your mouth a little bit, that's a little bit more of a fashion sort of look, um, less expression, more just kind of in the moment. Now, we're taking this on the middle, on the middle lens. What if we punch in? So this is the long lens, right? This actually looks nice and we can actually step away, which makes your subject a little bit more comfortable, same pose, tilt your head down a little bit. Sam smile, smiles. There you go. So you can see our background has sort of shifted a little bit and we don't see as much bowing, right? Because the lens is longer, it compresses it a little bit and we don't get that sort of wide weird angle on the outside like you see here. So again, long lens, close lens. So we're back on our camera mode and you can see the phone itself is trying to detect the face. Now that's doing it for exposure and it's doing it for focus. Um That's a really cool automatic feature of a lot of phones as they become face detected. So we'll turn away and we'll look right at Sam and see it automatically detects his face and it focuses and exposes to that face. Now, we talked about portrait mode earlier. So let's move into portrait mode immediately. We've jumped to the lens and we're close up, but look how out of focus the background is and look how there's a square around Sam's face. Now, we can immediately take the picture Sam looking at us smiles and we can see now that this photo has a blurry background, a sharp foreground of Sam and it's creating that depth of uh field, look in camera um in in phone really. So you can see though if we get too close portrait mode will still work and it is detecting where it thinks the out of focus and focus should be. Now, it just depends on how your camera adjust to it. We can step a little further away and it's gonna start to get lost a little bit. But the background again, the background is still out of focus and our subject is in focus and it's doing this in the computer itself real quick. If we actually went to edit, we could completely adjust uh what we see as, as as you can see here, we can see where the computer is finding our subject and cutting it out. Now, this is just a way of editing an app and also in the upper left, we can actually change the F stop. So this would create more things out of focus, more boca if we move all the way other side, more things in focus. And it's the other way, slowly shift it how the things in the background get out of focus. And that's an aesthetic that is looking more professional, looking, more beautiful in some people's eyes. Um And the way that a phone can really up your photography in my settings, I can go and turn on grid right here. So now that we're in grid mode, we'll come over and we'll see there's a grid now over my screen. Now I'm gonna zoom in and you can see how it's basically again referring to our rule of thirds, right? For portraits, it kind of depends on your style, right? You can be something really interesting and putting them putting Sam at the intersection of the bottom third grid or we can have him dead center, but I'm still putting his eyes at the intersection of the top third and the left third just because that's a little bit more aesthetically pleasing at me. And it's really nice as you can see having that photo, uh look like a really well composed photo. And using the grid will sometimes help you figure out um what's looking good and what's not good until you're used to framing things up even like this. Something with some space behind him looks pretty good, right? It's a little bit more interesting. It has some more leading lines. Um And uh and yeah, it's like super helpful. So now let's put Sam in a more difficult position as far as lighting goes. We're here with Sam and step in the shade. Yes. So I wanted to put him in a sort of hard light situation. So step back, Sam. So you can see how our video camera can't handle that highlight, right? That's not a good look on Sam and still seeing me in the shade. So when he moves forward, he's fine, right? So now let's look at it on the phone here on the phone, Sam's in the shade. It's an OK photo. The background is we'll move it in the portrait mode. The background is cool kind of basic, right? He's got this nice red or a nice like kind of halo light behind him. Sam moved back into the sun and now you can see the the phones trying to adjust to actually try and get all that information in, but it's not that flattering. So let's use our posing first to see if we can get over it. Sam, can you pull your right shoulder towards me? Right? So that just positioned him more in the sun. Not great. Can you move your left shoulder towards me and move your head? Yeah, so move your head that way. Yeah, but keep your eyes on me. So that's an OK portrait. But again the sun is hitting his face and there's a lot of contrast and the skin tone is very different. So how do we avoid that? The best thing is a put him in the shade as much as you can. But if you cannot, I always like to have the sun backlighting our subject. So let's move over in this direction, right? So now look at Sam's face, he's got a nice halo on his hair, his face is nicely exposed. He's got tons of hair and he's got a good smile. See now that's a good shot, right? We've kind of achieved uh a way of around this hard light. Now, if you want to get more creative, you can move into the light and kind of get a fun little flare. Sometimes cameras don't necessarily like that. You can kind of position it around and move it around till you get something like that and then move it in the portrait mode. You see the camera is still trying to find the background. Again, pretty cool. We're getting a flare. So it's a little flat. You can see how when I cover my hand with it, that flare goes away and we get a more flat image. So we'll try to move the camera out of the sun and take a picture of Sam smile. What a smile. So again, it's really nice. Let's look at this photo. This is really great because we're getting this nice highlight on the back of his head and his whole face is exposed correctly. The background is blurry out of focus because we're using portrait mode. So again, the tip for me um and not just using your mobile phone, but working with your subject, working with your lighting, having the sun back light your subject when you can and having their face be in complete shade or at least singly exposed if we move to the other side and shoot Sam, not only can he not see, but as soon as I move my ha my camera to where it would be a good shot, my my shade is on his face which is not great. So the idea is singly exposed away from the hard light. Um If you can, if you're trying to be creative and get, you know, interesting shots, you could always do something like this where you're trying to expose and see the eyes. Like there are reasons for doing that like that's a pretty cool shot, but in general portraits even face sun backlighting. So that's the best way that you can start to take great photos of people with your mobile phone. The best thing to do is just go out there and practice and uh like everything else. Try try, try again and you'll learn real fast. So let's go on to the next lesson.
Ratings and Reviews
user-d195e3
Good course for everyone starting out and needed to have some more basic info beyond the common snap shot. I had wished for more info on using mobile in the more professional field like when switching from camera to mobile. Additional lenses and flashes and things like that. But this course was obviously not targeted at this. So overall still a nice brush up.
Joanna
Definitely geared to beginners, but the class has a lot of good information. As an advanced camera photographer still trying to get to know my phone camera better, I learned a few things I didn't know (like you can use portrait mode for selfies, what hyper lapse is and the VSCO app). Nice job!
Barbara
Great class. Well organized and clearly presented. Would be very good for beginners and mid level users. highly recommend.