Lesson Info
13. How To Create Mockups
Lessons
Class Introduction
06:54 2Document Set Up: Save The Date Card
03:05 3Create And Place Type: Save The Date Card
10:35 4Add Watercolor Clipping Group: Save The Date Card
08:23 5Add Texture: Save The Date Card
05:31 6Add Glyphs And Graphics: Save The Date Card
08:03 7Add An Image Save: The Date Card
06:35 8Layer Masks: Save The Date Card
08:24Lesson Info
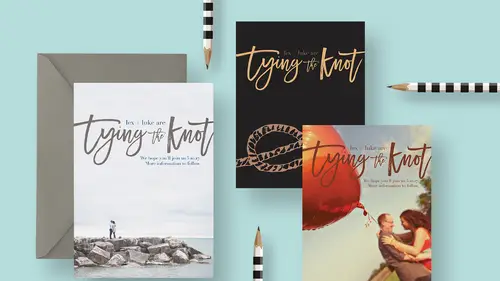
How To Create Mockups
Last but not least, I wanted to show you about mocking up your design pieces. Because if you're trying to sell this stuff, it can be pretty tricky to just send someone a flat JPEG file and be like, "Hey, here's your design." And I mean it works, but you're gonna try to sell the stuff on Etsy or something like that, you need to up your game a little bit. So, you're gonna wanna start making mock-ups for your pieces. So let's take a look at what mock-up looks like. Let me get rid of some of these opened files. Boy, I have a lot of them. Okay, so let's pop up over and take a peek. Okay, so here is an example of a finished mock-up. I'll show you a couple, and then I'll show you one that I included for you, and then also how you can also make your own. Okay, so here is a mock-up of that senior announcement. You can make your own mock up pretty easily or you can buy mock-ups. This happens to be a mock-up that I bought from creativemarket.com. Also, there's a link to it in the resource guide. ...
Really, the best thing about this mock-up was the pencil. I just love this fun striped pencil. The background is just flat. The card here itself, I mean that's just your document with a drop shadow behind it, and then there's an envelope. So, that stuff is pretty simple. But the way that it works is you'll usually get, in most cases, with most mock-ups, you'll get some sort of layered PSD document and it will have a file that will say something like your document here, whatever. And you just double click that file and it opens a smart object document. And then you just put whatever your mocking up into that document. Now that I've closed everything, whatever you wanna put in here, you just paste it in and then you save and close this file. So let's do something. Let me open one of those. Let's do one of our water color. Let's go back up. We'll go to our finished and I'll just show you one that we had done here. So, let's say we want a mock-up like this. So I'm gonna open the Save The Date. Okay? The easiest way to do this without shuffling and dragging things around is just to press Command or Control + A to get marching ants around your whole document. And then instead of Copy, what we wanna do is Copy Merged, because otherwise you're only gonna get a copy of whatever layer is active, which, you know, there's a lot of layers going on here. So, we're gonna Copy Merged. So Edit, Copy Merged. Then we go back to that smart object and we Paste. And we may have to resize, depending on what we're mocking up and where we got the template, and blah, blah, blah. So there we go, now all I have to do is save and close this smart document, and then we go back to our mock-up and look at that. It's been replaced. So we didn't have to drag and drop. We didn't have to clip anything or mess around with layers. We just double click the object that we wanna replace. We double click this smart object and we paste in the new thing and it's done. So that's usually, when you buy a template, that's usually how it works. And you'll see a lot of other messy stuff going on in the file and you can just ignore most of it for most of the time. So here's just a few more examples. Here's the birthday one that mocked up. And I even went and mocked up the envelope too. So that's kinda neat. Let's take a look. This one I actually included in the resource guide for you so that you have a mock-up that you can practice with. So I actually made this one from scratch using a photo of an envelope, using this background image, this wooden desk image that can from unsplash.com. And then this coffee mug also came from Unsplash and this plant. So I'm gonna show you how I did all of that quickly, and let's see. Let me grab, I think the only thing I'm missing is the picture of the envelope. It was in the wrong folder, okay. So, to be fair, I'm starting with just a flat JPEG of this envelope, okay? So we're gonna make a mock-up and here's how we do it. I've noticed just having played with this file a while now, I noticed that there's this weird pink color happening, like it's got some weird coloring going on. And rather than try and correct all of that, I'm just gonna get rid of it by desaturating this whole image. So, the keyboard shortcut for that is Command or Control + Shift + U for Unsaturate. Or if you like to go the long way, you can do Image, Adjustments. Where is it? Desaturate or Remove Color. I don't know where it went. This is why I do it the long way, or the shortcut way. You can also pull up Hue Saturation and just suck all the color out like that. So, whatever floats your boat. Okay, so we're gonna get that marquee selection tool and I'm just gonna select the envelope. We could try to get the white background and use the magic wand and all of that, but it would probably make a little bit of a jaggedy edge. And in this case, this is gonna work just fine. So I've got my selection and missed a little bit because sometimes I do that, so we can transform that by going to the Select menu and using Transform Selection. Sometimes I think, with my pen, there's a little bit of a shake that happens between when I pick up the pen, and I mess it up a little bit. So, I've got that selected. It's better to err on the inside edge, rathe than on the outside. So I've got that done. I'm gonna get the Move tool. I'm gonna put my cursor over here and just drag this into... Where are we going with it, with our background? Hold on. Let's close some of these messy files everywhere. You don't need all of these, too much stuff. That's our finished one. That's so pretty. Okay, we can close that. Oh, we didn't have it open, no wonder. Okay, so we're gonna start with this and we'll open this and our two plants, so you can see how this works. So I'm gonna do it for you on camera right now from scratch. Okay, envelope. There we go, and we're gonna go to, I guess we'll just go to this wood panel scene. Before we do it, I wanna see what size it is because, whoa, it's huge. Let's say we don't wanna make it that huge, because probably our envelope is not gonna be that big and it'll just cause us a hassle later. So let's size this. Since we'll make this our base document, we wanna size it to something usable. So let's just say something like 1,800 pixels. I think that's plenty big for a mock-up. Okay. Now we get our envelope. There it is. And we'll go to our image, okay. So I'm just gonna click and drag that in. It's gonna be too big, which is good. We'll scale it down. Now you can decide what kind of mock-up you want, where you wanna place this. Is it horizontal or vertical? It's really up to you. In this case, I'm gonna go ahead and rotate it guess. So we'll get something like this, and that looks nice already. We're gonna add a quick drop shadow. So with that layer active, we'll go ahead and name it Envelope. We'll add a drop shadow by clicking the Effects button down here at the bottom and adding Drop Shadow. And here is where we get to decide exactly how we want this to look. So the Size slider is gonna basically determine how soft and fuzzy or how hard edged your shadow is. So, I want it to be pretty soft because this is just how these things tend to be. So, that looks good. So, just the Size accordingly. The Distance determine basically how high off the background your envelope is floating. Is it way up high or is it pretty much on the background? That's up to you. I'll just do something, I don't know, like that, and I'll reduce the opacity a little bit. And let's make this global light so that it's gonna be... When I have that Use Global Light checked on, that way all of the light will match for all the different objects that we put in here. Okay, so there's our envelope. Let's just close this. What do we want to mock-up? Now that we've closed everything, let's say that we are going to mock-up this, I guess. We'll open this. We'll do Command or Control + A to select everything, Edit, Copy Merged. We'll close it. Let's close that. And alright, so we're back here and I'm just gonna Paste. And it's gonna be big. So again, that's good. So we'll scale this down so that it fits like relative to the envelope. So I'm gonna make it a little bit tinier than the envelope because that's how it needs to be in real life. So something like that I think is good. Maybe we put it here. And we just wanna add that same drop shadow that the envelope had. We wanna add to our mock-up. So we'll call this Mockup. So I'm gonna hold down the Option key and drag that drop shadow to our mock-up later. If we wanna make this easy to mock-up later, we are also gonna go to the Layer menu and choose Smart Objects, Convert to Smart Object. And that will allow us later to just paste something in to this place if you wanna make a different mock-up. So that looks pretty good. Let's get this plant. I'm gonna grab the elliptical marquee and just click and drag to select this plant. Now the way that this tool works is as long as you hold the mouse down and don't let go, you can adjust your circle. So once I let go of my mouse, it's game over. So with that in mind, click and hold to drag out this elliptical shape. Keep holding your mouse down. While you continue to hold your mouse down, you can also add the space bar, and that lets you drag your cursor and reposition it on your screen. And then I can keep holding my mouse but drop the space bar, and now I can stretch it if I need to resize. So it allows you to fidget and really get this where you want. So, something like that. Oh, but let's include this little blip. You see the plant that blips out of there? Let's use something called quick mask mode to get over there. So, to enter quick mask mode, I'm gonna press Q on my keyboard. And you'll notice that my selection area, the area that's not selected turns pink. So this is called quick mask mode, and it's gonna let me use my paintbrush. So I'll grab my paintbrush tool. I've just got a round brush. I wanna make the brush smaller so I'm gonna use the left bracket key. So next to the letter P on your keyboard, you've got two brackets. The left one makes your brush smaller and the right one makes it bigger. And I want my brush to be pretty hard edged, so you can use Shift + left bracket to make it softer. So if I hold Shift and I hit left bracket a bunch, you can see right here that the brush gets softer. Or if I hold shift right bracket, it gets harder. So I wanna hold shift right bracket to make it hard and make it tiny. And now by painting it, you see with black I'm adding pink, but I want to actually remove this pink from the top of this, this little plant. So I'm gonna swap my colors so I've got white on the top. And now I can just paint this away. So this allows you, this quick mask mode allows you to take a simple selection made with the elliptical marquee tool. And it allowed to alter it by hand to accommodate something like this. So now I press Q and now my simple marquee selection has a little bit of a sploop. That's a very technical term. Has a little bit of a blurb up there, or blob, that's gonna include this plant. So it just is a little more fine tuned now. Now, I'll get my Move tool and we'll click and drag this over into our document and it's huge. That's good, we'll scale it down with Control + T. I don't know how big of a plant this should be. I don't know. You can do what you want when you make your own. So in your file, I believe you have a finished version, and then I also gave you the source file so you can also make your own. Alright, so that is looking good. Now this is gonna also need a drop shadow. So let's Alt or Option drag to put a drop shadow here. Now this one, because it's a vertical object, it's gonna have move of a cast shadow. So we're gonna alter this cast shadow. I'm gonna uncheck Global Light so we can make this taller compared to the rest, because it's actually standing in the scene. So, I'm unchecking Global Light. And look at this, you can actually come in your document and just click and move the shadow around. Look at that. So, that's changing the angle. So I could change the angle or I could just drag this where I want. But the angle actually can stay the same. It's just that we want the distance to be bigger because it's actually a vertical object, or we're trying to make it look that way. So, I'll fade this down though. I don't want it to be so high. That's probably good. We can get rid of that, not save it. And then same thing, we do the same thing with the coffee cup. So get that elliptical marquee. Oh, somehow I already did that here. Oops, I saved that with a layer in it. So you just get the elliptical marquee and you do the same thing. You make that same selection and drag it over. So, I've already got that. So, lucky you, you don't even have to do that. That needs to be smaller. Maybe we turn it something like this. Oh, no, now we're messing with the shadow, so let's leave that. Same thing, we're gonna copy this Drop Shadow, Alt or Option drag. Now, that's a little too much for this layer. So I'm gonna double click the Drop Shadow effect to pop up this window, and that allows me to edit it. So this was maybe not as tall as the plant. So we'll just reduce that Distance a little bit. There you go, something like that. You had to fiddle with it. The idea is you want to make the light match around everything. And then maybe what we wanna do is add a bit of a vignette to this whole thing, because the background here has a vignette, and so it looks a little weird. I feel like we should have shadow around all of this. So, we'd wanna do a lens correction, which is under the Filter menu. So if we come up to Filter, Lens Correction, and then we can come in here... Oh, except I'm on a blank layer. Is that gonna work? Not on a blank layer. We could fill this with gray. Let's do an Edit, Fill. We're gonna fill it with 50% gray and then we'll add a vignette. So let's go to the Filter Menu. We'll do Lens Correction, Custom. And the vignette amount, we want to darken it. So we're gonna drag it to the left like this. So we get this nice black edge. We'll go ahead and click OK to turn that off, and then we can change this blend mode to overlay. Perfect. And what that does, by changing the blend mode to overlay, it gets rid of the gray and we're left with just the vignette. So you can see when I turn this vignette layer on and off. Do you see how it adds a bit of a shadow on top of the plant and everything? And it just makes it look everything maybe belongs together and wasn't such a mocked up piece, if that makes sense. So, there you have it. That is a quick and simple mock-up. There's so many ways that you can take your mock-ups to the advanced level. You can see in the one that I made you that we actually have the invitation tucked in behind the envelope a little bit. So, that's another advanced thing that you can do. There's a lot you can do with your mock-ups to have a lot of fun and really showcase your final designs. So, I hope that this had been enlightening and encouraging. And I just wanna make sure to remind you that experimentation is key and this stuff takes a long time. It takes a long time to find designs that work. And ways to combine everything that work well together. So don't be afraid to include that in your pricing, in your estimates when you're doing this for other people. So you got take care of yourself too. So thanks so much for tuning in and make sure you share your work on Instagram and tag me, Kay Plitanage. I would love to check it out. So. thanks so much for joining us.
Class Materials
Bonus Materials with RSVP
Bonus Materials with Purchase
Ratings and Reviews
Nova
Khara is a brilliant instructor and I learned so much to improve my business. I'm running wild in photoshop with the tools and approaches that I gained from this amazing course! Thank you!
April S.
I have a Photoshop Bootcamp that encompasses a few weeks of learning but I just haven't had the time and focus to sit down and go through it even though I know there is a ton of useful stuff for me in it. One thing I have wanted to do for awhile is to design cards using some of my photography and graphics/lettering. Khara's Invitations in Photoshop class goes right to the heart of what I needed to know in PS for this specific kind of project. I am not a complete newbie to PS but seeing her use various functionality in this context hit home for me. I'm glad I picked up this course and look forward to working on some of my own cards. Khara's is well-prepared and direct, she speaks well, is clear, gets right to the things you really need to know. In my opinion, she's a very good instructor for the Creative Live teaching format.
user-f9ff5e
Khara packs a lot of info into this 2 hour class. She has the right balance of being friendly and conversational yet stays focused and on- topic. She shows several ways of doing actions or accomplishing a task. What I like the most is how she sometimes backs up and reviews what buttons she pressed or actions she just did. Even if you have been doing PS a while, you might learn some new shortcuts or new ways of doing a task. I could have written 4 or 5 pages of notes easily on tips. Sometimes she is a little fast and I couldn't see what exactly she did, but if you buy the class it would be great to pause and rewind a section several times. I would put her up there with Dave Cross as one of my favorite PS instructors who pack in info and won't put you to sleep.