Lessons
Class Introduction
06:54 2Document Set Up: Save The Date Card
03:05 3Create And Place Type: Save The Date Card
10:35 4Add Watercolor Clipping Group: Save The Date Card
08:23 5Add Texture: Save The Date Card
05:31 6Add Glyphs And Graphics: Save The Date Card
08:03 7Add An Image Save: The Date Card
06:35 8Layer Masks: Save The Date Card
08:24Lesson Info
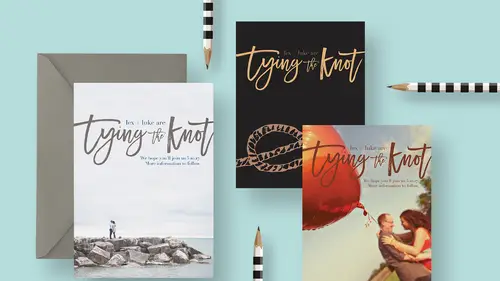
Add An Image Save: The Date Card
Let's go ahead and grab a photo to try tossing in here. We have a number of things we can try. These are images from unsplash.com. So you can always go there and download some stuff. We can try this one. This is a horizontal image and we are gonna try it in a vertical space. So not every image is gonna be a good candidate for this, but we're gonna give it a try. So I'm gonna click with my move tool and I'm gonna click and hold my mouse down while I drag up to the tab for our card right here. I'm still holding my house down. Then I'm gonna move my cursor into the image and now I'll hold shift while I drop the mouse. Now it's gonna throw that image in there. Now we obviously don't need the knot on here any more, 'cause we're gonna use a photo. And the photo comes in way huge, so that's a good thing. It's better to have more pixels then not enough. So we'll scale it down by again by transforming it. So command or Control + T. I can't even see the edges of the box, 'cause it's so big. So w...
e'll press command or control the number zero. That scoots us back enough to see that. And then I'll hold shift to scale proportionally and alt or option to scale from both ends at the same time. And I'm just gonna drag into something about like this. And I'll go ahead and commit it. And then it's as simple as maybe we select all this type, by clicking and shift clicking in the layers panel and then I'll use my move tool to just move that down here. And I think we could even keep those same colors, 'cause it's easy to read on their clothing. But if we couldn't then, it's as simple as just changing the colors of the type. One thing I wanted to also show you, let me grab one more image, that's also horizontal and we'll do the same thing. So we'll drag this. My move tool, I'm clicking, holding, dragging. I have a lotta images open now. (laughs) Transforming, shift, option, dragging. Okay, so I'm gonna basically get this in place. But here's the problem that you run into sometimes and I'm gonna show you one way to deal with it. So if I put this image like this, this image is just busier and you can see now that it's really hard to read this type because she's got this watch and bracelet and the pattern on his tie, it doesn't lend itself to having type down here. So there's a couple ways that you could deal with this. In this case, I would try something like, we can try putting like a faded gradient on this. So what I'm gonna do in the layers panel is click this button down here to add a new layer and I'm gonna reset my colors to their default by either pressing d on my keyboard, or you can click this little button right above your swatches in your toolbar. That's set's it back to black and white. I'm gonna grab this tool right here. This is a gradient tool. You can also just press g for gradient on your keyboard. And if you come up in your options bar, you'll notice that there's all different kinds of gradients. The first two are dynamic and they change based on what colors you actively have in your foreground and background swatch. So that's why I wanted black back as my default. And this second option right here, creates a gradient that transitions from black into transparency. So that's what I want. So I'm gonna double-click that. And I wanna make sure over here, these are the different styles of gradients. I just want this first option, which is a linear gradient. Okay, so I've got a blank layer, I've got black foreground, my gradient tool, and I've got the second gradient option chosen right here. So to use this, I'm gonna position my cursor at the bottom of the image. I'm gonna click and hold mouse and I'm gonna drag upwards and I'm gonna release maybe about here. And this just takes some experimenting, to see how far you wanna stretch this gradient. So what it's doing is basically creating a like a black sort of shadow down there and then that creates more contrast. So that looks nice without how having like a block on here. So if I feel like that's a little strong, I can just come in my layers panel and then dial down the opacity a little bit. Like I think that looks pretty, that looks pretty good. And you can see that it was just enough that it increased the contrast. So here's without it. Trying to read that type is really hard. And here with it, you can see it's much easier. So that's one way to deal with that. So we have a question coming in from the internet that says, where do you download special fonts. Are they on a special license? Does it matter when making invitations for clients? That is a great question. Yes, it does matter. So free fronts, doesn't mean you can do anything you want with them. If you get a free font, you wanna make sure that you are able to use that font for commercial purposes. So if you're making anything for a client, that's a commercial purpose. If you're creating a logo, that's a commercial purpose. So all of those things would, you'd wanna make sure you have the license to do that. And you may or may not with those free fonts. One of the places that I like for free fonts is called dafont, d-a-f-o-n-t.com. So they have a lotta free fonts, but you always have to look. It'll say, you know, maybe it's 100% free, which then I guess you can do whatever you want with it. Or they'll often say free for personal use, in which case you have to buy a special license to do commercial work. When you're buying fonts, they usually will include a commercial license, but it might have restrictions. Like if you wanna design a t-shirt with that font, if you want to produce more than 5,000 shirts then you need another license. So just read the fine print of wherever you get your fonts. Just read what comes with it. There's usually a little read me file and it'll tell you how you can use it. So you wanna make sure that you're being responsible and respectful of other people's rights and copyrights and all that.
Class Materials
Bonus Materials with RSVP
Bonus Materials with Purchase
Ratings and Reviews
Nova
Khara is a brilliant instructor and I learned so much to improve my business. I'm running wild in photoshop with the tools and approaches that I gained from this amazing course! Thank you!
April S.
I have a Photoshop Bootcamp that encompasses a few weeks of learning but I just haven't had the time and focus to sit down and go through it even though I know there is a ton of useful stuff for me in it. One thing I have wanted to do for awhile is to design cards using some of my photography and graphics/lettering. Khara's Invitations in Photoshop class goes right to the heart of what I needed to know in PS for this specific kind of project. I am not a complete newbie to PS but seeing her use various functionality in this context hit home for me. I'm glad I picked up this course and look forward to working on some of my own cards. Khara's is well-prepared and direct, she speaks well, is clear, gets right to the things you really need to know. In my opinion, she's a very good instructor for the Creative Live teaching format.
user-f9ff5e
Khara packs a lot of info into this 2 hour class. She has the right balance of being friendly and conversational yet stays focused and on- topic. She shows several ways of doing actions or accomplishing a task. What I like the most is how she sometimes backs up and reviews what buttons she pressed or actions she just did. Even if you have been doing PS a while, you might learn some new shortcuts or new ways of doing a task. I could have written 4 or 5 pages of notes easily on tips. Sometimes she is a little fast and I couldn't see what exactly she did, but if you buy the class it would be great to pause and rewind a section several times. I would put her up there with Dave Cross as one of my favorite PS instructors who pack in info and won't put you to sleep.