Lessons
One Light Outdoor Portrait
17:01 2Focus Umbrella Outdoor Portrait
09:49 3Outdoor Athlete Hero Image
10:17 4Cross Light Outdoor Portrait
04:37 5Edge Light Outdoor Action Image
10:21 6Clamshell Light Outdoor Portrait
17:50 7Mid-Air Basketball Action Poses
13:24 8Refine Mid-Air Basketball Action Image
06:44Dynamic Mid-Air Basketball Image
16:02 10Natural Light Indoor Portrait
12:18 11Action Image With Shadows
18:30 12Stroboscopic Action Image
21:11 13Backlit Indoor Portrait
07:39 14Environmental Portrait
06:11 15Incorporate Architecture Into a Portrait
09:30 16Mixed Light Athletic Portrait
10:12 17Cyclist Action Image
17:45 18Adding Motion to
09:47 19Environmental Light for Runner Action Image
17:19 20Add Haze to Runner Action Image
11:11 21Create Your Own Environment
14:50 22Swim Outdoor Portrait Poses
05:18 23Action Images in Water
11:40 24Freeze Motion in Water
06:45 25Selection Process: Basketball
23:49 26Camera Raw Post Production: Basketball
11:47 27Finalize Images in Photoshop CC: Basketball
13:15 28Selection Process: Fencing
13:17 29Capture One Post Production: Fencing
07:05 30Finalize Images in Photoshop CC: Fencing
15:13 31Selection Process: Triathlete
13:43 32Camera Raw Post Production: Triathlete
07:47 33Finalize Images in Photoshop CC: Triathlete
27:42Lesson Info
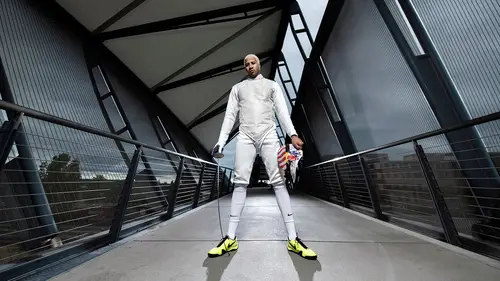
Finalize Images in Photoshop CC: Fencing
So, first thing I wanna do, this thing bothers me so I'm just gonna take it out, over on the left side. This was a location, we were at a school. If I could, I would have taken this off the wall, but we were at a school, and if I wanted to save a little post-processing time I would have taken it off, but we couldn't, so we just do it in Photoshop. I'm using a healing brush right now, just doing a really fast edit on it. If it messes up or adds any lines I'm gonna go back in and fine tune it, but it's doing a pretty good job right now. I'm zoomed in, going back to my healing brush, taking this stuff out. Now I'm back over to his skin, so I'm going to go into a harder brush, zoom in a little bit more, select something that looks very similar. I think it's a little brighter over there but let's check it out. Nope, I'm still down on my opacity. Turn that back up to 100%. It's getting a little dark up there but we'll fix that in a second. Yeah, it's a little brighter on right close to his s...
kin, so we're gonna take from that and then we'll blend it in a second. Okay, so I'm gonna use the healing brush again, blend these spots in. It made a really hard line. Sometime the healing brush doesn't do a good job, so I'm going back in with my clone, and I turn the opacity down to 40%. I'm just sorta blending as I go. I'm getting a weird shadow down here, but we'll leave that for now. I'll clean it up later if I need it. Okay, great, so that's out of the equation now. I think the crop's a little wonky right there so I'm gonna bring that up, bring this over this way a little bit. It's a little tight for my taste. I think I woulda left a little bit more room on the right-hand side. But for now, again, sometimes the moment's a little bit better than the technique. So we're gonna go in, I don't like to take out too many, like, if he has some moles on his face, I won't take those out. If this was a beauty campaign or something, I would do that, but if there's like blemishes, he doesn't really have too many, he's pretty good. He had pretty good skin, like I said, but I'll take out a couple of these things. And I'm just using a healing brush right now. If they look too flat, I'll go in with a cloning brush, but right now it's leaving the texture in quite nicely, so I'll usually do it pretty quickly in here. I'm not looking for greatness on these athlete images. I want them to look like them. I want them to keep the distinguished marks that they have. Some athletes are very well known, they see their face everywhere, and if you take out too much, and you make them look weird, that's just, it's not good. You have a public figure you're working with. You gotta make sure you make them look realistic. So yeah, it's doing a good job with the healing. It's very, it's at a low depth of field. I'm out of focus a little bit, so this is already soft, so it's not really hard to do this with a heal brush. I'm pretty good on this now. I would say maybe right here, it might be a little wonk, no it's good. And you can't really see that so I'm gonna leave it. Nothing on his shirt. Oh, I'm gonna take out this wrinkle too. Just using the healing brush again. Just real fast. Let's see if that does a good job. I'm gonna go into my clone, turn the opacity down, take something, hmm, bright or dark, bright. I'm gonna use bright, try that. Use a little bit overlap there. See how that looks. That looks good. I think it's okay. Now I just wanna keep cleaning it up. I could do this all day. Okay, so, I just kinda sprayed and prayed over there. I'm gonna put Command-Shift-F, and bring down the fade on this, because it's a little much. I'll do something sometimes and then just bring it back if it's way too much. Let me look at his hands. A lot of people forget about hands when they're retouching. He has pretty good hands. If he had like a cut, or some weird fingernail thing, I would take that out, probably. I wanna make him look his possibly his best. Specially if there blemishes and it's not always there, then you want to make sure that you treat your athlete well, or your subject. So again, this is a real nitpicky thing, but I'm just going to grab this highlight right here with the soft clone brush. Actually, make sure it's soft, yeah we're still on soft. So, 30%, and I'm gonna see if I can take away some of this shadow right here, and I'm gonna bring it back down just a little bit more to blend it. Alright, so we're looking pretty good. The next thing I'm gonna do, I'm gonna try to do the whole auto thing. I like it, so I'm gonna leave that. Try auto-levels, auto-color. Neither of them work out really too well. The levels worked a lot better than color. The color turned it a little bit more green, and I don't really care for that. I'm going to increase, I'm going to turn on another layer, and I'm going to actually put it in multiply now. Put it down to 1, and see if I can add in some of that texture back in those hot areas. Yeah, I like that too, so I'm gonna leave that in there. When I use multiplying layers sometimes, it's just so I can add the texture back into the skin. And I'll use multiplier, soft, soft light and hard light the most, out of all those. I think I'm good with this image I would probably just sharpen it, and finish up, but we're gonna move on to the next image. This one's pretty similar to the other one, so I'm not gonna edit it right now, but the first thing I would do again, take this out, take this out, and apply a lot of the same techniques. I would actually leave this a little bit more of the gradient. I like how this, and this sorta like pull you in to the focus right here. This image would be pretty similar to the last one. The first thing I would do here, is I don't like how close his hand is to the edge here, so I'm going to increase my canvas. I'm gonna make that 19, great. It's all black. I'm looking up here. Sometimes if you wanna see where this stuff is, I'll open adjustment layer, and I will just pump all that up. Now I can go through and see exactly where this is. I can take a brush tool, put it on black, 100%, paint this in, because we woulda put this up anyway, so it's fair game. Great, you could see where we cut off right here, so what I'm gonna do now is take the burn tool, set it on shadows. I don't really wanna protect tones, because we're not really on his skin or anything, so I just wanna darken this down. I'm gonna turn it down to 10%, just push 1. Learning quick keys in Photoshop is very useful. You can get through a lot faster using quick keys. This shouldn't affect the foil too much because it's pretty bright, but you still wanna watch out for it. Now, that's all good. I'll take the layer adjustment off. I now have a completely black layer, so if I pull it open, or if it's printed a little wonky, you won't see the actual seams of our backdrop back there. So it's still dark. Again, I'm gonna try and auto levels really quick. I don't recommend auto levels all the time, but it works sometimes. I like this warmth that auto color did. But I think I want a little bit brighter look to this picture. So, I'm gonna open my levels, actually I'm gonna open a levels adjustment. I'm gonna delete this one first, yep, get of there. We don't want ya, leave. Okay, so I'm gonna open my levels, and I'm just gonna pull up the slider real quick and see how much I can go before I just absolutely hate it. I don't care that these are almost going out. I'm gonna bring it back in a second. I kinda dig this right now. I like how it's really, really bright on the back, and you're kinda seeing this negative light right here. It's pretty cool. But I see this, and it's over-exposed. I don't like it too much. I want a little bit of material there. So I'm gonna grab my brush. I have a layer up here already, turn it to black, put it on about 40% or 50%, go back in here, make sure I could paint in this again. Going back in here, I could see the texture now. That's all I want. I don't need much more. Good, you don't need to take one swipe at it, but I like to do it in as I go. Great, let me come over to this one really fast. I'm gonna use my pen so I can go a little faster. I'm gonna turn it up to 60%, do some speed here. Bring it down here, do this right here. Most of the spots where I wanted the highlights to go were his face and the back. Let's see up here, make sure we're not too blown out right under the eye. I'm gonna turn it way down, 20%, because I wanna build this up slower and not just put it back in altogether at once. This is pretty good, it's there. Well, yeah, it's there on my screen, I don't know if it's on yours. Let's go down, let's do a little bit more. Good. Maybe if I was really nitpicky I'd go into the eye right there and bring it up a little bit, but I don't mind it too much. I would take maybe this shadow right there. A lot of time when you're putting hard light on people, it's not flattering. It's cool, but it makes a good shape but sometimes you need to fix some of the things you make. So I'm just gonna try to soften up this shadow just a little bit. I don't want to make it too weird. Obviously that's not working so I'm gonna go back, take a different part of the skin. Oops, that's too bright, or too dark. So I'm just sampling a bunch. I'm gonna probably take some of this back in a minute, because it's looking funky. Put in a little bit of dark right there. And now, I'm going to just go to my history, and go back to where my clone started, put Y for my history brush, put it on 40% or 30%, put some of it back in there. There we go, let's see here, maybe a little bit more right here. Yeah, and I think I'm just gonna touch this up really fast. You see what that does. It's a little weird, so I'm gonna use the hard clone instead. So now we are at a pretty good thing, so I'm gonna use my magical multiple layer mode, pull up my red tones, switch to soft light, bring it down to 1 or something low, maybe I'll try 2, 3, 4, 5. Let's go back down to 3. Let's try it with and without. I like it darker. I'm a big fan of dark. Let's flatten this image. The color's a little green, still, but for the most part I really dig it. Maybe I'll pull it back open into Camera Raw, that's a Command-Shift-A, if you really want to know. And adding in some more blue. I like this picture. I would just sharpen it up, and move on to the next image. Let's go to, I think this one's almost there, honestly, I don't think I'd really edit much. I'd probably take down the color a little bit on the face. Make it a more neutral, and then I'd take out this stand right here. The hard part with taking out this stand is keeping these lines. Because you could still see this information back there. You can't just throw up in a healing brush. Most of the time it's not gonna do a correct job, so it would be a lot of fine tuning, so that would take a while to get that out of there. I still want to keep the flare in. I like it. So that would be for another time. Let's go over to this image though. This image, I like. I would probably come in here, again, if I was really working towards doing something that I really wanted, I would center him a little bit better. We're at 26, I'd probably move up to 30. Let's do a, I want to actually put it on it's own layer, take the lock off so we can just have a clean thing right here. Let's move it to 30. And then, so we're adding that right now. I'm gonna pull that over in a little bit so I can keep a separation from that. The first thing I would do with this image, is basically take all these out right here. Again, we couldn't do anything to this. I really wanted a clean white wall. It just wasn't happening. I'm just gonna take the healing brush right now. Do a sloppy edit, because I can always fix it later. Just gonna hover it over everything. It's probably gonna do some weird stuff, like think forever. There we go. Again, it's kinda sloppy right now, but it doesn't matter. We're gonna go back through it in a second. It just thinks we want to make more lines. That's not true. It's like, everybody needs power lines in this world. Okay, I'm just going to take it onto my cloning brush now, and I'm going to take this white area right here, and put it back up to 100. Clean that up right there. Push that in right there. Actually I'm gonna take that off. I'm not caring about the color right now. I kinda like this sorta not ultra-white. I wanna clean it up over here. Take this, get rid of that thing. Again, get rid of all these lines. And really, that's basically what I would end up doing. I'm gonna extend this over here. I'm gonna clean up all these lines. It's gonna take a while to take this out right here, because you're gonna have to make sure you're really careful with this shadow. Otherwise you could really mess it up, and you don't wanna alter that part of the picture too much, so it's a lot of just going through, and really this is just patience, and going through, taking out that, taking out this, without messing up the foil. And then at the end it's just gonna be the ground, and him, on white, and that's the point of the image that's the most important to me. I just wanted to see him with his shadow, and a nice clean, crisp white wall. If we had a little bit more time I'd walk through every single step, but basically that's it. It's just a lot of time and effort into it. Over on the right side over here, I would lighten it up with the dodge tool, and I'll just show you really fast just what I would do, 10%. Put it on mid-tones, because I don't want to kill him totally. It's on a hard brush right now, so I'd soften it up all the way, and just kinda paint in as I go and lighten this up to the temperature I want. And again, a lot of blending. Things like that. I would apply the same sort of contrast and things I've done on the previous pictures to it, and it will end up looking pretty nice. Yeah, that was fencing.
Ratings and Reviews
awynterphotos
Loved all the ideas and why he's positioned his athletes the way he did, and positioned the lighting. I met Dustin a few years ago at and NPAC conference. It's nice to see him doing these teaching videos. His work is very inspiring to me.
a Creativelive Student
Less talk and all action.. This is the best no mumbo jumbo talks and straight to practical work..
Alexandra Schaede
I really enjoyed the multiple exposure video, the pity is that they are no videos to talk about the post processing of this image.