Lesson Info
2. Gear Overview
Lessons
Introduction
01:25 2Gear Overview
07:58 3Super Basic Splash with Black Background – Part 1
10:17 4Super Basic Splash with Black Background – Part 2
13:57 5Basic White Background – Part 1
07:06 6Basic White Background – Part 2
11:25 7Chaos Theory in Action
15:00 8Shake the Bottle
17:00Lesson Info
Gear Overview
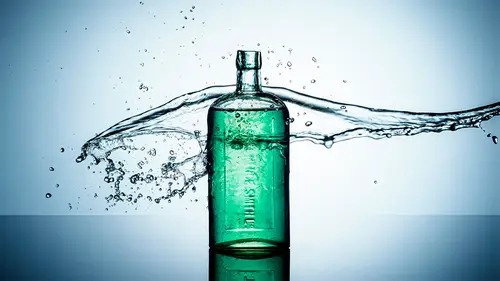
before I start taking pictures of splashes, let me take you through some of the equipment we're going to use during this session. I'm actually gonna start with the room itself because the nature of splash photography is simply this, you are going to get things wet and potentially messy. So a room like this where I have concrete walls and a concrete floor is really good because it's all wiped clean. It's not so good for the audio in here, but from the photography point of view, this is the perfect place then there is the equipment. Well, where should we start? I think we should probably start with the most important thing. Light light is absolutely critical for photography generally, but when it comes to splash is the light really matters. You need something that's going to freeze motion and that means flash. Now, the first question you should probably ask yourself is can I do this entire session with a speed light? And the answer to that one is absolutely yes you can. So why am I not g...
oing to use a speed light? Well, there's a couple of reasons when it comes to photographing splashes, the amount of light that you can throw it, it potentially is really important. So the more light you have in reserve the better it's going to be and you'll see why that makes sense in a little bit. So with the speed light you may have to compromise, increase your ISO something like that to get similar results. So speed lights are fine, You could use something a little bit bigger. This is the flashpoint evolved 200 or the gold box A. D. same flash different name. It's about the same size as speed light, but it's around about three times the light output. So that would be a better choice. However, I'm going to be using this. So this is my flashpoint explore 400 or the Botox 8400. It is a much bigger light. Much more light output. That's going to be handy. But what I'm really using it for is well, the fact that I can actually turn on a modeling lamp and see where the light goes, that's not essential. It just makes it a lot easier when I'm doing this sort of work to see the the shot before I press the shutter. There's also another advantage and that is the light modifier. Now this isn't a workshop with complicated light modifiers, it's really simple. Most of the time it's just going to be a standard reflector. So, just, you know, one of these, Absolutely perfect for the shoot. This means I get maximum light output from my flash, which is really good and it turns the light into a round shape lights, which will become much more useful when we get to the white backgrounds later on. Now you could of course modify a speed light so it fits inside and put some sort of diffuser on the top and it will give you a similar result. But this is designed to do that rectangular night from a speed light isn't going to look as good as round lights in my opinion. So that's what I'm gonna be using flash wise or we will use a soft box towards the end. I should say there will be a soft box appearing at the end. We'll talk about that. It is just a standard rectangular soft box. What about the camera? Well, the camera, you could do this with any camera brand you like. It really doesn't matter. As long as you can fire the flashes. You are good to go. So anything with a hot shoe will work. I'm going to be using the Olympus camera. I am an Olympus shooter. This is the OM D E. M one Mark three and the lens on the front is my favorite lens, a 12 to 40 millimeter lens. If you're a full frame user, that's the equivalent focal length to a 24 to 80 millimeter and when we photographed some small stuff, I'll reach for a longer lens, but this one should do most of the shots for us. Whatever camera brand you've got a remote release is really handy. So a remote release means that you can actually fire your flashes and your camera without having to reach across and press the shutter. Go for one with a physical cord because this means you don't have that momentary loss of signal. If you're using a wireless system, this is instant, press the button and the shutter fires. That's going to help with your timing. Then there's the tripod tripod. Once again an essential item unless you're working with somebody else, in which case you probably get away with it without it for a few shots. But get yourself a tripod, nice, sturdy, stable tripod will make life a lot easier. Right? That's the camera kit. What else have we got here next? I'll have a look at the backgrounds that we're going to be using. I've got a couple here, a black background that is the easiest to use. Its where we're going to start, but I personally prefer white backgrounds. They're a little bit harder to do, but it's worth the effort. So my black background is just a pop up fabric background, but the white background is actually tracing paper. It is the sort of thing that dressmakers used to draw out patterns. It is cheap and it is disposable and that's a really good thing because as we go through this session that is going to get wet and when it gets wet it is ruined. So we can just cut it off and start fresh. Then I've got this. So this is going to be the base when there's a base in my image, it's going to be this. Which is a black glossy floor tile available in all good title shops, I guess it is 60 centimeters square, which is about two ft square and it sat inside of a kiddie pool or paddling pool. And this is simply there to catch the splashes because well, it's going to get wet and messy. Speaking of which a little squeegee is a really handy thing to have that's going to allow me to squeeze you off the surface of this and keep it to dry when we need it so that's the background set up. What are the props am I going to be using? Let's have a look. Yeah. Obviously you want to photograph something interesting and the things I'm going to be photographing our glassware, things like this, translucent glassware, except not everything is actually glass. This is plastic. Which is good news because we're gonna be dropping things into that to make a splash and obviously if it was glass, well that's going to get really dangerous really quickly. I do have some glassware, things like this. Yeah. Okay. Obviously we don't wanna break those. Those are quite fragile because the things we're gonna be dropping in are actually made a glass are going to be using ice cubes. These are glass ice cubes and the bigger the ice cube, the head of the ice cube, the bigger the splash it will make. So that's some of the problems will be using. There's other random things as well. I've got a lot of a clamps. I've got jugs for holding water in. I've got a fork. Yeah, we'll get to that. I've got some food coloring. Now obviously you need water that goes without saying and you could use Clearwater. We'll use that at some point during the session. But also colored water. Now when you're choosing food coloring, which is what this is to put in the water, always choose liquid food coloring. If you use gel or paste, it'll just look a little bit weird in the water. This will give lovely smooth colored water. So that's what's going to be using to make our water go interesting colors. Another thing to have handy is a lens cloth. All it takes is one drip of water on the lens and you could find your great shot is ruined. I'm also gonna need things like light stands and a boom arm, which is gonna come in handy later on in a way that you might not imagine. Finally there is you, this is going to get a wet and messy shoot, so don't wear your best clothes for this because you may regret it. And then there's other things. So things like old towels, you really need to know where your towel is because this is going to be an essential piece of kit or kitchen towels like this. Very, very handy small bits of tarpaulin, very, very useful for protecting things and for controlling where the splashes go. You'll see why this is an essential piece of kit as we go along. That's everything I need to do to get set up. So let's clear this out the way. Let's get our first shoot ready. Let's get taking some pictures.
Class Materials
Bonus Materials with Purchase
Ratings and Reviews
Rachel
Paul
J
Student Work
Related Classes
Commercial