Lesson Info
7. Chaos Theory in Action
Lessons
Introduction
01:25 2Gear Overview
07:58 3Super Basic Splash with Black Background – Part 1
10:17 4Super Basic Splash with Black Background – Part 2
13:57 5Basic White Background – Part 1
07:06 6Basic White Background – Part 2
11:25 7Chaos Theory in Action
15:00 8Shake the Bottle
17:00Lesson Info
Chaos Theory in Action
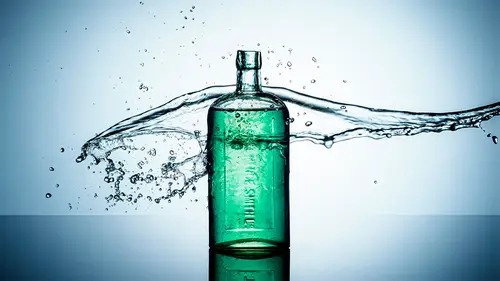
I'm going to move on to glass. Whereas our subject matter, we've done plastic stuff now, we're gonna move into things made out of glass. Now being glass, I'm not gonna drop anything into these because although that's fine, there's a pretty good chance it's going to smash. And that isn't the sort of photography I'm into. So, glassware from now on and I'm also going to add a couple of extra bits in here as well. So I've got a bucket down here full of clear tap water and because I'm going to pour some water into this, I've got a little funnel. So the idea with this set up is the fact that you will never ever take the same picture twice when you're doing splash photography, you just can't. There's so many variations of so many things that can affect the results. Every picture is unique, which is kind of part of the appeal. So for this case, what I'm actually gonna do is something that sounds really simple. I'm gonna put a bottle up here and pour water into the bucket and photograph the res...
ults. Yeah, I know that doesn't sound exciting but trust me it will look good when we're done. So let's set this up and then we'll talk through it as we go. So the first thing I need to do is actually put some water in here. So let's get the funnel and we'll add it into the bottle. It doesn't need to be all the way full because the most exciting bit is actually towards the end. So something like that is absolutely plenty of water will do nicely. Okay, I've got little bunk so we can put a cork in the bottle like that. And then I've got a clamp clamps, we've used a clamps all over this set up, hidden away in various places. But this is a nice big one because it's going to attach onto this boom arm. So it's a boom arm or a grip palm. It's just something that I can use to suspend the bottle above the bucket of water because we're gonna recycle the water back into the bucket. That's the idea. Okay, let's put that on there and slide that along like that. Okay, so this is the basic setup, boom arm bottle bucket. So let's make sure this actually works. So I've got the camera set exactly as it was before. It hasn't changed from the last set up, same camera settings. I'm still manually focusing. In fact, the only thing that's really changed you might notice is the lens that I'm using. I'm going to use a longer lens because I only want to photograph a relatively small part of this. So I need the long lens to get close. Right, let's see what we've got here. I'm going to turn on the modeling lamp for my light. That's gonna give me the ability to see where the light is going to be more or less and allow me to frame this up fairly accurately. Now, if you don't have a modeling light, you just have to take a couple of test pictures and adjust as you go. But I want the bottle to be pretty much in the center of the hotspot, more or less, probably about right there. That looks pretty good. Okay, let's take a shot and see how this goes just as it stands. So, this is the same power as I had before. Nothing changed. That's 32nd power, which is a really white background. I mean if you're looking for a clean white background, I've nailed it, but that's not exactly what I want. I actually would like some detail in the background and the bottle that's also completely washed out. Now you would imagine that the same settings as before would give you the same result. But think about what I've done here. I've gone for a smaller area of the photo. So effectively I am cropping into the circle at the back, which means I'm just not seeing the vignette. So if I want to see the vineyard, I can just turn the power down a bit. So let's take it down to 164th power. Let's try that. That's one stop less light and that's getting better. I'm kind of happy with that. There is still the hotspot in the middle. I'm starting to see some detail in the bottle. I reckon I can go even lower. Let's take it down another stop. So this is gonna be 1 128th power. And when I do that, that is Yeah, a lot better. There's still some vignette in there. I like the vignette ng in these shots. There's loads of detail in the bottle. That looks pretty good. I'm happy with that. Out of interest. Taking the flash power down will of course make the flash last for a shorter period of time. Don't need as much light. It's not honors long. How long is it? Let's have a look at the flash duration. Now it is A flash duration of 9900 of a second. That's a really short flash duration. Bearing in mind my camera has a maximum shutter speed of 8,000th of a second or a minimum shutter speed. I guess it would be. That is better than I could do with my camera with any other light source. This is why flash has the ultimate freezing power. Okay, so manually focusing on the bottle, that looks pretty good. Happy with that. All I have to do with this is just pull out the cork and press the shutter. Okay, so let's pull the cork out. Here we go and it's quite tight. Always there is off, right, and we're off and where it goes now, you'll notice there was no real skill involved with that. As far as timing went none of this. Trying to time the splash absolutely perfectly because we're no longer using splash to actually create our interesting pictures. We're using gravity and gravity is happening all the time. You can't really turn it off. So I'm just letting gravity do its work and pressing the shutter as and when the pictures get interesting, the end result is a complete variation from start to finish. They all look different. I really like the ones towards the end where we see a bit more bubbling coming through, they look fantastic. I like that. So what am I going to do now? Well, because it is different every single time I'm gonna do it all over again, because you can never do these too many times every time is unique. So let's just refill this, go again and again. We don't need too much water because it really is the last few seconds of the interesting bit. And all day I'll put the bung back in cork in the bottle and realign this, put that on there. Yeah, so okay and okay, so I got to be a little careful because as it stands, it's a bit wonky and I know I can fix that in post processing, it's not that difficult to fix, but it saves a lot of time if you get it right before you press the shutter and a few moments spent now getting everything lined up, we'll save you a ton of time in post processing a little too right. There we go. That looks pretty good. Okay, check the focusing is, spot on, pull the cork out bottle, don't leave the cook and it's the stuff at the end I want. Here you go. Can we get a drip? Go on nearly. Okay, that's great. So we've got a whole sequence of images. But I said that it's different every time you cannot take the same picture twice. But there's other things you can do to make it more interesting and one of them is to try a different bottle. So let's do that. So I've got another bottle. This one's got some writing on it, which is quite nice. But actually what I'm going to use is a close up shot of the top. It's got a nice curve to it. So let's fill that with water like that and cork in it. Hopefully this call could also fit this bottle. Yeah, just about That's great. Okay, so we'll pop that onto the a clamp like that. Okay, and we'll frame this up. So this is going to be a much tighter shot. So I need to recompose for this because I like the curve at the top of the bottle like that. Okay, let's just check focus and take a test shot. Okay, so this is nice. I like the curve we've got there. I love the sort of the shadow effect going on that all looks very nice indeed. There's even a bit of texture and dirt and grime in there and we always love that as photographers. But I've lost the vignette because once again I've gone closer. So this time rather than adjusting the flash power because it's pretty much as low as it goes. I'm gonna try moving the light instead, so I'm actually gonna move the light in closer because as I move this light and closer, so the vignette id circle becomes that much tighter because I've cropped in tighter. Hopefully we should get to see it. Let's have a little look. That is, yeah, getting there. There is a little bit going on. I think we need to go closer still so let's move that in. Yeah, here we go. Sometimes it can be just a few inches that can make a massive difference. So a couple of goes at a smaller amount is better than just doing it all in one go. That's getting pretty good. I'm actually gonna take the power down as well because as I move the light closer, so of course it actually gets brighter because the distance reduces and that looks pretty good. I'm kind of happy with that. I can see a nice little bit of vignette ng just cropping in around the corners. That's just enough to give a hint of something that it isn't a completely blank white canvas and now we're right down at power, the lowest this can actually go, which is a flash duration of 12340th of a second, wow, okay, that is a very short flash duration. Right, let's pull the cork on this and off we go. Yeah, fantastic. And of course, once is never enough, so let's repeat that again. So you might be wondering why do I need such a really fast flash duration? Well, if you think about it when you really crop into your shot and you look at the view finder, something that isn't necessarily moving that quick. The closer you are to it, the faster it appears to move through your frame. So even something that is relatively slow will appear very, very fast when you're very close in. So that really does make a difference. Okay, let's just move that across a little bit and again, because we're so cropped in, even a little tiny adjustment will have a big difference. I'll check my focus, pull the cork. Yeah, off we go. Yeah. And of course, because my flash is so low in power, the recycled time is basically zero. So I can just keep going and going and going and the flash will keep up with me every single shot. And there you go. There are some great images. I love those. They look fantastic. So what do you do with a load of photos of water pouring out of a bottle? Well, I mean individually they all look really nice. You could use any of these as standalone pictures but I thought it would be nice to create a little panel of pictures, something called a trip Tik. So a trip tick is three images with a connecting theme and I think we've got that here and then there are all displayed together either as photos next to each other or in this case, I'm just gonna make one large print and then just put them all on the same sheet effectively. Now to do it, I'm gonna use a Photoshop action because what we need to do is really repetitive and really boring and it's much easier just to use Photoshop action. And the good news is I've made one. So I'm going to share it with you in this class. So once you've got hold of the action you need to install it into Photoshop. This won't work on light room, this is a Photoshop thing and then you need to come to the actions panel. If you can't see it, go to window and then choose actions. And then on the actions panel, find a three or four little lines, click on those, choose load actions, navigate to wherever you've put your actions minor in the presets actions folder and you can click it and load them up. Honestly that is the hardest part of this whole process because now you have a whole bunch of extra Photoshop actions that do a whole bunch of different trip Tik effects. Let's go with something really simple and straightforward. I've tried to give them reasonably obvious names. So white canvas, black key line and a drop shadow, yep, that sounds like me click on the play button and it will play that action through. So this action will take the last three images that you've opened and before I can even describe what it's going to do it will actually create a trip Tik just like that. So yeah, that's pretty quick, isn't it? So there are my three images, you can change a few things. So if I go back to my layers here, let's just tidy things up slightly on the screen. You can see that this action leaves everything as individual layers so you can adjust and fine tune, you could change the position if you wanted to move the the order of these around, you could sort of, you know, just move them around as you need. What I'm actually gonna do is take this middle picture, which is this one and I quite like these. So we've got not a lot of water, not a lot of water and then a little stream of water that goes out the bottom of the picture. So what I'm actually going to do is to flip this one around the other way just to break up the pattern slightly. So let's go to image uh perhaps would be better with transform and then I'm going to come down to flip vertically and that will flip the active layer vertically. They may have gone for horizontally, their little click happy, we'll try that again, transform, flip vertically. There we go, that's better. And that will flip that one vertically upside down. So now as a pattern of pictures that has a little bit more visual interest. Now this is a whole bunch of layers, so if you wanted to you could do something like I don't get the crop tool and maybe re crop this a little bit. So let's add a bit more room at the top and the bottom and a tiny bit at the sides as well, something like that, commit to that. And if you want to do that then you will find that the background layer is unlocked so you need to click it and then fill that with white and there you go. There is my trip Tik completed.
Class Materials
Bonus Materials with Purchase
Ratings and Reviews
Paul
Rachel
J
Student Work
Related Classes
Commercial