Lesson Info
5. Basic White Background – Part 1
Lessons
Introduction
01:25 2Gear Overview
07:58 3Super Basic Splash with Black Background – Part 1
10:17 4Super Basic Splash with Black Background – Part 2
13:57 5Basic White Background – Part 1
07:06 6Basic White Background – Part 2
11:25 7Chaos Theory in Action
15:00 8Shake the Bottle
17:00Lesson Info
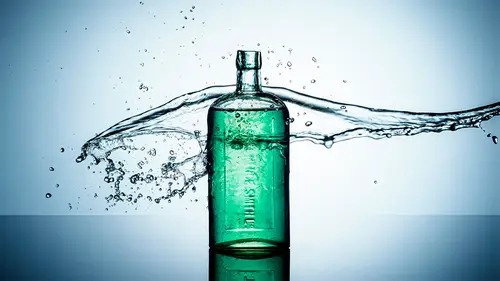
Basic White Background – Part 1
black backgrounds are great. When you're starting in splash photography, they just make the process a little bit easier because you don't really have to worry about them. They just go black but white backgrounds. Well, that's a whole different thing. It gives a much cleaner look to your splash photos and it's how I like to work. But how are you going to make a white background? Well, that's what we're gonna look at in this section because there are many things you can use to create your white background. I'm starting with perhaps the most straightforward, which is a white wall or in this case, a white piece of fabric. And I've got my flash down here so my flash is going to light this and then light will bounce off back, illuminate the subject. I'm always back illuminating whenever I can and then come into the camera. Now, that's quite a long path of light, The distances between here and here, then we get some absorption because it's not a pure reflective white and then it has to travel...
all the way back into the lens. The further light travels, the more like you lose. So I reckon I need to be at roughly a quarter power. Let's try that. So quarter power with this flash and that is well, it's a nice white background that actually looks quite clean but it's perhaps a little bit too bright. I don't mind a bit of vignette ng I actually quite like a bit of a netting. So I'm going to take the power of the flash. Always adjust the flash. Never the camera settings. I'm going to take that down to stop to 1/8 power. I'll take the same shot again. And this time I have just the hint of vignette in around the outside. That looks pretty good, couple of things to note. The tide is still the black tile. I know it looked like it was a white tile, but what you're seeing is a reflection in the tile of the background. So it looks white Then when you look at it, you might think well that's absolutely fine. 1/8 power that will do. And I'm getting a flash duration of 2775th of a second, which is a fast flash duration. It really is, but it's not as fast as I know it can be and the more I can get shorter flash durations, the sharper my pictures are gonna be. So for me this doesn't quite work. Let's try something else. So I've changed to a soft box rather than bouncing light off of the wall. This is going to give us a different result. Think about what we've got here. We now have a flash firing through a soft box firing through our water and into the camera. The path of the light, the distance it travels is greatly reduced. The more we reduce it, the lower we can make our flash, the lower we can make our flash power. The shorter the flash duration becomes and the sharper our pictures get. And that's the whole purpose of doing this. Yes, there are two layers of diffusing fabric in this soft box that may affect things slightly, But let's see what happens at the exact same settings we had before. 1 8th power And at 1/8 power. Whoa. That is a very, very bright image. I mean that is a white background and then some far far too bright. So in fact, I can turn this flash down. Let's take it down to stops to one 32nd power. That would be two stops less light from the flash. Or was it just the flash? Never the camera and that is looking a lot cleaner. And I can even probably go down one extra stop to 164th. But as I do my white background stops being white which is okay. I don't necessarily want to pure white. I would actually like something back there. But the texture of the soft box is starting to show through. That could be a problem. But the biggest problem for me isn't so much that it's the fact that when I drop something in here the splash is going to go everywhere, including all over the surface of my lovely white soft box material. It's going to stain it red and I'm not really happy about that. So for that reason alone, I won't be using a soft box. This is tracing paper, it's the background I use for pretty much every single image of splashes with a white background. And I like it because well, once it gets wet and it will we can just cut this off, throw it away and get a fresh sheet and clean background. So the set up for this is my flash here, firing into and through the tracing paper through the liquid into the camera. But you'll notice that the distance between the camera and the flash has increased and when we increase the distance we know we're going to lose light. So how is this going to work? I mean, to be fair, there is only one sheet of tracing paper rather than the two of the soft box. But let's start where we finish before. So one 64th power is where I ended up with the soft box. One 64th power with this shot is okay, but perhaps just a little bit dark. So I'm actually going to increase the flash one stop to 32nd power and that looks about right to my I of course, things may change as you actually take your pictures. A couple of things to note with this image. The first thing is the vignette. That is a natural vignette. It's not done in camera or post processing. It's done because of the light passing through the tracing paper. It's around in shape because we have a round light modifier, the reflector and it's repeated on the tile below to give that fantastic reflection. Now there's a few things you can do with this set up to control it that make it a little bit more versatile than using the soft box. For example, if I get my flash and I move it closer to my background. Well, that is going to make that circle a lot hotter and more defined. If I move it further back, then the light has more time and room and space to spread out. And that's going to take my background and make it more even if I change the height of my light, let's put it back roughly where we were before. Yeah, I drop it down as low as it goes. Then that vignette will also drop down so I'll end up with less flash and a more of an arc coming across. If I go higher up, then I'm going to end up with a darker base at the bottom. Now, all of these things are fully adjustable, so you can choose exactly the look you want to go for and mix and match as you see fit. And of course, the advantage of this particular flash, the 8400 or the explore 400 is I have a modeling lamp which I can switch on and off, which means I can actually see in the viewfinder exactly where that light's going to go before I press the shutter. So that's why I'm using tracing paper. Let's use this setup to create something just a little bit more exciting.
Class Materials
Bonus Materials with Purchase
Ratings and Reviews
Paul
Rachel
J
Student Work
Related Classes
Commercial