Super Basic Splash with Black Background – Part 1
Lesson 3 from: One Flash Splash PhotographyGavin Hoey
Super Basic Splash with Black Background – Part 1
Lesson 3 from: One Flash Splash PhotographyGavin Hoey
Lesson Info
3. Super Basic Splash with Black Background – Part 1
Lessons
Introduction
01:25 2Gear Overview
07:58 3Super Basic Splash with Black Background – Part 1
10:17 4Super Basic Splash with Black Background – Part 2
13:57 5Basic White Background – Part 1
07:06 6Basic White Background – Part 2
11:25 7Chaos Theory in Action
15:00 8Shake the Bottle
17:00Lesson Info
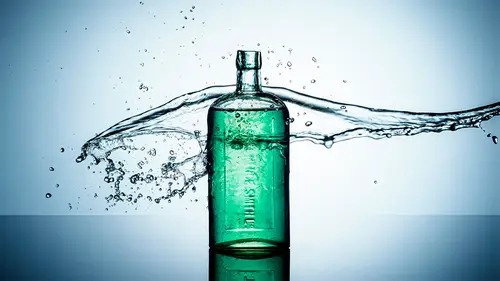
Super Basic Splash with Black Background – Part 1
This is going to be a nice straightforward set up. It is the perfect place to learn about splash photography. I've got one of my plastic glasses, we've got some water with some red food coloring in it. We've got a black glossy floor, it'll a black background and the whole thing is going to be lit by flash at least that's the idea. But we need to make sure that that actually happens because we've got quite bright room lights in here so you can see the video. I don't want the camera to see the room lights. I only wanted to see the flash. This is much, much brighter and if I try and combine the two, I'm going to end up with a blurry picture. So how do we do that? Well, I'm going to take a picture without any flash firing at my chosen settings, which are well, let's start with the aperture F 11. I want a good depth of field. When you drop something in here, it's going to splash up and it will go in all directions equally. You actually need more depth of field then you realize I'm going to ...
start F 11. If you're using a full frame camera then you might want to go for F 16 or even F 22 then there is something like the shutter speed. So the shutter speed is also going to vary depending on your camera. I want it to be my flash sync speed, the fastest shutter speed I can go without high speed sync flash. That's not part of this tutorial for me is 250th of a second. But for you it could be slightly different. Finally there is the so now my Olympus camera happens to have a native ISO of 200 iso and that's the perfect so for this shot because if you run at 100 so you'd have to put the flash at twice its power. That means it's going to be less sharp. We'll get to that in a bit. So 200 ISO is where I'm going to be. So those are the settings. Let's take a picture without flash firing and see what we get and without flash firing, I basically get no flash, no picture. That means the camera is not seeing the room lights in this shot at all. One other thing I should say as well is I've actually put the camera on manual focus because the last thing I wanted to do is to hunt for focus at the exact moment I've dropped something in there and miss the splash. So manual focus is a really good idea. Okay, let's look at the position of the light where you put this light is going to have an impact on the picture. Most of the splash photography. I do tend to be rear illuminated, but with this set up with a black background, I might try front illumination first. So I've got my flash, let's bring it around to the front. I've got it set to 1/8 of its power middle of the road. I don't know whether that's the right exposure or not. I'll take a picture and have a look. I'm actually gonna take a picture without any splash because you want to get everything set up and finally do the splash. That should always be the last part of the process. And of course to my flash trigger on and when I do that I can get a picture that looks well about correctly exposed. There is a little bit of flare on the surface of the glassware but that doesn't look too bad. So let's try over here where the flashes pointing pretty much side onto the glass as far the camera positions concerned, I'll slightly angled away from the background as well to try and keep this background nice and dark. Let's take that shot. The first thing I noticed is it's a little bit brighter because the flash is a little bit closer. I was on 1/8 power, I'll take it down one stop of light, not going to change the camera settings. They are always going to remain the same. I'm always going to reduce the power of the flash and that looks about the right exposure and I think that looks a little bit better. Yes, there's still some flair on there. It will look different when we drop something in but for now that looks pretty good and of course it's worth trying. What happens if we put it back here? So this time the background should go nice and dark because all of the light is going in that direction. Rear illumination as I said, is my favorite. They should look really good except of course there's one small problem actually, I'm gonna get loads of flare because I'm just catching the edge of the light and that's flaring into the lens. So my black background isn't black at all. So I'm gonna put the light around about there, that's gonna be the position for this shot. Let's drop something in and take the picture. I'm just gonna check the focusing before we go for it. I'm going to focus on the stem of the glass pretty much in the center and when I'm framing up this shot, I'm also framing it with quite a lot of height above because I have to leave room for the splash to fill that area of the picture. So I've got an ice cube of course it's not an ice cube, it's a glass ice cube. I'm going to drop this in now. There are a few things you can do to make this work better because there's a pretty good chance I'm going to miss and if I miss it's not gonna end well. So I need to make sure this actually hits the water fairly cleanly. And the trick is to dip the ice cube into the glass of water. And if you hold it up, if the drips from the ice cube drip into the glass, there is a reasonable chance that you'll ice cube will actually fall straight in. That's that's kind of the idea. Okay, let's just make sure this works. You can never take too many test pictures and here we go. Yeah. You know how do we do? Yeah, pretty good. The ice cube went in the glass, the splash went up in the air and when we look closely at this we can see loads of really sharp detail in there. That is looking excellent. Is it the best picture? No, but it's a start. Yeah. So if you're wondering what the fork is for, it's for this, it's for getting out the ice cube. So you don't have to put your hand right to the bottom of the water because that will spill all the water out which is a bit of a waste and of course stain your fingers red when you've done it too many times. So I said earlier that the flash you need to have not the quantity of flash but the reserve of flash. So I was working at 1/16 power which apparently is a flash duration of 4002 100th of a second. That effectively becomes a shutter speed, that becomes the freezing power of the flash. Now, if I was using something like a speed light or something without this power, I'd need to increase the power of my flash. So to simulate that I've put a nd filter on the front of this just to show you what it would be and pop this flash all the way up to full power. So I'm gonna take exactly the same shot at full power and let's see how sharp or not this becomes. Here we go. Yeah, well, that was a really good splash and if I go have a look at the close up of that, it's okay. It's not bad, but you can definitely see some streaking rather than it being absolutely frozen in time. There's a softness of some parts and definite streaking to others. This is why using a lower powered flash with a shorter flash duration makes such a huge difference to the sharpness of your splash pictures. So I've taken off the nd filter, the flashes back down where it was before and I'm back to the same sort of exposure that looks good. Let's talk about timing. Now. You notice I'm not using continuous high speed shooting, I'm not blasting away at this Even with my Olympus camera, which is capable of up to 60 frames per second. That's not how I want to do it. There's something about nailing the exact moment yourself in a single shot. That is so satisfying. You just can't beat it. And besides, if you did shoot at 10 frames per second, you would still miss some of the best pictures. So try and do it in one shot if you can. So when do you drop this in and press the shutter? Well, the best splash actually happens a little bit later than you might imagine if you watch for the splash and then press it when you see the best splash you've missed it. There is that delay between your brain, your hand, the camera, the flash. That's enough to miss the best splash. The best place to begin is listening. Listen for the sound of the splash. When you hear it splash, press the shutter. You'll get better at it as you refine this and you practice and practice. You will find you get instinctively better. But to begin with listening is the best way to do it. So let's try that. I'm half pressing the shutter so I'm ready to go. I'm going to drop this in and when I hear the splash are fully pressed the shutter. Yeah. And yeah, I've got a great splash. Every time you do this, it will be slightly different. The more you do, the better you'll get at this. So let's take the ice cube out and try again. Now, of course, every time I do this, some of the water comes out, so I end up with less and less liquid in the glass. Is that a bad thing? Not necessarily. It depends on the glass. Sometimes having less is definitely better. It depends on the shape the size of the object of dropping in the amount of splash you want to achieve. So don't go filling it up right to the top. Every single time variation is the key to getting different pictures. However, remember this is a glass ice cube. It will chip eventually, and the less water there is to cushion the fall, the more chance there is of chipping it. So do watch your fingers as you're putting your hand in. Okay? Let's top this up and go again, mm hmm. That went absolutely went over me. Great splash there, okay?
Class Materials
Bonus Materials with Purchase
Ratings and Reviews
Paul
Rachel
J
Student Work
Related Classes
Commercial