Lesson Info
5. Edit in Photoshop Options
Lessons
Class Introduction
03:19 2Lightroom Fundamentals
06:17 3Round Tripping
10:33 4External Editing Preferences
13:38 5Edit in Photoshop Options
15:33 6Open as Smart Object in Photoshop
11:06 7Linked Smart Objects
11:44 8Open as Layers in Photoshop
05:00Lesson Info
Edit in Photoshop Options
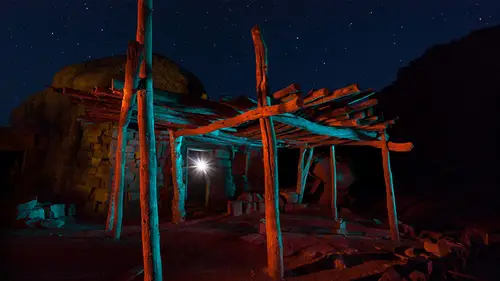
When you send a non raw file, that means a tiff of JPEG or any other file formats. As long as it's not raw and you send it to Photoshop from light room, it's always going to ask you about three options for you to choose between. Let's take a look at those choices here. I have an image that is in Photoshop file format. I'm energies photo edit in until it to edit in Photoshop. And here are the three options it's going to ask me about. In an earlier lesson, I said that I'd suggest you choose Edit original, but that's only until you learn what the other choices do. If you look at what the text is underneath each of these choices, it can create a little bit of confusion here. It says Ed edit the original file and that light room adjustments will not be visible. Well, when would you ever not want your light room adjustments to be visible? Well, a lot of people get confused about that. Let's look at it in a little detail. If you remember how light room works, it will leave your original files...
untouched on your hard drive and It only keeps track of the changes that you make within light rooms. Develop module in your light room catalog file. And then when you tell that image to be opened in Photoshop, those develop settings get applied and it opens the developed version in Photoshop. Then when you save the image, if you started off with something that doesn't support layers or you start off with the raw file, you always end up with a secondary image. Well, that's secondary image already has those developed settings baked into the file? They cannot be changed. And in fact, light room doesn't even know that the image was ever adjusted because it's only looking at the end result, and it doesn't keep track of how that end result was created from this original over here. So when you get this option, I take this and I'm just gonna choose edit in. If you have not made any adjustments to this image in light rooms develop module. Since that file was created, then you'd always choose edit original in over here, where it says light room adjustments will not be visible. What it should say is, light room adjustments do not exist for this file and therefore are irrelevant. Uh, and so this would be the obvious choice. Well, there is a way to find out if you've adjusted an image in the develop module and therefore, if the choices that are found on that screen are important, when I look at this image, look in the lower right and notice that there's a little badge down there. It looks like two rectangles overlapping. That particular badge means that this image is also found in a collection. That's how I've organized these pictures. But notice that there's only one badge down there now. Watch what happens to this image if I go to the develop module and in the develop module, I grabbed the crop tool and I cropped the image at all. Then I go back to the library module and notice. Now there's an extra badge. That badge is supposed to look like the cropping rectangle I was using to cross my picture. Then, if I go back to the develop module again in this time, I changed the adjustment Sliders. You notice they're all at zero right now because no adjustment has ever been applied to this image. After It was originally turned into a tiff for a Photoshop file format image. But now I come in here and I brighten the image. Maybe I bring out some shadow detail and adjust some other sliders. And now if I head back to the library module, you're going to see an additional badge. That's the one with the little plus and minus sign on it. That indicates that this image has been adjusted in the develop module. Where is the one to its left indicates it been cropped. So now it's a little different if I again come over here and say, I want to edit this in Photoshop. Well, now we do have settings that matter. And if I choose this bottom choice, it says, edit original light room adjustments will not be visible. What that means is, if I choose edit right now, I'm going to see this picture just as it looked the last time it was open in Photoshop because those settings had yet to be applied to it. So edit original to find choice to use. The only thing is, I'm not going to see this brightened up version that we just modify. Instead, I see the original brightness of the picture, the exact same brightness I saw the last time this image was in Photoshop, and I don't see anything special to indicate it was ever adjusted in light room. I'm not going to save that image. I'm just going to close it and let's go back and talk more about the other options that were presented. If I come back in this time, I'm going to use the keyboard shortcut. Notice the keyboard shortcut for editing. Photoshop is command E for edit. I'm going to use that from now on just because it's going to be faster now. I typed Command E, and I'm going to choose the top option here, it says. Apply the light room adjustments to a copy of the file and edit that one. All right, if it's going to apply the light room adjustments, that means we're going to get this brighten her version of the picture. It's going to be cropped slightly, and it's going to have those adjustments incorporated. So when I choose edit and it opens in Photoshop now it looks bright, and it also opened much faster. But take a look in my layers panel and noticed there are no layers whatsoever, whereas I don't know if you look before, but there was a bunch of layers when I edited the original. So what's going on here? Well, let's close this and let's think about how light room really works. Do you remember in a previous lesson when I talked about what happens when an image gets saved in tiff or Photoshop file format? I mentioned that if the image has layers, there's actually two versions of the file gets saved. It saves the individual layers that make up the image so you could open the image again and get to those layers if you edited the original in this case. And they also saved a flattened version of the image that had all those layers merged together. So it was only one piece effectively with no layers. And that's what you get. If you tell it over here to edit with light room adjustments, let's figure out why. So this on the left side represents your tiff file or Photoshop file. Contained within it are the individual layers that make up your picture, along with a special version that has those layers merge together light room does not know how to work with the individual layers in a picture. So it has two choices and what to do if you tell it to edit the original image, It takes that layered image and sends it to Photoshop. While it ignores any adjustments that were applied to it in light room. That's what the bottom option does. Then, if you choose the top choice instead, then if you applied any adjustments to that file, therefore you'd see these little badges on top of the thumbnail for that image, then the only way it is capable of applying those image or those adjustments to your image is to work with a flattened version of the picture. Because light room does not understand how to read individual layers, and therefore it just can't deal with the layered version of the file. So it takes the flattened version. It's applying the light room settings to it, and then it opens it in Photoshop. But it wants to make sure that you don't accidentally permanently throw away those layers, And that's why it always says to edit a copy. So you'll always have the original, which has the layers included. So now we gotta think about when do we choose edit original, And when should we choose? Edit a copy with light room adjustments. Well, I'm going to take this image, and I'm going to send it back into light rooms, develop module. And I'm just going to make sure I've done an obvious change for the image. I'm not trying to make it look good or anything. I'm just trying to be obvious that something is different. All right, there the colors look completely different. Let's go back to the library module. So now if you see this version of the image, you'll know that the light room adjustments have been applied. Now I'm going to take that image, and I'm going to adjust it in Photoshop by typing command e to edit in Photoshop. And I'm going to say, edit the original. Well, when it edits the original, it's going to ignore those light room adjustments, but they'll still be stored in the record for that file inside our light room catalog file. So here I see the original version of the picture, and I'm gonna modify it. I'm gonna come over here and take a look at my layers, and I think one of those layers is the layer that has the light in the doorway. I'm just gonna turn that layer off, and that's all I'm going to change in this file. Then I'm going to close the file and I'm going to tell it to save it. Then once it's done, I'm going to return to light room. And now, if I look at the image, I can hit space part of you at large, I noticed that that light that was previously in the doorway is gone, but I still see the adjustment that I made in light room that made all the colors look weird. So what happened? Well, all it did is it has a record for this file that's based solely on its file name and where it's located on your hard drive. In all, the changes that we've made over here in the develop module of light room were just written down as text. So in that text, it says that the temperature should be sent to negative 100. The tint positive 100 the exposure at 1.5 and the shadows at 61 and All it did is after we finished editing the original underlying picture. It simply reapplied those settings to the image. Now, on occasion, I found that it will get a little stuck and it might not re apply these settings. If you ever notice that being the case, you can always get around it. If you go over here on the left side of your screen, you're going to find the history when you're in the develop module. And if it ever doesn't reapply the light room adjustment settings, then you're going to find that the step in the history that it's on will not be the top most one. It'll be like down here, uh, probably right about there so it'll look like the original picture before those additional settings. Just click on the top most step in the history panel, and that will usually force it to re apply those settings if it failed to do so. So anytime we choose edit original, there's two things that it thinks about the original file and then the light room adjustment settings. You may have applied to that file. You open up the original file, you see all the layers in Photoshop. It looks just like it did the last time it was in Photoshop, and last time it was in Photoshop. It didn't have those light room adjustments, either, because the only way it could have applied those would be to flatten that image. If you still have your layers, it hasn't done that. Then you're done working on that layered file. You save it and close it. Now it's back in light room and it says, Hey, I still have this record This record still has some adjustments for that picture. Let's just re associated with that file so that they get applied and on occasion to get stuck, you have to go to the history, and one click will force it to apply. So most of the time I'm using the choice of edit original. But on occasion I need those light room settings to be applied. Let's say I was going to use this image on the cover of a book, and I need to add the text for the cover in Photoshop, and I need to add the little logo for the company in the lower right corner. All that kind of stuff. Well, then I would want the version of this that has those light room adjustments applied. So instead of choosing edit original, I would be choosing Edit a copy with light room adjustments, and I'd get exactly what I see on the screen here. But when I got opened into Photoshop, there would be no layers. Now let's try. There's one more time I'm gonna type command E. That means edited in Photoshop. And let's look at the middle option. It just says, Edit a copy and notice. It says the light room adjustments will not be visible, so that choice in the middle is very similar to the choice at the bottom. The only difference is light. Room will duplicate the file first and then right after that, it chooses at its original. It's just doing it one step instead of two. So let's see when we want to do that. Well, here is a template file. This is a file I might use when people get engaged to be married and I take their photographs and adhere. I can put in their photographs to replace these gray rectangles, and I do that all the time and therefore I don't want to mess up this file. This is my template. So instead of saying edit this in Photoshop, I sure type command e. But I'm gonna say Edit a copy of the file instead. Then I'm going to choose edit, and it just made a duplicate of that file. If I go back to light room, you can see there's two versions already, even though I haven't saved what I've done in Photoshop. But it instantly created that second file. Then I can do whatever I want in Photoshop. In this case, I'm not going to modify it. I'm just going to close it and head back to light room. All it did was duplicate the image and then choose edit original or the equivalent to that. I would use that again if I had a calendar template, and I use that every year and every year I replaced the pictures, but I want to keep the ones from the previous years as a record. Or here's that book cover. Here's the actual illustration that was made. I chose with this that I want to edit with the light room adjustments. Then it got put onto a book cover. Well, that's where I want to work on a copy because I want to keep the original clean version. Just like once I get my book cover done and I want to simulate a three dimensional version of that book, I'm going to end up choosing Edit a copy because I want to keep this version and create another iteration of the picture. And so any time you come in here and type command E the majority of the time I choose edit original because I know any adjustments of applied in light room to brighten the image crop. It should be reapplied once I'm done editing, and I only choose the top option if I really need those end result, uh, adjustments to be visible. And that's when I would have an image like this one about to be used on the cover of a book or some other project, and I need those adjustments incorporated and then I use edit a copy. Whenever I'm working on something that might be considered a template where I don't want the original one to change, I want to have a secondary version. And so those are the options. We have the most of the time. The bottom option is what I use. Next. We're going to talk about a special way of opening your images, which is known as opening it as a smart object.
Class Materials
Bonus Materials with Purchase
Ratings and Reviews
Carl Grooms
Fantastic, clear explanations of these features. i have a much better understanding of how to go back and forth between LR and PS. Thank you Ben. this is must watch class for anyone that uses LR and PS