Understanding How Light Works
Lesson 2 from: How To Create Beautiful Portraits By Simplifying LightAudrey Woulard
Understanding How Light Works
Lesson 2 from: How To Create Beautiful Portraits By Simplifying LightAudrey Woulard
Lesson Info
2. Understanding How Light Works
Lessons
Lesson Info
Understanding How Light Works
So in this segment we're going to talk about how I approach light, I wanted to give you guys just, you know, a brief overview about how I actually approach light and what my thought processes because once we actually start shooting and going into the field, I think it will give you a better insight to, you know, the way that I think um in the way that you know the way that I do things, because I think that you know, just kind of having this little moment, she just really map everything out. A lot of things. We may make sense to you guys. So I would like to start things off with my favorite quote by Charles mingus and it is making the simple complicated is commonplace. Making the complicated simple, awesomely simple. Now that's creativity. And the reason I love this quote and it's a quote that I use pretty much all the time when I'm speaking is that sometimes you may find situations where people will take something that's really super simple. I'm not overcomplicated, but if you take som...
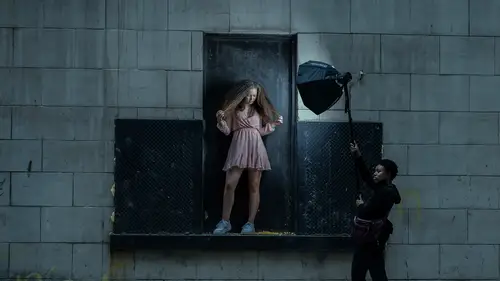
ething that is actually complicated and make it seem simple, That is creativity. And I love to approach, you know, everything that I do within the industry from my work, from my business. I love to make it extremely simple because I find that it just makes my life so much easier. So hopefully those would be some things that will resonate with you guys as well. Now, how do I approach light? And uh, we're going to kind of break some things down. Um we will go over, um you know, pretty briefly, some of the different situations that we're going to be. And then of course, when we jump into those other segments will go a little bit more in depth. But I like to approach light um where my images have the same feel, regardless of where I am or the light that I use. So even if this image here at the top, right, left hand corner, I'm sorry that was captured with a strobe, but the image right next to the girl with a big curly hair, that's actually just ambient lighting and I'm using a street lamp and then the young man that is a strobe. So I honestly try to keep things with that same feel, that same Audrey look. But I have to, you know, approach things differently in order to achieve that. So simply put, we're not going to over complicate things. That's going to be the, the theme throughout this entire series. So rules, we often hear about the rules within the photography industry and I probably break most of them. I don't know if I break them on purpose or if it's just something that's part of my personality. Maybe it's both, but I like to either fine tune the rules and make them a bit my own or I may toss them out the window all together. Now I do know there are certain rules that we do have to adopt within our industry, but I am a big proponent in trying to not only as you shape and mold, light shape and mould your own rules because that my friends is the start of a style and that's just my thoughts there. Some people may disagree, but I'm, you know what, That's just pretty much my thought here. So going back to that thought process, um, you know, if I'm going to use ambient lighting only or if I'm going to bring in a stroke, I still like to have that look. So if you even look at this particular image, this was captured all with natural lighting. No um handheld reflectors. No nothing and actually captured in one of the areas that we're gonna be shooting in during the series. But same, you know, I guess thought process and technique that I would bring in regardless of the light source that I use. So even with this particular image here, same thing. I'm still only using natural lighting and again, it's going to be what, it's 11 of the areas that um we will be shooting during the series, but you never really know it because I'm often looking for different things to achieve the look that I want it Now. Same thing here, one thing that I like to use is I love to have a more dominant lighten sort of light source, something that is a bit directional. So in this instance, although this is captured with ambient lighting in the Children's room, you can pretty much tell that there is a window located a camera right? But I still keep the integrity of that background, so I still get, you know, a lot of that nice ambient lighting back there. And I like to keep that same thought process when I bring in a strobe. Now this image is an interesting one because many people think that it is captured with a strobe and it was not. And in fact, let's take a quick break and talk about this image in particular. So let's discuss intent and this will be the theme throughout this entire course. This particular image I actually love, love, love. Um many people think that I did use some sort of um studio lighting or a reflector that I brought portable reflector some way, shape or form, but completely ambient lighting. Just me and my camera. And this is going to be a theme that we are going to explore regardless of we use ambulance, ambient lighting or not. Throughout this entire course, what I wanted to make sure is that is that I got really good somewhat directional lighting on my subjects face, but I wanted to keep the integrity of that background that yellowish, you know, lighting that's going that's behind her gives you know, the I guess look of using gels on a stroke. So I didn't want to take away from that particular look, but I also didn't want her skin tone or anything else for that that matter to be taken over by that all of that yellow which is really tungsten lighting because she's in a parking garage or around a parking garage. So let me show you guys what that you know, set up really looked like. So as you can see um there's the parking garage, you see the yellow light that's inside there, but that red X. What it actually is doing. It represents where I had my model stand. So if you notice she's actually standing right in front of all of that yellow light. So all the ambient lighting is really perfectly exposed. Well, I'm gonna say perfect exposing her face because I've got to step my exposure triangle. But um my it's not, I don't have to do anything special um with my white balance because all of that yellow light is behind her. And if you remember the image had a little bit of that yellow, I guess light spill that went along her hair. But I embrace that look and these are the types of things that I look for when I'm choosing um you know, my locations and when I'm thinking about, you know, molding and shaping light and creamy and creating dramatic looks as simple as possible. I'm very keenly aware of what is around me because that is going to determine what, you know, my final look, you know, it looks like. So what I want you guys to see now is you can see where the direction of the ambient light is coming from, where the sun is located in the sky. So it's beaming right directly down onto my client and it's, you know, you can, you get that same, you know, directional look that I tend to go for regardless if I'm using one stroke or not. But this will also let you guys know why I prefer to use one strobe. So think of it. I like to think of it as a glorified reflect and I'm probably going to say that 100 times during this entire course the little driveway there is acting as a natural reflector so the sun is beaming down on that, it's helping to expose the face and I'm able to create the look that I want using just ambient lighting. But what we're gonna do mostly is we are going to um show you guys how to bring it in a stroke. But this thought process is the exact thought process that I go through regardless of the light that I use. So now this particular shot was captured all natural lighting, no um flash or anything here at all. But also in one of the shot places that we will be a shooting in today. Now the funny thing about this particular photo session is that it was actually a storm that was about to come. So this is really kind of playing on I guess a bit of open shade with lots of those low hanging because it was a it was a really bad storm that was about to come. So um those little clouds um kind of hanging down and really giving some nice diffused lighting that's kind of above the girls, but that son was behind me and it was fairly low because it was later in the day. So this is when, you know, when I knew that there was a storm coming and we had this photo session planned, you can see in the sky what it looked like. So we literally um jumped in the car with the parents and we went to this particular spot specifically because of this look now with these girls here, we used a stroke stroke right here at camera. Right? So again, I'm keeping that same look, you know, nice directional lighting, keeping a bit of that ambient behind my subjects. You know, again, picking the same spot that we're gonna be shooting at. This is captured with natural lighting, but like I said, I'm keeping that same, I guess feel this particular shot was captured with them a stroke, but it gives that feeling of um I guess low was low sun kind of almost turning evening light, but this was actually captured at 11 o'clock. So with 11 am I would say my fault. But it's still kind of giving me that directional look. And the point with even showing you guys all of these different images is understanding what's around you and how light behaves. So the way I approach light is I really look at how light behaves around against my surroundings. And then my subject is kind of second in that thought process. So I said I was not going to over complicate things, but I would be remiss if I did not mention the inverse square law of light. It is the single most thing I think we all should at least understand. And regardless you hear it a lot, you hear this a lot, the inverse square law of light with studio lighting, but with, regardless of whatever light you use. I think it's it is, it is what it is. You have to, in my opinion, no, it in some way, shape or form. One way I like to say to say it to people is, I mean, really, really oversimplify it is closer you are to the subject, The closer you are to the light source, the brighter it is, the further away you are from the unlike source, the less bright it is. I think of that thought process when I'm thinking about my backgrounds. So often people say to me, they like how I balance my ambient with my strobe. Because the very first thing I'm thinking about is how is the ambient, you know, behaving on my backgrounds And then I make sure my strobe is not going to overpower it in a way I don't want it to. So inverse square law of light, that is my, my oversimplification of it. Now, what factors do I need to always consider when I'm booking photo sessions? So two things, the location and the time of day. So let's talk a little bit about location. I ask myself, you know, what's there, what objects around that area can I use to help shape the ambient lighting and I, you know, bring into that the time of day, how intense with the light be at the time I book, you know, how will the ambient light react to the objects that you know, are that are around. Those are the two things that I really play heavily heavily when I book a photo session. Because of that, I cannot remember a time and all of my 17 years that I let a client dictate where a look where a photo session would happen. Um Usually I would ask them what they're looking for, show me some images that I've created that you love. And then that helps me dictate where the photo session will be and take place. Um but I never can clients say to me, oh, I want to have it over here in this garden at 12:00. And if I don't know a what it looks like be, you know, whatever. There's so many different factors. I just won't put myself in that situation. And instead I would work with a client of course professionally to come up with a place. Um that would work. And because of that, I'm usually in kind of similar ish areas because that's the look that they're hiring me for, that's the look that they want. So when you do lots of location work, like I do, um you really have to maintain some sort of control to have that consistency that clients are attracted to. I found, I found myself when I was shooting in studio, it's natural light studio, um I bought one and I just got so super board bought another one. I got so super, super bored with it. Um that I found myself venturing off into the city and now having the world, you know, as my studio, I feel more inspired. So, you know, having a mental, that mental block, but the Creative Black, I mean that's really, really tough. So those are my two things that I always consider. Now, let's start breaking some stuff down and I'm gonna show you exactly how I approach light in certain situations. You know, when I'm teaching workshops, many people ask me like what are you looking for when you are choosing locations or or what's going through your head and honestly what the actual background or anything, you know, that is in the image is really kind of like secondary, it's the light. So I wanted to show you guys just a picture of something that would just catch my eye completely and it has everything to do with the light and less about like what the, you know, background looks like because no one would really walk over to this area and says, ah this is exactly what I want. But the way that the light um is uh reacting on what's around it is what attracts me. That goes back to the inverse square law, how intense the light is versus how less intensive, less intense that light is is exactly what I look for when I'm examining ambient lighting. So this honestly, I love the way this light looks, I absolutely love it, let me tell you why. So I kind of took out the actual color and everything that's going on so that we can just kind of concentrate on this part. Um I love the filtered light coming directly from above, but it's not so intense and super bright down on the ground. What it does is it gives like a gradient effect so that when I placed my subjects here, I get that entire, I guess integrity of the light that is around it. And the key for me when I'm really trying to capture a look that I like, is to have that delicate balance between strobe and protecting the integrity of the ambient lighting in the way that I like it. So this particular shot, the way the light is kind of on that street, you see how kind of soft it is, it just gives that, you know, really gradient look is exactly what I go for. So I look for that light first and then I look at location. Now, I want to show you guys another image. Um and this is a natural light image because and I'm showing you guys lots of natural light stuff really fast is because I want to really show you how important that is in any shop that I do and how it's pretty much my very first focus. And then I'm bringing in that strobe kind of as my secondary light. So if you look at this image again, you're seeing that kind of directional look. Um that that um I try my best to go for in fact if I can um as you can see you've got your um ambient that's coming right at camera left, but no one would really welcome to the scene and say, hey this is exactly what I want. I want to make sure that we're all looking at ways that ambient light moves and how it reacts around the um obstructions that are around us. So this is where the light was coming from when I captured this particular shot, we were in an alleyway, but it was coming the light was coming directly from the side. Often when we get in alleyways we think that we have to have the ambient light facing directly on us. Or I'm sorry on the subject. Now, while that is you know, a great technique and one that I use as well. I want you guys to kind of think outside of the box. So showing you this image again, you'll see how I'm able to get such different looks or a different look, seeing such different looks as in plural. But with this particular shot, it's one from one version of a look that I can get by playing molding and shaping the light that is around you. So now let's look at this set up. One of my favorite favorite setups um in Chicago. So thinking of light, Yeah, I've got my buildings and again you'll hear me say this a lot during the course. Nice tall one. So it's blocking a lot of the Ambien and it's casting a nice kind of tunnel if you will of um shadow and my ambient is for the most part more intense coming from above. You can see that with the sky. So with that part said, these are some of the keys that I look for when I personally choose to photograph in the city. These are for me, my look that I want. Um It's almost I must have like literally almost I must have enough to find something that can block off flight from either side of me. So let me just show you guys um some images that were captured actually different types, different times of the day and um given me you know same spot, different times of the day and different types of ambient lighting. Now I used to stroke for this cloudy day, same thought process light coming from above. And what I like to do with my um strobe is I like to feather that light so I like to have it slightly off of the face ever so slightly so that again, I can get another kind of softer gradient look onto my subject and making sure that I'm not overpowering the light or the ambient light that is behind my subject because of that light is too powerful in relation to the ambient there. Like with this being a cloudy day, I can totally overpower it and that background will go completely completely dark. Okay, now, same image, same shot, same setup. Well that same image, same, same spot, same setup. Used a strove. However, this particular image was captured on a bright sunny day. So what I had to do here was I had to actually bring my strobe makeup as powerful as I can, but balance it with my exposure triangle so that I still can keep a little bit of that in that integrity in that shot. So again, buildings blocking a lot of that, uh, full sun on either side, left or right. Same principles as photographing in full sun with my son located behind my subject, making sure I've got plenty of ambient lighting behind me to help expose for the face with the ambient. And then I used my strobe feather the light and make it like a, use it like a glorified reflector. Okay, lastly, I wanted to get through this one in here for fun. Um, this one was captured in um, Gosh, where we just captured it philadelphia. And one reason why I really like this image because we're talking about creating a dramatic look. Um from a simplistic perspective, this was captured all ambient lighting. And uh, what I wanted to show is I actually used the light that was coming from the cars behind her and if you notice would be using the red arrows, it's framing her on either side, so it kind of makes it makes her stand out a little bit more. I love chaos, I love it, love it, love it in my images. So all of this, regardless of what's going on behind her, she just pops and the light coming from the cars behind her is me is giving that beautiful backlit. Um look at her hair. Blue arrows represents the light coming from above. Again. I need to have tall buildings. So it's that same thought process. So we're going to jump into the next segment and I will see you guys soon. Mhm.
Ratings and Reviews
Michael A. Gruich Jr.
My goodness! This class is like a breathe of fresh air in the morning. Vey easy to follow along for some very amazing results. Really enjoy the friendly presentation, filled with tips and clear explinations for working with light using a minimal setup. Thank you Audrey
a Creativelive Student
Audrey brings together and simplifies divergent ideas in photography. Finding beautiful available light (based on direction and quality) on location is her first priority. She then perfects the light using a single strobe on her subject. Her style emphasizes shallow depth of field using fast primes and high-speed sync, and her post-production is minimal. She offers a pragmatic workflow and a creative philosophy that values getting out in the field and making photos. The reliability, ease of use, and affordability of the newest off-camera flash solutions make this kind of dramatic portraiture accessible to more artists.
Yo Pal
Wow! I love her non-complicated process and the stunning results! I can't wait to use all I learned from her shooting on location as well as her editing tips. Audrey has a great personality and is a teacher I would watch over again. Will search for more of her classes. Did not want the class to end! Yolanda
Student Work
Related Classes
Portrait Photography