Navigating Full Sun
Lesson 4 from: How To Create Beautiful Portraits By Simplifying LightAudrey Woulard
Navigating Full Sun
Lesson 4 from: How To Create Beautiful Portraits By Simplifying LightAudrey Woulard
Lesson Info
4. Navigating Full Sun
Lessons
Lesson Info
Navigating Full Sun
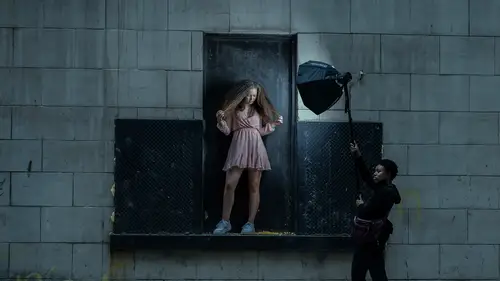
Yeah, So this next segment is going to be all about full sun. We are going to balance ambient lighting with a stroke. Now, my model is always this. Regardless if I'm in full sun or not. Light. First location. Second now, what does that mean? That means my ambient lighting is going to always be my main priority. Regardless if I'm using a strobe or not, my ambient lighting is going to be my main light. That's what I consider to be my main light. Then I'm going to bring in a strobe and that is actually going to be my second light. So when I bring in that strobe, I can decide how intense or how I guess natural it will look. That is the key to having those dramatic looks. Now in this full sun set up. The sun is going to be behind my subject. Behind me. The photographer, I'm going to have an open area because we want to make sure that we have good ambient lighting behind me that would help expose for the face. Now remember that motto. Light. First location. 2nd. The reason that I love this l...
ocation. I mean, yes, it's a beautiful location, but we have natural reflectors. Natural reflectors in this particular instance is going to be a sidewalk and it's a bright, you know, light colored sidewalk. So the sun is going to be down on the sidewalk and it's gonna bounce lighting onto my subjects faces. So let's do a quick recap sun behind my subject, natural reflectors. And behind me, the photographer open air, an open area so that all, you know, lots of ambient lighting can bounce onto the face. So we're gonna show you the kind of the behind the scenes and that and you can see exactly what that setup looks like. I'm going to show you the images that I captured from that and then we'll discuss that, you know what you know, set up. So we'll be give all of the info so that you guys can have a successful run using full sun and a stroke stay tuned. So photographing in full sun tends to intimidate a lot of photographers. But I'm here to tell you it's really super simple. As long as you keep a few parameters in place when you're taking these images. Now, it doesn't matter if you use a strobe or not, if you are standing in a grassy area or not, keep those parameters in place and you'll have some success. So in this setup, the sun is going to be located over the water and behind me it's going to be that grassy area, ambient lighting, free flowing onto the face to help with exposure. Now I am gonna have my model standing on that sidewalk and it's just going to help aid and give me that little extra lump as a natural reflector. So again, sun high in the sky behind my subject. Now I do consider high noon to be around You know, or at noon. Um that's what I consider a full sun, but I do know that in different areas of the world it can be different. But that's a good you know rule of thumb. Now the next thing is you want to make sure that you've got an open area behind the photographer. That's usually the point that people miss. So it does not matter if I use you know just natural lightning is going to insert an image. Let you guys see that and once now you can see I am able to capture that sky. But if I do bring in a strobe, it can be located at camera left or camera right. It really truly does not matter at all for personal preferences, I usually like it at camera, right? But in this particular example I'm showing you it is that camera left. So it really doesn't matter now. You can see I've got my model standing around the sidewalk and I've got all that bright, beautiful son. But we had a bit of a snafu when we were filming this because little bugs, we were being attacked. They were everywhere, but we were in the middle of the rainy um time of the year and this was one of the only full sun days that we had. So we had to make it happen and look at how beautiful that is. We don't even see any of those disgusting bugs anywhere. I wanted to do a quick little sidebar because I'm often asked about my white balance. So I'm using a Nikon Z 72 and I use auto white balance but I'm able to tweak it. I can keep, you know, the overall color of the scene. I can change it and you know, keep warm colors. I can take the warm colors out all by using the eye menu and it's so super simple for me to kind of flip back and forth and get the exact temperature that I want in my images. Love it. Beautiful. Okay, you too can be next to each other. Okay, sorry. Okay. Okay. Hold on, go Alfredo. Go, go, go, go. Yeah, just like, okay, now I'm going to get above the knee ready. Nice. Yeah. Nice. Beautiful. Keep going. Nice. You're going beautiful. Now let's break the shot down again. When you have those parameters in place, it all you have to do is worry about the pose or the expression. So as you can see, the light is not completely facing the model because the light is feathered, the distance between the light and the model is really you know short And the light is powered at its highest point, which is a 10 because I want to overpower some of that sun on her face. Ambient lighting coming from that son bouncing down on the sidewalk, acting as a natural reflector. Again, my main light is a minute late. The strobe is considered my second light because it's acting like, you know, I call it a glorified Reflektor because it's intensifying those um you know, highlights that I love and it gives that bit of you know dramatic look by keeping it super simple. If you pay attention to the ambient lighting first, then everything can look a bit more free flowing, but you still have an element of drama from that strobe and that is the exact look that I want over here and hopefully all of this is starting to click a mute light coming from above, bouncing onto the face and look at that gorgeous. And my highlights are beautiful, Nice couple more. Keep going, keep going. There's some smiles. Nice, nice, nice. And I think I am good. Oh, now I mentioned naturally only, you know, quite a few times during this particular segment and this is a setup. I decided to do it really quick so that you guys can see what it looks like. Nice. Some are moving really close, look right at me. Not a bad looking image, 85 millimeter 1.4 I S 0 100 shutter. The only thing I'm missing are those highlights that I like so intensely. So I'm always going to bring back that strobe because now I want to have a bit more dimension to the face and I don't want it to look so flat. Beautiful. Mhm couple more. Yeah. Nice. All right. Now what I want Berkeley is I'm gonna get a kind of a killer close up shot. Beautiful. And then go ahead and play with your hair and to do a combo of smiles and then those smiles. There you go. Beautiful. Nice couple more awesome. Now you see how easy that is. I mean all I have to do follow the formula and then I just worry about the expression and the pose and do whatever you want. Change the composition. Get full bodies, get three quarters get close ups, all of those different setups whatever you want to do. But I no longer have to worry about the light aspect because it's all set up and I'm using that glorious ambient lighting and then bringing in that strobe to get to intensify the image where it just gives it that you know, kiss of light that I want. Not so you know, overpowering, but a nice kiss of light. Just keep moving Berkeley Yeah, that's so pretty. So I hope that this made full Sun a little less intimidating. Following that formula, you'll never lose bring in that strobe. Have it powered high because you want to overpower some of that son and you are all set.
Ratings and Reviews
Michael A. Gruich Jr.
My goodness! This class is like a breathe of fresh air in the morning. Vey easy to follow along for some very amazing results. Really enjoy the friendly presentation, filled with tips and clear explinations for working with light using a minimal setup. Thank you Audrey
a Creativelive Student
Audrey brings together and simplifies divergent ideas in photography. Finding beautiful available light (based on direction and quality) on location is her first priority. She then perfects the light using a single strobe on her subject. Her style emphasizes shallow depth of field using fast primes and high-speed sync, and her post-production is minimal. She offers a pragmatic workflow and a creative philosophy that values getting out in the field and making photos. The reliability, ease of use, and affordability of the newest off-camera flash solutions make this kind of dramatic portraiture accessible to more artists.
Yo Pal
Wow! I love her non-complicated process and the stunning results! I can't wait to use all I learned from her shooting on location as well as her editing tips. Audrey has a great personality and is a teacher I would watch over again. Will search for more of her classes. Did not want the class to end! Yolanda
Student Work
Related Classes
Portrait Photography