Light and the Urban Location
Lesson 6 from: How To Create Beautiful Portraits By Simplifying LightAudrey Woulard
Light and the Urban Location
Lesson 6 from: How To Create Beautiful Portraits By Simplifying LightAudrey Woulard
Lesson Info
6. Light and the Urban Location
Lessons
Lesson Info
Light and the Urban Location
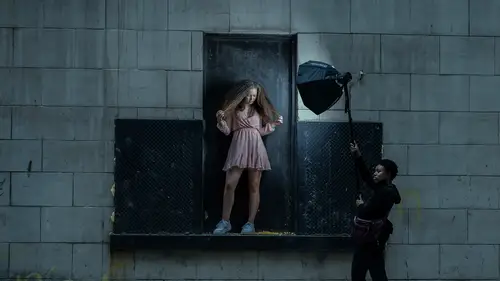
This area is a prime example of light. First location. two now this area is pretty disgusting. I mean, I'm surrounded by garbage cans, they're dirty puddles of water on the floor paper everywhere. But guys, this light is beautiful and I'm gonna let you in on a little secret. I don't necessarily want my clients to walk into an area and can see the beauty of it. I don't want to give them a thought that you know what, maybe they can capture the same image themselves if they're able to envision the final result instead, I want them to wonder what is Andrea going to create right here. And then when they see the final result, it's magic. I'm gonna try my best to give you guys a peek inside my brain to give you a bit of that thought process. So let's talk about the light. Now, when I'm photographing in the city, I need to have a couple of parameters in place for me to feel that it is a successful shot. I'd like to have buildings on either side of me, tall ones because what that does is it bri...
ngs in beautiful filtered light from above. The other reason that I like this particular area is because of the cool tone of the buildings. I am someone who likes to have more cooler tones in my images. So if I wanted to bring in some colorful, you know, outfits on the people that I photographed, this background gives a nice kind of steel look gray, very monotone. So it's a bit of a juxtaposition that aids into my images. Now I mentioned the filtered light that's coming from above this particular location. You've got the buildings on either side of me and then behind my subject, I've got these brighter buildings. So it really helps make my subject pop, especially using light apertures. Lastly, let's discuss that whole wide aperture thing and photographing and an element of chaos, which I am personally drawn to having different, you know, things behind my subjects. It aids in different planes of focus. So I've got my subject one plane then different areas behind my subjects can each be its own plane of focus and inserted image. And let's discuss it and I'm going to tell you exactly what I mean by that. So I wanted to use this image because I believe it gives a really good example of what I meant when I like to have different planes of focus within my image. Really, I'd like to have a lot of chaos behind the people that I'm photographing because it tends to make them pop out and I'm going to show you guys exactly what I mean by that. But if you just look at this particular shot, you'll see you've got just a lot of things going on behind her that most people would shy away from. For me, I tend to embrace it and figure out how to really use it to my advantage. So you've got the cars, you got garbage cans, but they're not really the focus. Now, let me just show you guessed the um quick little behind the scenes. Uh give you my stats on that. You've got an F 1.8 aperture I. S. 0. 400 a 64 100 shutter. And as I was illustrating with the footage, you see, you've got the light coming from above. So that ambient light is aiding in this image. But I also have my strobe that's located at camera, right? That is a B-10 and I'm using the two ft Octa box, which I told you guys earlier, is a double diffused. So you see how it's nice and close. So it gives a really soft quality of light. Now let's go back to that whole plane of focus thought process. So obviously when you're looking at this image, our girl here, she's going to be the main focus as she should be, But when we start to really break it down then you'll see exactly what I'm talking about and why, you know, um she tends to pop off a little bit more now, of course, that F 1.8 aperture, it totally does help with all of the stuff going on behind her. But my first plane of focus is my subject, as it always should be, how I have her lit going back to that inverse square law of light closer the light the more intense, the further away the less intense. So this light nice and close, soft, I've got a nice um soft diffuser so that light is not extending all the way behind her. That quality of light is actually getting shorter and shorter and shorter. Therefore my subject is now the brightest person or brightest object, I hate to call the objects, but brightest object within the image. And that is by design. So now I want you guys to start looking at what's next? What else is like around her? And how does the quality of light, you know, um display itself on those things? So now let's look at everything else. You've got these pillars right? That on either side of her. Now I have I've got a whole thing about having straight lines and certain things, but that's not the point of this. But you see the light that's kind of on top of those pillars that's coming from above. And those are the things that I look for, because again He kind of like tricks your eye to make her look as if she looks a little bit three D. But you see how the lights falling on those pillars bright on top of it, but then if you, as you look down it's kind of just getting a little bit more faint now, also looking at those pillars, you got a little bright spot right on top, then like on the side you've got kind of a brighter spot, but kind of looks a little gradient if you will, that's because I'm in an alleyway and that light is coming from behind me. So now I've got ambient lighting coming towards, you know, those pillars and all of that aids in my shot and I look for these small different things um that can help make my subject pop in an element of chaos and I know it seems so fine tune and you know, minute, but honestly I care more about my background at times and how the light plays on it than my subject because I can kind of control the light with my strobe and you know, position and all of that. But what I can't always control is how the light plays on an element of chaos such as this. So now what else do I see? What else do I see in this shot? So now you've got that train in the back. So luckily with them in Chicago or what we call there are L. L. trains and they come like every five minutes so I can wait for a train if I want it in my shot. So it's not like the train is there and then it's gone. It literally comes on a regular basis, like a bus, like a public um bus. But I wanted that train in the background because of the color tones. It matched the buildings and I knew that son that's coming down was going to reflect on that silver train and all it does is it AIDS in my shot, it's framing my subject. So from a composition standpoint, all of these things kind of box her in. I didn't even circle that car that's in the back on at camera left. But again, that light coming down on it all AIDS in my shot. So those are, that's kind of what I was talking about. You got those different layers. Now that image was shot at around captured around, I would say about 34 kind of late um in the afternoon, but I wanted to show you guys what the light looked like if it was earlier in the day. So this was around 11 a.m. And as you can see with the buildings behind her, look at that train, it's not giving you the same look because the sun is not in the correct position to give that. And also, if you look at on the grey buildings at camera, right C can you, how can you say you can have those are different reflections on there, which is coming from windows. So I don't necessarily like photographing in this alley at this time of day because of the different elements that can distract. Sometimes I do come over here, but I changed my composition. So this area in particular is going to give me lots of different looks. There's so many nooks and crannies and I'm able to get different looks in if I'm using even just natural light or bringing in a stroke. So, in this next segment I'm going to show you exactly. Some of the things that I'm going to go for it because it's so many, I couldn't possibly show you all of them, but I'm gonna give you an idea of what my favorites are and my go choose, stay tuned. So we're going to head over to the alleyway and it's around four o'clock ish in the afternoon. And as I mentioned earlier, this is my favorite time of the day to photograph in this particular spot. So my goal is to get as many looks as I possibly can um by having her in just one position in this alleyway. I'll have her change her pose and different things like that. And she's not always located right underneath the light and that's particularly fine. Beautiful. Oh, that's cute. I love when you do the walk and then you smile, you look back. There you go. That's pretty. A couple more beautiful. Mm hmm. Beautiful. Now I've been photographing her since she was eight years old so she kind of knows what to do and what not to do. I'll give her a little bit of direction but just kind of have and I'll say just move side to side and she kind of picks up, you know exactly what to do in terms of posing. Which is always a good thing. Not everybody can be like that. But I really don't tell people to do specific poses but just move. But as you can see here in this position, the light is feathered off of her and it's kind of pointed a little bit just off to the side. So I'm able to incorporate get ambient lighting behind her but still keeping it very dramatic on her. So you've got my settings their eyes. So 404,000 f. 1.6. So when we go back I'm changing my position a lot. You guys will notice that I do kind of squat down so I can shoot up a bit because I find that especially with teenagers it makes them appear more empowering. And that may just be my thought process there. But that's um that's literally why I do it. But again look keeping position of the light just really kind of take note of that. Got it nice and close still to her but kind of off to the side. So not always pointed directly at her so I can still always preserve that quality of ambient lighting. So now let's just break down, you know what we just saw. So let me just give you a shot to look at again, light filtering from above. I've got my stroke and that's located at camera, right? And that's just my own personal preference. Sometimes you may oddly see it at the left but I just I just prefer it at the right, but I've got that light feathered coming at camera right. F 1 .6 400 s. o. and a 4000 shutter. So again I've got those pillars, pillars but there's buildings located from either side of her blocking a lot of that ambient lighting that would normally kind of be a little bit more free flowing. So think about it, you know, in terms of light and shadow or white and black, black or shadow kind of decreases the light. White reflects light. So that's where I use those buildings for in this particular instance, so just bringing it back, you guys can see the light coming from above. And I've got those buildings on either side to block off or kinda suck away some of that um free flowing ambient lighting that will be located within that alleyway. So I can have the free flowing light from behind me, the free for free flowing light behind my subject. And then I've got my strobe that can dictate exactly how I want it. Now, what I just showed you earlier, that footage was captured earlier in the day. And this is why I don't necessarily like being in this area um earlier in the day around 11 a.m. Sons. Very, very high. But it's located in the sky more towards those buildings behind her. So I get lots of blowout now. This is what it would look like if I just decided to just take the shot. But it's still honestly guys not my favorite look because a lot of that that um blow out from the sun still is located on those buildings. And because I like to keep a lot of free flowing ambient lighting behind my subject and I don't want it to go to dark behind them. I unfortunately get a lot of that spill if I'm not very diligent about choosing my locations and notated how the light falls on, you know, different objects within, you know, those areas. If I don't know, take that, I get things like this. So this is why I know when to do it now comparing it with some of the shots that we um that you guys just saw today 85 millimeter 1.4 I. S. 0. 404,000 shutter, 1.6 aperture buildings behind her look perfect exactly how I want them, nothing competing with my subject. I'm able to really get good light on her beautiful shadows and I want to give you guys a quick little sidebar um and it's actually one that I uh from a shot that I captured with this particular um client of mine a couple years ago. So let me just show you Audrey cam and we're back in this alleyway but I'm going to use it in a little bit different way. Um This is actually not with a strobe, I'm just using the light that's around me. So you see those lights, those little street lights above the doors. Well you would use a lot of those within my images but not, I don't need a, you know, a strobe in order to do it. And this is what I would get 1.6 aperture I. S. 0. 512 50 shutter and okay, just just to kind of break down the thought process from the actual shot. If she were looking directly at me I would have of course I would have gotten um the light from above. You know, really kind of casting the shadows on her face. So what I wanted to do was like okay well how can I get you know, a nice shot and think outside the box with the light that is presented to me in the location that I was at, have her look up at that light, get a nice beautiful pose and that's kind of how you play around with the situations that are presented to you. So that's my little sidebar here. But so next I'm going to use this doorway for a couple of ambient light images only. And the reason that I'm going to start off using ambient lighting because I love the black door and I also love the way that the ambient light is. You know, it kind of looks over here because remember white um reflects light and black, some tracks from light. So because there's lots of good shadow, like a little shadowy area over there, I get some really nice shadow play while have combining it with just a beautiful ambient lighting so I can get a more dramatic look, but only using natural light. So I had I did decide I was going to go ahead and bring in a stroke and um but I'm gonna change my position over here for two reasons. So a I do like leaning against buildings because when I'm photographing with wide apertures, I can get some really cool um shallow depth of field in the foreground of the shot. So then that's doing that layer of focus. I'm sorry, layer um plains of focus again I get some kind of cool um depth of field in the foreground. Then I've got my model and then I've got the depth of field behind her. Now bring it in that light again, going back to you. Um Black subtracts from light. I can get some really nice shadow play, combining it with me leaning against the wall to get some really cool um shadow depth of field in the foreground and then I can get a more dramatic look um with the strobe right on my model. So here you can really see where I really kind of used more depth of field in the foreground on this rather than um in the background if that makes sense. And it kind of like frames her so you see how close I am on that wall, I mean I'm like literally pressed against it and unfortunately all my hair is like blocking the camera, but really like leaned against that wall and sometimes I'll have her step away from it so I can kind of play, but again, light nice and close, not directly on her and look at those highlights on the face, exactly how I want it playing around changing up my composition and that. And now you can really see how that camera is. Just leaned on the wall. I'm totally leaning on the wall. So that's how I'm getting a lot of that foreground. Um that that um showed up the field in the foreground. So that's my little trick um here to kind of change up my looks and adding a strobe and getting that nice, cool shallow depth of field in the foreground. So I'm gonna see you guys in the next segment. Mm It's cute, cute, nice
Ratings and Reviews
Michael A. Gruich Jr.
My goodness! This class is like a breathe of fresh air in the morning. Vey easy to follow along for some very amazing results. Really enjoy the friendly presentation, filled with tips and clear explinations for working with light using a minimal setup. Thank you Audrey
a Creativelive Student
Audrey brings together and simplifies divergent ideas in photography. Finding beautiful available light (based on direction and quality) on location is her first priority. She then perfects the light using a single strobe on her subject. Her style emphasizes shallow depth of field using fast primes and high-speed sync, and her post-production is minimal. She offers a pragmatic workflow and a creative philosophy that values getting out in the field and making photos. The reliability, ease of use, and affordability of the newest off-camera flash solutions make this kind of dramatic portraiture accessible to more artists.
Yo Pal
Wow! I love her non-complicated process and the stunning results! I can't wait to use all I learned from her shooting on location as well as her editing tips. Audrey has a great personality and is a teacher I would watch over again. Will search for more of her classes. Did not want the class to end! Yolanda
Student Work
Related Classes
Portrait Photography