Navigating Full Sun and the Forest
Lesson 5 from: How To Create Beautiful Portraits By Simplifying LightAudrey Woulard
Navigating Full Sun and the Forest
Lesson 5 from: How To Create Beautiful Portraits By Simplifying LightAudrey Woulard
Lesson Info
5. Navigating Full Sun and the Forest
Lessons
Lesson Info
Navigating Full Sun and the Forest
This is one of those hidden gems that I love to photograph here in downtown Chicago as you can see. We are in the forest now, believe it or not, I personally have a philosophy that all forests are not created equal when I'm in these particular situations or really in any situation, I'm always going to think about my ambient light first because remember my ambient lighting is going to be my main light and when I bring in a strobe, that stroke is going to be my second light. When I'm choosing this forest area, I love to have something that's a bit more wide open because that's gonna bring lots of free flowing ambient lighting that I feel I can shape and mold. Now I'm gonna give you guys a little bit of a bird's eye view of exactly what this location looks like. And I'll point out exactly why I love it. So here, I really like the fact that if I'm going to have trees next to me, I would rather have them on one side or the other, either on my right or on my left so I can bring in that strob...
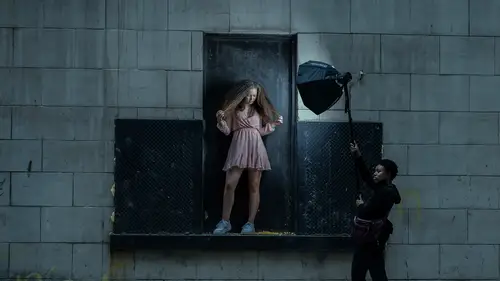
e and I can kind of bend and mold the light exactly how I wanted. As big as this area is. I really only come to one specific spot because it has all of those elements in place that can create those dramatic images using gesture camera and one strobe. So remember I'm going to combine the ambient light or rather I'm going to balance the ambient lighting with my strobe. But I'm using my surroundings to really capture the look that I want. So stay tuned and I will see you guys in the next segment. So we're headed over to the forest area and as you can see those little pesky bugs are located there too. But we've got to make the best of it. And I'm going to go over to the spot that I prefer to photograph and in this wide open area. So pulling out the Audrey camp, you'll see behind me lots of wide open space. I don't like those trees that you see to be close to me. They're actually very far away. So, you know my rules that I like to have in place when I'm photographing in full sun or high noon is I'd like to have the sun to be located behind my subject. And this was this is what will be behind her. You can see I still have nice contrast with, you know, between with the trees, but that son will be located behind her and now I'm panning, it would be located at the left of me. Nice wide open sky. So what will be located on the right of me is more contrast in trees. Beautiful, nice. Mhm. So this is what the light setup looks like. You see the same exact thing. I've got the light fairly close. So the closer the light source is than the softer the light is. But it's feathered so it's not pointing directly at her. The light power is fairly high. I am using a pro photo be 10. So it is at a 9.5. The highest that it will go is at a 10. Mhm. Mhm. Right, couple more. Mhm. Now, if you look at the distance I am away um I'm sure I can go between a three quarter and a full body. So this one here I wanted to get more of a golden look and we'll do this part of editing later on. But you see exactly what I'm going for. So I kneeled down and I angle my camera up to get shots like those because I want to have kind of a little empowering look. So this is when I will now start playing with my composition, start with a full body, then I start to move in closer and closer so that I can change the compositions that I capture so that can deliver a bit more variety to my client without moving my model so much nice. And so these are the shots that I would get. So this is one of the reasons why I love that, looking down um angle. So when I angle it up, it just gives such an empowering look. So, you see, I kind of kneel down a little bit and just change those compositions a lot. So, right here, I'm really getting some of those three quarter body shots, but still playing with that light. Have it nice and close, Nice, look off that way. Nice laugh at something, looking off that way. So as I have it nice and close I'm able to get soft created light that balances with some of the harsher light that you can see literally right here. Um in this clip that's beautiful. Look right at me. Nice. Mhm. I want to see how soft that is. And so my settings on this 1.4 35 millimeter lens, 100 S. 016 aperture couple more. That's it. Oh that's cute. Don't move Berkeley stay there. Let me get this shot. No I bring that light down just a minute. There you go. And then they look right that Berkeley, there you go. Mhm. Now you can depth. So this is kind of where my composition is on this still I. S. 0. 108,000 shutter 1.6 aperture. Sometimes people wonder why I have such high shutters, why do I prefer them Higher? The shutter sharper the image. And if I'm shooting at a 1.6 aperture I need my picture is as sharp as I possibly can get them. So here I'm just literally playing with my um composition. Now I want to go back to um this particular set up because you can see how far away I am and I'm going for a full body shot and here we go and I want to break this down now when we're looking at that area remember I've got um the trees and you know they're contrast and it's bringing in shadow, it's subtracting a lot of that bright light that's coming from camera left that is so important to me and it really makes me choose a location or not depending on how that ambient light will play with the objects that are around them. Again, reminding you guys again, wide open, you know, area that's located to the left of me. So located a camera left, so I have more light. So here's your set up again. Light is one stop from full power, so it's really, really high. So I'm able to overpower the sun a bit that's going to be shining on my model's face. So I don't get any hotspots or anything like that. Um, but again, nice and lights fairly close in my opinion. So I'm getting a nice soft look and here's my shot. So when you're looking at this particular image and we are going to um see some of the shots from this, you'll see where the light is located, but we'll see some of the shots from this during the editing process. But when you see where the light is located, again, not that far off from her at all. So when I am, you know, creating the final shot, I can easily remove that light. So there's your son son is really located behind her. It's literally located behind her. So again, my rules for Full Sun is exactly the same. Need to have that light behind. I'm sorry the sun behind her because if the sun were behind me, she would be stunting, she'll be blown out. It will be all sorts of things happening. Um but we don't want that. So making sure that that light is, I'm sorry the sun is located behind my subject and then bringing in that strobe is really giving me, you know, like I said, it's acting like a glorified Reflektor because I love to have my highlights. You know, nice. And I guess bright on the face. Now let's talk about that ambient light, sun coming from above, but also coming from camera left. And that's why I can get, you know, that kind of that glow in her hair. I can get all of those really, really cool elements that when I bring this image into editing um I can just accentuate what is already, they're so setting up that shot, getting exactly what I want. Then when you bring it into editing you do nothing but you're able to enhance it and not necessarily create it. Not saying that creating it is bad, but if you can accentuate is what is already there, it does cut off on your post processing time, which goes back to simplifying. So you guys in the next segment.
Ratings and Reviews
Michael A. Gruich Jr.
My goodness! This class is like a breathe of fresh air in the morning. Vey easy to follow along for some very amazing results. Really enjoy the friendly presentation, filled with tips and clear explinations for working with light using a minimal setup. Thank you Audrey
a Creativelive Student
Audrey brings together and simplifies divergent ideas in photography. Finding beautiful available light (based on direction and quality) on location is her first priority. She then perfects the light using a single strobe on her subject. Her style emphasizes shallow depth of field using fast primes and high-speed sync, and her post-production is minimal. She offers a pragmatic workflow and a creative philosophy that values getting out in the field and making photos. The reliability, ease of use, and affordability of the newest off-camera flash solutions make this kind of dramatic portraiture accessible to more artists.
Yo Pal
Wow! I love her non-complicated process and the stunning results! I can't wait to use all I learned from her shooting on location as well as her editing tips. Audrey has a great personality and is a teacher I would watch over again. Will search for more of her classes. Did not want the class to end! Yolanda
Student Work
Related Classes
Portrait Photography