Lessons
Class Introduction
03:57 2Document Set Up: Love Note Card
07:34 3Add An Image: Love Note Card
06:14 4Create And Place Type: Love Note Card
14:30 5Add Color And Layering Fonts: Love Note Card
15:32 6Add Additional Graphics: Love Note Card
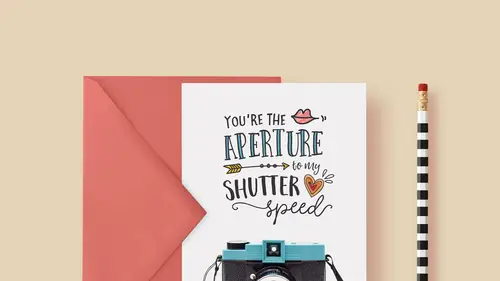
17:12 7Image Inspiration For Greeting Cards
03:36 8Work With Multiple Images: Thank You Card
07:38Lesson Info
Glyphs: Thank You Card
And now we're ready to add some type. The first thing we wanna do is add a type bubble to this, and this type bubble comes from another set of fonts that I really like, that I've been using in all of these designs. I've been using them combined with the font box collection, and that is called the sun daisies, what is it called? Sun daisies, Sunshine Daisies, excuse me. Sunshine Daisies collection and you'll find that over at Creative Market too, and in the resource guides, I have links directly to all of these things. But, this is a really nice collection that has some more hand-drawn fonts, and it also, one of those fonts is what we call a dingbat font. So, let me show you how that works. I'm gonna grab the type tool and get my default colors here, black and white, and I'm just going to click, actually I want white on top so I'm gonna flip flop these. So, pressing this little arrow is going to flip flop my colors and that'll just make my type white, and I won't have to change it later...
. So, I'm gonna click to get my cursor active. Then, I'm going to go to my Glyphs panel, and in the Glyphs panel, I'm going to type Sunshine Daisies, and Photoshop is gonna ignore me because for whatever reason, the Glyphs panel doesn't let you type as well as it does up here. So, you will have to do some scrolling, which is a bit of a pain, but it's not the end of the world. So, I'm gonna scroll in my font list to something called Sunshine Daisies Extras, and this whole font, let's make this Glyphs panel a little bigger so you can just see a little better. This whole font is just doodles, basically, and it comes in two varieties. We have Outline and we have Fill. So, you can layer these doodles the way that we layered the text in the other example. You can layer these doodles to have outlines and fills which can be super fun, and we'll see that as we go. Right now though, I'm gonna switch to the Fill variety, and I just actually want this right here, this little talk bubble that's here. So, it's gonna be filled and in this case, because white is my active foreground color, it will just be white. So, I'm gonna double click to insert that at my cursor and then I'm gonna close the Glyphs panel, and I'm gonna set my type. And I'm gonna get the move tool and move it over, and it's obviously very small. So, I'm going to enlarge that by pressing Command or Control + T, and shift dragging from a corner, 'cause I want this to be a rather large bubble. I can drag down to reposition it. I can also rotate it again, by dragging, and hovering over one of the corners and rotating like that. That might be a little bigger than I bargained for. Maybe actually about, that's actually pretty good. Let me get a smidge smaller, something like this. So, what I'm looking for, is I want it to not go all the way to the edge up here because I like seeing that it has a defined edge, but I do like that it's overlapping the dinosaur's snout just a little bit because that creates some dimension in our design. So, I want to be able to show that. So, we're gonna mask this out so that the dinosaur actually ends up in front of the type, which is a really cool effect. So, we'll go ahead and commit this and before we mask it I want to also add a little, sort of a drop shadow behind it, and yes we can add a drop shadow from the Layers panel down here, but we're instead gonna just duplicate this layer. So, you can press Command or Control + J, or you can drag it to the new layer button and drop it down there, and that makes a copy. And I'm gonna call this Talk Bubble up there, and this bottom layer we'll call Talk Bubble Shadow, and this one I'm gonna convert and fill it with black. So, to do that, well let's just do it the easy way. We'll go to Edit, no we won't. We'll do the keyboard shortcut. To fill a type layer with your background color, your current background color, it is, on a Mac it's Command + Delete and on a PC it's option, or excuse me, Alt + Delete, but we won't see anything happen because it's stacked directly underneath this layer. So, in the Layers panel you wanna make sure it's the bottom talk bubble that you fill with black and then, you can just move it into whatever position. I'm gonna use my arrow keys to just nudge it over like this. So, we get kind of this little popping, comicy, fun dimensional look, and that's it. So, those are both vector because they're actually type layers. So, they're actually text technically, but they're text in the shape of a talk bubble. So, we've got a white talk bubble and a copy of it that we filled with black. We moved it down below and now we're gonna group these into a folder. So, I'll click the top Talk Bubble in the layers panel and then I'm gonna Shift click this lower one so they're both selected, and then I'm gonna come down here to the bottom of the Layers panel and click the folder icon. That puts them in a group that we can call Bubble and that allows me to mask this group. So, what does mask mean? Mask means that we're gonna hide the part of this talk bubble that is covering up the dinosaur and by doing so, we will create the illusion that the dinosaur's actually standing in front of the talk bubble. So, the way that we do that is that we add what's called the layer mask. So, in the Layers panel, at the very bottom we have this button here that looks, it kinda actually looks like a camera. It's a rectangle with a circle inside and you click that, and we get in our Layers panel this white area called a mask. And just like a mask you would wear on your face, if you were gonna go trick or treating or whatever, and you wanted to cover your face and like, a Zorro costume, you would cover your eyes with a black bandana; when you paint on a layer mask with black, it blocks anything on that layer from being seen. 'Kay, so wherever we see white on the layer mask, we can see the layer, and any place that we paint with black is going to block that layer from being seen. So, it's like the ultimate mask. Just like you'd wear at Halloween. So, to do this, we are gonna grab our paintbrush and I'm gonna zoom in so I can see better, and I'm gonna temporarily reduce the opacity of this talk bubble because I need to be able to see the dinosaur beneath it. So, in the Layers panel where it says Opacity, I'm gonna temporarily just lower that somewhere like, in the middle. So, around 50%, that allows me to see the area that I need to mask. So, I've got my paintbrush. I notice by looking up here in the Options bar that it's got a soft edge and I need a hard edge for this to work, so to fix that you can do a couple things. You can click that little, this dropdown here, and then take this hardness slider and drag it to the right, all the way I guess, or sometimes I like to just do it to like, 90%. Or, an alternative to that, remember those bracket keys next to the letter P? If you hold Shift and add Shift to that, the Shift left bracket key makes your brush softer, and the Shift right bracket key makes it hard. And that goes I think in like, 20% increments, so what happens when you're changing that is you're just changing the slider behind the scenes. So, I'm just gonna go to like, 90%, just so it's not too hard and then I'll use the left bracket key to make that cursor smaller, and I wanna make sure my opacity for my brush, like painting, is 100%, and look what happens now. So, now I just paint on the dinosaur. So, I'm basically painting away the talk bubble by masking it. So, I've got black paint here, in my Layers panel I'm on this funny thing called the layer mask, and I'm painting with black, but I don't see black coming out of my paintbrush. That's because it's in the mask. I'm not painting the image, I'm painting the mask. If we wanna see the mask by itself, oops, for what it is, I can Option or Alt click on the mask in the Layers panel, and now we see I am indeed painting this black blob here, and that has the effect of hiding the talk bubbles in this area. So, I'm basically putting a mask on the type bubbles, the talk bubbles, so we don't wanna see the talk bubbles in this area. 'Kay, so now to get back to our image so we can see what we're doing, I just Alt or Option click one more time on the mask, and now we see what we're doing. If I make a mistake and I accidentally mask too much of the talk bubble, I can just press X to get white paint back on top, and I can then just paint it in. So, if I make a mistake or if I mask too much, or you know, maybe I need to make my brush a little smaller and really get in here, I can see what I'm doing and have a lot of control this way. So, if I make a mistake it's easy to fix. Oop, like there I went too far, so now I'm gonna press X to get black on top again and then paint this back. Now, to see our work let's go ahead and restore the talk bubbles back to 100%. So, in the Layers panel I'm gonna drag that back up to 100%, and that actually looks pretty good. It's kinda this funny edge here. So, I'm just cleaning it up, I just switch back and forth between white or black paint by pressing X on my keyboard to exchange those two colors, and I can just paint that 'til I'm happy with it. And I think that looks pretty good. If I need to move my talk bubble around now, I can grab the move tool, and if I move it, right now you can see there's a chunk missing because that, it's got the mask on it. So, what I wanna do if I need to move the talk bubble for any reason and I don't wanna move the mask, I just come over here to the Links panel and I unlink it. And then I can drag, oops, that'll move the mask so I'll undo that, and then to move the talk bubble, I just make sure I select over here and actually click on the folder. So, you see there's an outline around the mask here, that means I'm gonna move or affect the mask. So, if I wanna move the talk bubble not the mask, I need to click here, and now I can move the talk bubble around a little bit. If I go too far I'm gonna have to mask more. So, I can move it a little bit to do that.
Class Materials
Free Bonus Materials
Bonus Materials with Purchase
Ratings and Reviews
a Creativelive Student
I bought this class and love it! I learned so much - Khara is a great teacher. She has packed in heaps of detail and new ideas, and is very easy to listen to. I am now a Creative Market addict and have had lots of fun making my own cards. Thanks Khara!
Pat Taylor Schink
I found this really really useful in many ways, like photoshop shortcuts, how to incorporate glyphs and patterns and more. I bought the Sunshine Daisies and the Fontbox pkgs and also discovered that a year ago I had purchased some other packages with glyphs/patterns/dingbat fonts and brushes and never really knew how to use until this. I have watched portions over and over because I didn't take very good notes. Khara is a great instructor. I recommend her, too.
Christal user-9a70d686
Khara has really inspired me to try making my own cards. She has taken the intimidation factor out of the process for me. I'm purchasing her class, but I sincerely hope she'll do a follow-up class with yet more ideas. I'd particularly like to see her work through a folded card with text inside. I must say that as a teacher I think she is one of the best I've seen yet on Creative Live. She doesn't flit around too fast and really explains when she is doing (and UN-doing) various steps. Thank you, Khara!