Lesson Info
6. Add Additional Graphics: Love Note Card
Lessons
Class Introduction
03:57 2Document Set Up: Love Note Card
07:34 3Add An Image: Love Note Card
06:14 4Create And Place Type: Love Note Card
14:30 5Add Color And Layering Fonts: Love Note Card
15:32 6Add Additional Graphics: Love Note Card
17:12 7Image Inspiration For Greeting Cards
03:36 8Work With Multiple Images: Thank You Card
07:38Lesson Info
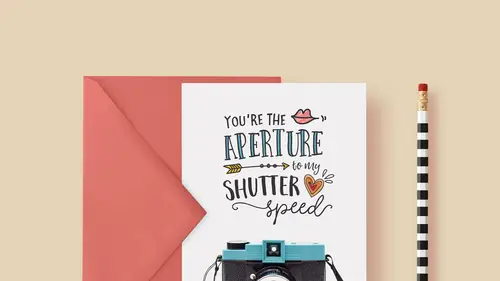
Add Additional Graphics: Love Note Card
Let's talk about the graphics that we're gonna add to this and then we'll go about organizing this a little bit better. So another way that you can spruce up your designs is by using different design elements. And those can be text based as we saw here and as we'll see in the next example. Those can be text based. They might be little ding bats and swooshes and swashes and even text illustrations as we'll shortly see, or they might be actual illustrations or other artwork from some other source or even other programs So one of the things that's really cool another thing about that font box collection from Nikki is that she includes a bunch of illustrations that she created that you can use in your design and the document that comes with that whole set if you get it, is this so she made this little doodle document these are all vector illustrations that you can use in your design pieces so we're going to be using a number of these and you can see in the layers panel that each of these l...
ittle doodles is on its own layer which makes for about a gazillion and a half layers so there's an easier way to select these things so for example we're gonna start by grabbing this little lips illustration down here so I have no idea with layer that is cause they're all just called compound shape and that's a lot of time to go through and to try to find it so one little trick that can be helpful is you use the move tool and you hold down the Command key and you'll notice as I hold command or control on a pc I get these little purple boxes that show up around everything and that's helping me select stuff so if I can click while I have the purple box around these lips then it selects that layer for me and then I can move it and I can grab it and take it Okay so to make that work again it's the move tool and you hold down Command or Ctrl and then you're gonna click and I'm gonna drag that back into our document and before I release it I'm gonna shift hold down shift on the keyboard the reason for that is otherwise this might end up out here in the pasteboard area or what I refer to as outer space and then it's really just hard to find so let's repeat that one more time let's go back to this graphic. Okay so I got the move tool, I hold down Command or Ctrl to sort of smart click this layer, and that will activate the right layer in the layers panel. Then I'm just gonna drag, I'm gonna pause on the tab that I wanna switch to. I'm still holding my mouse. Then I'm gonna drag and before I drop the mouse I'll hold shift and that will land it in a place that I can see Alright, and this happens to be a gray color which I want to replace, so to do that I'm to go to my panel over here and I'm gonna click this button here to get my default swatches of black and white and with black as my top active color I can do a shortcut to just fill this, and the keyboard shortcut on a Mac is gonna be Option+Delete and on a PC I believe it's Ctrl+Delete and that will just fill that layer with that color and because in the layers panel this comes in as a shape layer, a compound shape layer we don't have to worry about like pixels or just messing up the layer, it's just going to effect what's already on that layer. Okay so I'm gonna drag this into place and I'm going to put this here, make it a little bit bigger because it's a shape layer we can do that so I'll press Command or Ctrl+T and shift drag from a corner and then I'm gonna rotate a little bit by hovering my cursor on the edge and clicking and then dragging to get that nice rotation there and I'm gonna come back down and make this type a little bit bigger as well cause I wanna fill this a little bit more. So I'm gonna come down to select that layer in the type layer, so that's this one right here I'll press Command or Ctrl+T and I'll Shift drag from the corner, so something about like that and I'll press the commit button to commit that. Alright let's go get a few more illustrations. So somewhere is this, here's this little arrow that I wanna use so I've got the move tool I'm gonna press Command or Ctrl again and when I see the purple box I'll click to get that layer and then I can drag So again I'm gonna click and drag old my mouse down this whole time, switch documents and hold shift when I drop it and we get it here I'm gonna fill this also with black because it happens to be gray, so I'll press Option+Delete or Ctrl+Delete on a PC and Command or Ctrl+T to resize it So I wanna fill up this space here about like that Now if I wanna nudge this position a little bit more gently I can use my arrow keys and maybe I wanna rotate it a smidge so I'll press Command+T or Ctrl+T and then when I hover my cursor out here I can rotate it just a little bit like that. We'll go ahead and commit that. Alright we're getting close. Couple more illustrations here. Let's get them quickly. I'll get this guy right here, hold down Command there we go, think I got it, bring it over put that about there, and I'll use my keyboard shortcut to make it black again, Excellent and lastly we'll get this fun heart collection bring that over, there we go I'll just resize that a smidge it almost fits just perfectly, and recolor that as well Awesome! now if I want to I would in my document I would rename these layers because I want to know what they are so for example, to know what this one is I can check by flipping this layer on and off and I see that it's this lips layer so I'm gonna double click and call it lips this one, we'll test it, these are the hearts these are like little, I call them petals and this one is the arrow so now we know what everything is in our layers panel that's pretty important we're gonna add some color to this and there's different ways of doing this as well if we want sort of that hand drawn look then this is what I like to do so we're gonna actually just paint this in by hand it's not as difficult as you'd think it actually can be pretty simple so I'm gonna create a blank layer to do that so in the layers panel Where's the bottom of my? There we go. at the bottom of the layer's panel is this little button down here and this creates new blank layers so I'm gonna click on that and I wanna make sure that this blank layer is underneath all of those doodle kind of layers so I'll put this down here at the bottom so if it's not there just drag it down and now I'm going to pick a color that I want to paint this so in my swatches panel I can see all these different swatches If you don't have your swatches panel open you can find it under Window Swatches, okay? so I've got mine right here and I'm just gonna pick a shade of pink that I think will be good maybe something like, ooh like this so all I have to do is click to make that active, whoops and then I can click this little double arrow to close the swatches panel now I need to get a brush so I'm gonna press B on my keyboard, to get my brush tool and at the top of my Options bar up here we have this dropdown with all of these different brushes and these are all just the presets that come with Photoshop and I like this one down here this is the 36 pixel chalk brush so I'm gonna pick this brush by just double clicking it this is just a default brush I haven't done anything fancy to it So we made a new layer and we'll call this 'Color' We got our brush and we picked the chalk we picked our color and now we're ready to paint so I'm gonna zoom in by pressing Command or Ctrl+Spacebar and then clicking and dragging I can change the size of my brush by using the bracket key So the left bracket key makes it smaller the right bracket key is gonna make it bigger and then I can just paint in here Um, right now my opacity in the options bar is set to 50% and that allows me to create a sort of a textured look where not all the paint is the same opacity or thickness sort of as I do it so that might be a look that you like if you prefer you can change the opacity to 100% and paint it in that way, it's up to you if you made a mistake, maybe you like that maybe you want sorta some scribbly like smudges outside the edge maybe you want that if you don't then you just switch to your eraser tool over here and then you just, you know, erase your edges so this is kind of just a fun very hands on way to fill this in and keep that hand drawn hand painted look so I'm gonna just paint all of these in on the same color layer here so I'll zoom in on this little arrow so I can see better and I'll pick a couple different colors so maybe this yellow color for the uh oh and I've got my eraser (laughs) so that's not gonna do me any good I gotta switch back to my brush so you can switch between them by pressing B for brush and E for eraser so I'll go and fill in this and I'm not even gonna perfectly like if I really zoom in on this you can see that I'm missing places and I'm okay with that because I like that kind of messy look so I'm gonna do the same thing up here and we'll do a different color I'll do like a orange maybe maybe something like this fill in these little balls on the arrow and then I'm scooting around my image by holding the space bar and just dragging so it's an easier way to get around instead of scrolling and then I'm gonna color in this heart and maybe I'll pick a red for the center I'm just really scribbling I mean this is just like oldschool just coloring I'm not doing anything fancy I'm not trying anything particularly I'm gonna drop the opacity down to 50% just to create more of that layered look, so I can really build up the color if I want or I can, I'm using multiple stroke too, right? so if I put that at 50% and I just do it all without picking up my mouse it's not gonna build up the color but every time I pick up my mouse I can lay down a little more color and create a built up look and then we'll pick like this yellow for this final ring let's up this a little sometimes it takes too long if you have a low opacity so we'll color this in Awesome. I'm gonna press Command or Ctrl and the number zero to scoot back and see that all on the page and I think that looks pretty awesome we can clean up our layers panel a little bit by just creating a folder, so we have I'm gonna drag the lips layer down, whoops with all these other illustration layers um, these are our two swatches and just to sort of make things nice and easy in our layers panel, let's group this a little bit so we can select the illustration the first layer I have here is lips so then I'm gonna come down and we'll include the color layer with that and I'll hold shift, and when I click color you'll see Photoshop selects all of it and I can put it all in a folder to create a group so I'm gonna click this little folder icon and that creates a group and I'll rename it by double clicking and I'll call it illustrations and then all of our type is all of these layers that have a T representing type so I'll click the top one and shift click the bottom to make another selection and we'll group that and call that 'Type' and press Enter and that just makes this easy to find later and then let's resize this and move all of this and to do it all at once is really easy since we've already grouped everything I'll hold shift so both groups are selected and if I grab the move tool now I can just move that in position like that and if I wanna resize anything I can press Command or Ctrl+T and hold Shift while I drag from the corner and I can resize this and it's all vector except for the filled in color that we filled in here, and because it's just color we don't have to worry really about any resolution issues with that but we can position this something like maybe here and then, I think, I think that would be done I would feel great about this before we would send this to a vendor we would want to check the guide layer so back in our template file here we've got our guide layer so I would turn that on and I just wanna make sure that I don't have, you know, any text getting anywhere near this line so we're totally cool in that department and I would make sure that the graphic does indeed reach all the way to the edge so for example this photo needs to go all the way to the edge and not stop, you know, some place before the edge even if it stops within this gray range that means it could show up in the final print so we'd wanna make sure that goes all the way to the edge and then we'd be ready to send this in to our vendor we would wanna make sure we turn off this guide layer before we do that so we turn that off once we're happy with everything then we'd wanna save this by going to File Save As and we'd wanna make sure wherever we put this that we choose Photoshop for the format that will save all of our layers and everything including our smart object and everything in that document so we'd wanna save that and then we'd be ready to send to the vendor but we don't send the vendor the PSD file they don't want your PSD document, Okay? You would want to send them in most cases a jpeg So to do that you would wanna come up to the File menu and choose Save As and this time we would choose jpeg just regular jpeg, not jpeg 2000, or jpeg stereo just regular jpeg and you're gonna see this little warning popup that says, hey we have to save this as a copy because you've got layers and that is fine that just means that when we hit save it's gonna flatten all the layers in the layers panel see here? So now they're all flat we get jpeg options and our choice would be the highest quality, so a setting of and you would click Okay and that's it and then this is the file that you would send to your printer or to your lab that would be that finished jpeg, Okay? so that is a look at the 'I love you' card or 'you are the aperture to my shutter speed' card I thought that was just kind of a fun thing for creative people who are into photography so there's a little idea for your next Valentine's I guess.
Class Materials
Free Bonus Materials
Bonus Materials with Purchase
Ratings and Reviews
a Creativelive Student
I bought this class and love it! I learned so much - Khara is a great teacher. She has packed in heaps of detail and new ideas, and is very easy to listen to. I am now a Creative Market addict and have had lots of fun making my own cards. Thanks Khara!
Pat Taylor Schink
I found this really really useful in many ways, like photoshop shortcuts, how to incorporate glyphs and patterns and more. I bought the Sunshine Daisies and the Fontbox pkgs and also discovered that a year ago I had purchased some other packages with glyphs/patterns/dingbat fonts and brushes and never really knew how to use until this. I have watched portions over and over because I didn't take very good notes. Khara is a great instructor. I recommend her, too.
Christal user-9a70d686
Khara has really inspired me to try making my own cards. She has taken the intimidation factor out of the process for me. I'm purchasing her class, but I sincerely hope she'll do a follow-up class with yet more ideas. I'd particularly like to see her work through a folded card with text inside. I must say that as a teacher I think she is one of the best I've seen yet on Creative Live. She doesn't flit around too fast and really explains when she is doing (and UN-doing) various steps. Thank you, Khara!