Lessons
Lesson Info
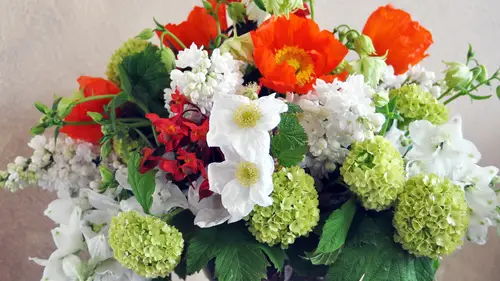
Vintage Centerpiece Part 1
So we are now going to start into our vintage design and to me, vintage is it's really more of a time period style? It could be anything from, you know, a victorian kind of look, teo, like a fifties diner or it's very much prop based seal c a lot of sofas and typewriters and suitcases and all those kinds of things that are trying tio create the feel of a particular put period in time is what would be what would fit under vintage to me, and one of the big things that I love to use for that is a mercury glass, which is what we'll be using for our vessel this time, and we're going to create this lovely centerpiece that is a pedestal, which is one of my all time favorite styles of vases to use when you're creating a dinner table escape, which is what this is going to be meant, teo be used for s o we're going to use this work table, and when we're done creating our lovely arrangement, I will bring up some plates and show you how you could arrange that as your dining table, so we are going t...
oe start with that, I'm going to move this sample out of the way, and we'll start creating hard to move that one, okay, so this is our base, so mercury glass is basically clear glass that has a silver patina put on it, and in this particular case, the silver's been applied to the outside of it. And many times it has this imprinted pattern on it. I think it's a really lovely it reminds me of lace and, um, time's gone by it's just really nice. So because this particular vessel is fairly shallow, we're gonna have a harder time filling this volume of it with short stems there. Naturally, if you were to just start with this right now, similar to you a teacup question, if you're going to start putting flower stems in here, they're going to just topple right out because they're going to be too heavy in comparison to their shorter stem. So we're going to create a grid using tape on here that's going to help keep our our stems in place. You could also use floral frogs, which we talked about before I don't use those as much in my event work, mostly because they're rather expensive individually, and they wouldn't necessarily come back to me. So this is a really great way tio, to create to this look, you can use regular a skinny scotch tape that you wouldn't you know commonly have at home today, we're going to show you floral tape, which is a little more sticky. Then probably a typical scotch tape. They just come out. I've just noticed maybe that's the correct way to say it clear tape now, which is perfect for what we're using today because typical floral tape is this green color, and when you have a lighter or even a clear base, you're going to see your edges of where the tape is. So I'm gonna have you guys use the clear tape, but for viewing purposes, I'm going to create my grid with the green so that our audience can see it better. Um, even though you'll see a few of my tape lines showing up, so we're going to do this with no water in the vase at first because you might end up tipping as you're putting their tape on stuff and we'll add the water afterwards, so I'm basically I'll show you how I'm going to start it, and then you guys can start in with me. I'm going toe start my tape line and I'm gonna start on the edge directly across from me and probably just put it, you know, not even a half inch, and it won't matter as much for you guys because you have clear tape, but you don't need to dio of really long edge that you're on the vessel itself so I'm going to just push it down with my finger and I'm going to pull it directly across from me and anchor it on the other side and then just cut that thiss tape doesn't especially tear well, so you're going to need some scissors, so now I've got one one lead line and with a few edges on it and I'm gonna do three lines going this direction and the rotated and do three more and I'll be like a tick tack toe board kind of do one over here, I think for this size vessel, this is probably good enough amount of of tape lines you're going to want to have, you know you won't eat still need to have room for your your stems to fit in so you don't want to have too many grids, but you d'oh won't have enough to hold him in also. So now we got three this side's probably done looks like you guys are pretty similar it's not gonna rotate mine and do the same pattern. I'll do one down the center going right over the top of the other ones and make sure they all touch to they're stuck together, matt and then she moreover one on either side hoops I would think everything scotch tape would probably do ok with this it might not be a sticky see, you might have to press a little harder to make sure your tape is staying but you can also get this tape I've seen it at craft stores like I know locally around here like hobby lobby and joan's and those kinds of stores have michael's have a floral a small floral department and you'll find some of these tools there so that's definitely possible you can order him online from places like save on crafts and those kinds of deals to so um so it's definitely you don't have to buy this from a floor supplier stories it's a possible okay, so I have migrated here now and it looks like it's pretty similar to the walls and I have my my squares are probably about an inch maybe a little bigger but that's probably good enough you could do more stripes but I think this is probably fine you guys pretty close thing yeah ok son in us but these away but I don't need this stuff right now and now I'm going to put in my water which I have a picture back here I think you all have some water around yes, perfect so I'm gonna pour that in and it doesn't need to be all the way to the top but you're gonna want to be close maybe a half a niche from the top because it is shallow you're goingto this is when arrangement that you would have to watch its flower level oh it's water level rather pretty well because it's there isn't as much of it for the waters to to absorb so perfect you guys doing ok so we'll fill that up and now we're going to start with again so much what we did before with your greens and for that we're gonna use this is a very common floral filler it's call italian rescue us and you'll see this in the stores a lot it's great because it's very stiff sometimes you'll get in and it's a little bit branching which would have been ideal for this situation also um but it's going to help create a really nice base for us so for this arrangement you're you're gonna wanna have sturdy greens to help create that that that base now they're definitely too long for us right now because we're not we're trying to keep create a smaller look for arrangement not as tall as we did before so I'm going to probably take off at least half of these and it's easily could just you know but two fingers on it this slide down and off they come maybe a little more effort but you know it's not too terrible so probably about I don't that's about four inches or so and I'm goingto test a length and see and you're going to have to put it in at a really angle so almost horizontal, in a sense, is that too heavy? Too long in my okay, yeah, as long as it's under and this we had more stuff it's going to push it down, but yeah, yeah, the ideas it needs to be below the water, for sure, I didn't make a very long stem and I probably could have even made it shorter, but I'm goingto start by doing on I'm pushing it in a little bit so that the leaves that first set of leaves in the tape and that's going to help anchor it a little bit too. So make sense just push it in a little further, so it's kind of grabbing that, um and you're right. So you just want to make sure that at the stem stays under the water level, them doesn't bobble up, so we're going to probably create several of these going around the edge, and then we'll try to find one or two that we can stick as up upright ones and it's gonna look sparse for a little while, but we will fill it in shortly. So slides he's around. This is definitely a design that you could easily make. Ob long looking or like if you have a long table such as this you could make two sides of it run longer if you chose to to extend the arrangement today we're not going to but this is definitely a style that you could do that too if you chose to maybe with vines with some more granaries and some flowers but today we're going to stay pretty true to the shape of the face you guys to stay hang in there pretty good ok? So I've got four of them in there now around the edges and that feels pretty decent I'm going to see who I have left that's looks pretty bushy I'm going to try to put a few of them up right and they might bobble for a while but as we have more things in you know keep him no for the upright ones you're going to have to have a pretty shallow are short stem see even that's too long and try it again that might work in my tip over for now what else I'll pull him back up again in a little while please let's try for maybe if you have enough to do maybe two or three in the center if you can again minor kind of leaning at the moment but ultimately I'm gonna want him up right? So as we add more things in all I will pull them back up to get them to where I want them to look or to stay rather and this is again helping create our shape so that our other flowers will stay where they need to be using a lot more delicate flowers this time a lot you'll see a lot more skinny stems um not nearly as much thicknesses we have before okay, so I'm gonna clear off this looks like you guys have got your shape fairly good who couldn't keep finishing mad see what we'll try next when you think you about those done, we're going to move on to the artemisia which is the silver bullet jj, I can get it out of here it's grabbing onto my my roses so silver is a huge color are gray in general right now you think well there's no gray flowers out there we'll probably true for the flowers but there's a lot of foliage that's a great tone or a silvertone and this is one of them it's also it's a cousin to the dusty miller which is hugely popular but this is one a shrub from my yard it's called artemisia there's a lot of varieties of it. This just happens to be a really lacey one so I chose that not only for its color because I feel that that helps with a vintage tone but also I like the lace feel which I feel goes with the face look and very fragrant. Yes, it's an I don't know what you describe it, but as very herbal. Yeah, probably would be good if you were trying to, like, freshen up a linen drawer, something this would do really well, but so we're going to use this. It too, because it's fairly branch e it's a soft but branch you were goingto helped build the center part with this, so I'm not going to take off too much of the lower stand. We're going to try to keep us much as I can because I want to use to sit out a little further than our rusk us wass I don't know if you'll have very many of these, maybe just a couple, so just use them as as you feel it's going to help you the most to kitsch, some structure, some around the edge, maybe one in the center. If that works, he has somewhere greenery coming in. So on a tilt up, the ones that were falling over before cfl start not quite yet. We'll have some of these, so definitely dusty miller is one that she could find a lot of, and it would work great in this situation also it's more of a solid leaf that's this same gray tone um and it's a great filler to I'm going to try one or two in this centre she'll get years in yeah, but that's good I like how they're sitting out farther than in your greenery no, you're rusk us ok let's see if I can get we're getting closer see now that you know if you can see in your bulls and kind of hiding mind now but as the is green's air going in there's they're crossing each other in the center right and like a pixie sticks or something so it's creating a lattice that now you could start putting other stems into and it'll start holding them better and that's our main goal and then the use of the tape to help create some more structure to it too okay, that was standing decently I think I'll say this one for later if I need it okay so we got all that in now let's move on tio are white flowers you'll have probably maybe one or two stems of these this is called feverfew and we're going toe when you pull them out, you'll see that they have a ton of little offshoots and we're going to pull those guys off and use them individually brazil's air more the right shape for what we're doing right now you can trim um even just pull him off, you'll you'll be re cutting him but these air great little flowers this is a double feverfew you can see that the flower is has a ton of pedals a more common one is just a daisy shape so it's got a real distinctive yellow center in just a single row of white petals around it if you ever plant this in your yard it will be everywhere within a year which is good and bad it's easy to pull up if you don't like where it is it's it's a great filler so it's nice to have around but it easily takes over your yard tio it just goes to seed and blows around and pretty soon you have too much okay, so I'm going to pull off a few more and then once you think you have a decent pile we're going we're going to use a lot of this so if you could get a good you know, eight or ten stems of it I think that be a great starting point they understand that it is just one stem and I've already trimmed off quite a bit of it honestly, yes here's another good example of what they look like this one's even bushier so that yeah it's a great level of and this just um so this is definitely a a typical filler flower where it's got one main stem and a whole bunch of little flowers coming off of there in clusters and those air great great to use for adding adding more color to your arrangement, adding more structure filling in holes it doesn't have to be a solid flower if you have a whole you can just stick a nice area little filler in there and I looks really great, so now we're just going toe again start making some shorter stems and just start testing them out I'm gonna have some hanging over the edge and then as I get that out of ring put in, then I should have enough stems flowing into the center that I could start putting some upright ones in yeah rather short because they need to be inside of the way when we start doing the center one yes, but at the moment when we when we're putting them into the side, they can be a little longer because they can go technically all the way across the bowl, right when you're sticking your medal at that deep of an angle, you guys got to stay up for a while. But yes, you're right when you start getting more to the top part of it than it would probably where you think your watch, you're the top of your shape to be and this is so when we talked before about our last arrangement we did the common practice of your arrangement flowers they're going to be one and a half times size your base this one we're not um because we're making a little more of a low um lo look to it and the reason I do that for dining tables is I kind of follow the rule that um you want to keep below twelve inches if people are sitting at a dining table, you want them to be able to see each other and converse over the top of your flowers so you either stay below that twelve inch line all right, go way above it so that it's above their heads and your flowers air up here and they can still see through but this is a great day definitely a great way to do it for for your home parties um it's a it's a good arrangement styles to do that's really accessible the tall ones are a little more challenging not impossible, but so is that working yeah, I can see hanging over how about how far we want him hanging over however you want I would say like three or four inches that they don't have to all be that way some of your other flowers khun fill that that role you don't want it to be a perfect ball right there you're going to be a different levels, but I think ultimately we're going to want it to be about three or four inches over the edge of the base when we're done and so maybe some of these air set in deeper and some were hanging out farther. Yeah, has some smaller ones here. I need to get some of these bigger ones in here. He is probably a good one for the center because he's really branch e yes. Yeah, maybe not quite ready. Here we go. Yeah, so we're in the room. By the time we're done with these white ones, you're going tohave the shape of your arrangement that we will be there. You'll definitely see it. And some of them will get covered up a cz we move along, but it's it's going to help us? You know, you could do this with the greenery, but I but I like to do it with with flowers sometimes too. Okay, this one was supposed to be upright, and I know it looks a little a little messy at the moment, but pretty soon we'll have enough stability that it'll well look like a real arrangement. You guys are getting that. Yeah, the upper shape a little bit seemed to be working way probably could have used a little more greenery in here, but but that's okay, we will definitely work with what we've got that wants to call a point where you're like that's too much filler flowers, yeah yeah, and I'm kind of reaching that at this point like this is feeling like a little bit too much, but I know I still need to have a few spots or I want tio like, over here, you can see this that feels really heavy when that's, so I probably wouldn't want to try to pull this one up so that I'm separating them out. It was my first attempt at trying to get into stand up, right? I'll see now it's standing up right better on that feels a little better to me where they're not they're not all right on top of each other, and you don't have just one big glob of white on one side, and we can add some more these back in, but I think just, um, we're just trying to get a little bit of a structure going here now, it's going to be start getting a little more difficulty seeing if you're stem is in the water, so you're just gonna have to be real conscious when you put him in that you're trying that you're not going directly across, but trying to get an angle the best you can that's looking good, you're getting a good shape there, yeah. And as we and more a lot more of our flowers or colors so little help break up that white if you're feeling a little heavy on your on your I think it's pretty uh yeah it's looking good how about you guys just still working on getting into stand up? I know yeah my my still has a lot of holes to um I think I put like, over here that thiss looks like a big hole, so I'm going to try to put one more on my whites and they're, um and see where things that feels like a little better yeah that's good. Okay, perfect. I know it's not getting cute. Okay, we're going to clear off some of this and where should we go next? I think we're going to move into our stock which is this flower and if you have never experience the smell of this great flower here are in for a treat tubes probably of any of the flowers we have here today. This is the most fragrant it's like a spicy smell to it. Um thes I do grow these in my yard. This this is not something I grew but it is a flower you can grow in your yard but it is available all year round and it's a great flower to use as your to help create a shape and later we'll use it again you probably have a lot of it over there will you some of it again for our modern when they get their use as much as you need right now but I think we probably only need about five stems and will be good for this one perfect you got it now we have probably more leaves down here than we might need sign is going to pull off a fuel room um just so they're not below the water line and I'm going to just spread him out again like we've been doing a couple around the edges if I can get him I'm gonna want these to sit a little more upright not as much hanging over the edge as we did with our first row of greens so like like this where it's coming up a little more of an angle that makes sense because I feel like our outside basis pretty well covered with what we've already established and now we're trying to create more of a shape around here and probably one in the center to would be cool so just where do you start finding a hole? We're going to try to fill that in with some of these and then we'll add in rose's next which will be our main mass flower this time that probably be at the top maybe he should be your top women yeah because he would probably tip over yeah yeah you have so much more bloomed out ones than I have right now but he's coming a great array of colors which is really nice one and all to my center are they working for you guys yeah I could see him filling in perfect yeah and just keep moving if something keeps tipping over finding a spot for it I bet after we're done with this stock that we will have our shape established and it shouldn't be such an issue anymore think this guy's too tall now is short on him a little bit my center so similar to our last arrangement where there becomes a point where you're going to start having a hard time pushing stems in this is gonna happen faster on this one because you're not only dealing with the stems you're creating your grid with but you got your tape that you'll keep running into so if if you feeling resistance and just try to move it a little bit and see if you can't get it to go through that's looking good yeah you guys are getting the shape nicely I needed like maybe cut these a little smaller so it's a little tighter I think I think your top stock is a little tall yeah I think so too short in him a little bit and I bet that'll help fill in the center of your arrangement also yeah let's see how that looks and debs all right, you got that? Yeah, see, that helps a lot, right? Yeah, just shortening a little bit. You probably still have some open areas, but the roses and other things are going to fill that in good. But at least now you have your shape really well established. Yeah, all of you do good.
Class Materials
bonus material with purchase
bonus material with enrollment
Ratings and Reviews
a Creativelive Student
I REALLY enjoyed this class. Great job, Kelli! The class made me feel like I can do simple live arrangements, which I've never had the courage to do before. Thanks for this great class!
a Creativelive Student
I love arranging my own flowers real and fake, but sometimes struggle with if I'm doing it right or is there a better way. This course really does offer good basic knowledge to get you well on your way to creating beautiful arraignments. I absolutely love her first arraignment, so timeless.
Cynthia
Kelli is a wonderful teacher and I learned a lot.
Student Work
Related Classes
Floral Arranging