Lessons
Lesson Info
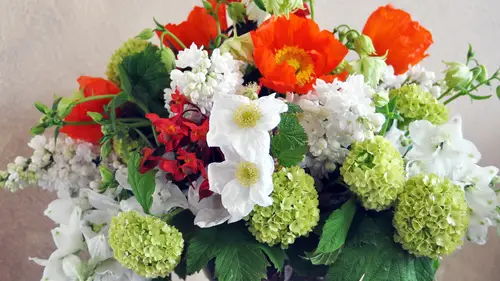
Rustic Centerpiece Part 1
This is our example of arrested for today and it's also a good example of a tall or linear arrangement I would use thes for entry ways. This is obviously really large one and probably wouldn't fit in most most people's homes, but if you're doing a venue or something, you know, when you walk into a venue and it's got the great big entryway with a circular table in the center or something like that, this would be great for that. I also when I entertain at my house, I have a large kitchen island, we haven't open designed house, so people just flow between the kitchen, dining room, living room, and I tend to do a buffet style eating on there, and I would make this kind of arrangement considering in the center of the the buffet or the island and the food it's up high enough that food with these leased it below it it's tall enough to fill and make a a grand statement, you know, he could easily. After we teach you how to do this style, make it in a smaller version don't feel like this is, you...
know, if you can't do this that you can't do it at all, you definitely can do this in many smaller versions of this you probably just would not usa's many varieties, but you would use the same types of flowers if that makes sense, we'll talk about the flower choices that we did for today and rest iq to me going back to our style rest iq is usually rooted in nature in physical elements of nature. So you see it's a lot of wood like this table barnes metal that's kind of rested a little bit just nature itself. I use a lot of moss when I do rest iq designs anything like that to when I decided to do this arrangement I pictured when we go to the parks is a family and here in the northwest are parks have those big meadows going down to the ocean and they got the grass is blooming this time of year and there's all the wild flowers out there and they're kind of in these tones you see the queen anne's lace and the bud leah that's growing out there. And so that was to me kind of arrest iq, nature inspired arrangement that I wanted to try to accomplish today I get a ton of people um asking me for a wildflower bouquet like you would just go out into a meadow and pickem so this is kind of my interpretation of what that might look like, so we are going to get started it's going to move this out of the way for the moment and bring my name go empty base over and we've got it already filled up with water tables a little bit well okay, there we go take her our garden shears the's air what I was referring to um I think some of the students have a slightly different style but they're all basically like this and we're going to start with when we start building this design are pretty much all the flower arrangements were going to be doing today we start with our greens and we're trying to build a structure to hold our other flowers with so we're going to start with our tallest screen and this time it's gonna police out real quick and tell you what these are hopefully I'll pull him out so this is called a mulva and it's a cousin to the holly hawk this came out of my yard I like this because it's linear in shape meaning it's tall it has some branching coming off of it, but when you're doing arrangements like this, you want to have the tall skinny um vines are rather greens and flowers to draw your eye back into the center of the arrangement and as we build again you'll see that better what that means but to this is what and we'll start with ease almost create the basic shape and then we'll add some more greens with it and onda also a lot of times people ask me, how do you know how tall ultimately to make your flowers in comparison to your base there's some general guidelines typically you would a common one is to make your flowers one and a half times taller than your face so and you don't need to take a tape measure out or anything like that and easy way to do it is I'm just going to pull this to the edge but if this is where my flowers are going to sit ultimately I'm going to lower it down so I can see that there's one this one's probably going to be almost two times this tall so I might want to cut it shorter but you can kind of gauge that by just holding it next to your base and where your flower you think is going to sit on the edge of it and so you can kind of say ok, yeah that's about one and half times tall and that I do it all visually that way instead of and it doesn't have to be perfect but go ahead and pull out to your guys is because you're going to arrange a ride along with me as we move along so you should have in your bucket and might they're all kind of mixed together so kind of look there a little bit lacey looking I know um there you go and never found hers so yours looks like close to your right there I think you just touched it perfect. You probably have about five stems about and then we're just going toe. I'll start and you guys could just follow along at your own pace and I'll kind of keep an eye on you again, and I kind of measured this one and decided it was probably a little bit too tall, so I'm going to pull off two of the bottom branches just to kind of get it to the right spot and again, it's just kind of an estimate and then cut, and this is another thing I forgot to mention earlier. When you do cut stems, you want to cut it a forty five degree angle, not flat, forty five is allowing it tio gives it more surface space, and so your flower, your stem is going to be able to absorb more water and also if if you were to cut it flat and then it sits on the bottom of your base flat, then it's not going to be able to absorb water that way we're at a forty five forty five, then it will it won't all be closed off, so that's kind of the idea behind that, so we're just going to put in hard greens and they're going to kind of sit around the edge first it's okay to stick a mint at an angle. When they're since it's the beginning here but they're not going to stand straight up on their own were going to use these guys as the create like a lattice um well so I typically will end up probably was four around the edge and one in the center the center would be taller I would say they don't all have to be percy these two orange maybe this one is going to be my center because he's a little taller than this other one and you know tested out if it looks like it's not the right cut pull it back out try again it's always better tio undercut so that you have a chance to still make another cut if you want tio cut to too much off accounts to get back on at least I haven't figured out how to do that yet so he's pretty tall so I like how this one's a little bushy down here at the bottom so I'm going to try to keep most of these laterals on him you guys are doing it nice this one's really pushy also how much of the greens which to be taken off I would try tio have very few below the edge of your face like here exactly yeah mostly because as you add more and we're going to put a ton of flowers in here and the more you add in it's going to push some of those lower leaves into your into your water line and you don't really want to have that um and it will make it harder to get more stems in there honestly as we get further along you'll see how how did the call that can be done and that's pretty good this one looks too tall sewing in every cut him e I think there's about five yeah um so in the general rule also in I think just design in general but definitely in the flower arranging world is to do things in odd numbers apparently that's more pleasing to the eye to see things that odd numbers versus even so I tend to do things and an odd numbers again that's not you don't necessarily have to do that and I think some instances today we might use even numbers but generally speaking I work in odds medicare all yours and that looks good. Okay goodness, these guys they're tall just not a bad thing. Ok, so now I have my four around the edge kind of in a circular pattern and one in the center and I'm gonna get rid of some of this debris you can see how it builds up quickly it's going to dump that away for now, okay, now we're going to move on to another one another greenery nh these ones are raspberry bynes and I'm using them kind of as my it's kind of a linear and a kind of a mass all at once they're bigger leaves which you're really nice to add in a lot more substance and full ege fullness to your arrangement but it's also a linear in that it's tall, which is kind of nice let's see if you all found you got your is great and don't worry if you're still working that's okay, we got time to catch up now these I'm going to probably I'm going to want to have this centre mall but being kind of my my top point, so from here on out things they're going to be a little lower than this guy if that makes sense yet pan, you got yours. Yeah, exactly, yeah, so and I'm going to start placing them in between my four malvo's that air sticking out so it's like every other so that's going to start creating our shape around the edge and then we'll fill in a little more in the centre when sweeps but on the outer edges and feel free to spin your base if you feel you're having a hard time reaching all the sides, you can always been it to get it to another angle I'm kind of used tio arranging from a distance so it um I might not always spin it, but but definitely feel free to do that on your own hard to find all your way have so many flowers here yes evening all of them it's up to you I think I have probably more than five here I am probably going to use I might use six I don't know I'm definitely using for around the edge so what's kind of every other and see now you can see the edges nice and full, which is great but my center is still a little bit lacking for structure so I'm going to add a couple around the center if you have them to give a little more um something for the other flowers too hold on to I guess in the sense okay, who stopped it? Okay, so after I just told you that I used odds all the time, I think I'm going to just do six of these because that feels to me feels pretty full. I can look around the base of my arrangement now and I don't see the water line anymore. I think for you, pam, that yet the same situation it feels like it's a nice full structure already. So that's really good to talk a little? Um no, I think that's fine, because we're going to be adding in some linear flowers with it yeah, feel free if you want to trim a little bit off, but I think in the in the end it'll be it'll be just fine yeah yeah no it's looking really nice guys plants like this in their yard where do you there is definitely so you can always catch green aries from you know in the states grocery stores have a lot of florals now so you can definitely do that farmers markets um even larger stores like costco sometimes I'll do that there's a lot your neighbor's yard ah, a lot of those kinds of situations I I personally grow a lot of my own greens and my own fillers I grew a lot of herbs rosemary's base, als, reagan nose and a lot of times those air available all year round and if you grow especially around here when your decision was trees go doorman in the winter you still have your evergreens, you're you're laurel bushes, your holly's all those anything like that could be used to screen and ultimately issues cia's we progress you're not going to notice a green so much anymore, so whatever you choose to use isn't necessarily a big deal if that makes sense can I ask a couple questions from online? Yeah, so one of the questions came in from clc ninety who wanted to know if you have to go to a chart or design only out to help you with placing the foot of the village of the flowers first I don't I don't think so I personally I visualize a grid in my mind that I'm putting things that a triangle does that kind of make sense where when I first start out I'm going to put things in in threes or fours at it like a triangle shape and then when I put my next ones and I'm going to rotate them so they're in between and once I start getting that that structure and I'll just keep repeating that and turning the face a little bit and hopefully you'll see that as we progress on um but in terms of knowing how many flowers to purchase for your vase size that kind of comes more with with practice and knowing how much variety want to use today we're using mostly groups of five but more commonly you'd use like three of a variety at a time so then at that point you just need to decide how much plant variety you want to use you do kind of have a chart I do visualize the chart but I don't necessarily have something printed next to me right yeah I suppose if you're new to floral design it's nice that it might not be a bad thing all right another question from she who wanted to know if can you explain why you start with the green ines yes they are the backbone basically so they are what they're not going to be my focal point sometimes I do just use greens is the complete arrangement but generally your flowers are going to be the focal point to your arrangement and the greens are here tio hold those flowers up and two keep them in the place that I want them to be when we do it another to sign later we'll see we'll use other structures that will help with that also but today this is a real and open flower design the vases helping hold this but then the greens are also their structures so that's why I use those and one final question she wanted to know how do you how can you tell when you have enough that's a good question um I think by knowing by looking down here and I can see that there's still room in between for the flowers but not big open spaces so again it's kind of going toe be you'll get better at knowing this issue go along I as a designer tend tio ton of flowers most people if someone watches me they think oh it's done now but then I add in six more kinds you know, so it's all up to you whatever feels comfortable for you but but definitely at this point we probably have enough greens to start doing our flowers but I'm probably going to stick more in because I like him so we're gonna put that away I had one extra one and looks like you guys all got that okay, so we are going to do one more green and then we'll move on to our flowers. This one, I guess, could be considered a flower I don't know it's one of those, um questionable ones I'll show you here in a second it's blue priam and you definitely will find this in the grocery stores. When are in the end any florists? You'll see this a lot it's kind of this really cool shar truce color and I think it's part of the four b a family I'm not sure, but these up here it could be considered their flowers, but they're actually there like a point set of plant or it's actually their leaves and the flower part is it's the really tiny little thing in the beginning, so I use him as a green, but they're probably really a flower I don't know one of those questionable ones, so we're going to treat this just the same as we did with her raspberries, where I'm going to place them in between probably only use um I have way more here than I'll probably end up using and this also this is not I would consider this to be a spray eso there's three three basic design styles are shapes for your arrangements we talked about the linear and their purpose we'll see more spray is considered a filler which means that it's got a lot of little branching things coming off of it and then your mass flowers are your mass leaves or your bigger solid ones, which will be our lilies for this example and maybe a few of our other flowers but this is going to be a good filler for us, so I'm just going to start placing some of these in and then just kind of move them around a little bit around the other agreements that are already in there that they we all can see this, so when I place this one in, it kind of just flows between several different and I like that I want that too, to have that freedom of movement there and I'll probably want a few that come up closer to our center um are center green, which is arm alba again, but I'm going to put it probably a couple of inches below so what's coming close to it, so we're ultimately going to get like this nice round dome shaped by not perfectly round okay? And some of these probably have too many more flowers again, so we're going to pull some of those off when you're preparing your flowers and you're putting him in your buckets it's sometimes hard to know how much greens to pull off, I usually just go for making sure there's nothing below the water line for sure but then I try to leave us much on the stem is I can until I get to the designing face so I know how much I might need to use it gives you more options if you have more still understand so I'm putting three to go around that center and then I'll fill in some more around here so I guess ultimately I'm going to have more than five I think I've done four so far that's cooking good you guys air spreading them out which is perfect at this point we're kind of getting full enough that spinning your bases you work is probably a good plan you can see it from all angles you can definitely do this design as a one sided um especially if you have like an entry where you have a table against a wall that you want to put an arrangement on I'd still with would create it with with greens all around but you you might not if part of its sitting against the wall you don't need to stick flowers back there necessarily but this one is meant to be seen from all sides so we're going to try tio make sure all the sides look look nice and well balanced you might just put one more in and then call it good can't get a good greens can ask questions from you kelly lisa is new to full design and would like to know what tools that you need to get in order to do that I know I think the only tool you need is a nightly yeah yeah yeah exactly some people do use actual knives I've always used garden shears because I I've started as a gardener and so that's the comfort to tool for me and I'm a klutz and I know I'll cut myself so with a knife so I used garden shears but nice air definitely really good tio but just something that you're going to use to cut you're you're stems with and then beyond that just a collection of vases whatever you want to use to put your containers in as we talk about more design styles you might want to get some floral tape or something but you could do a lot with just this what we're doing with arrangements I use a lot of water pictures and unusual based design things so you don't have to go out and purchase a lot of bases for that and I do know that they are there are floral design knives it's not a regular knife you're correct yes and it's very sharp looks a little more like like a swiss army knife kind of usually towards yourself don't you yes ok so yeah that's why I don't do it because ok yes yes yeah question how many bases do you have? I have a time I have I have milking barn at our property that is getting encroached with more and more shelves but then again, you know, I d'oh I have a large collections of things for events my personal collection probably that I use in my home where they're like singles or doubles of bases is probably like one hundred you know, joke, I like collecting those things, you know, and I'll use a teacup or I'll use you know, whatever anything that holds water pretty much can work champagne glasses yeah, sorry he said take up yeah, I have always wanted tio do a floral ranging in a teacup yes, but it's I haven't figured out the sweet spot of how to keep the floor isn't now do you use a frog or do you use a tape or it doesn't very on teacup? Yeah, no exactly because it's so shallow so when we do our vintage designed today will be using the taped grid design and I would use that I don't use for I don't know if he could find a frog that would fit in such a shallow you know, I suppose there's probably small and for those who don't know why frogs are there they're little they're made out of metal and they've got all these little spikes on him and he usually stick them to the bottom of your face or your vessel was like I don't know what it is, this dummy stuff, that floor issues that holds it in place. And then you can put your flowers it's onto those spikes, and it holds it in shape, and they're great. They're really nice to use. I just prefer the grid system personally. So I think, to answer your question is going to become down to more of your choice of flowers on what you used to create a it's, something that will hold what you're, what you're using. We'll talk a little more about that later, about using stiffer greens, you know, to create that grid for you, so, yeah, good question.
Class Materials
bonus material with purchase
bonus material with enrollment
Ratings and Reviews
a Creativelive Student
I REALLY enjoyed this class. Great job, Kelli! The class made me feel like I can do simple live arrangements, which I've never had the courage to do before. Thanks for this great class!
a Creativelive Student
I love arranging my own flowers real and fake, but sometimes struggle with if I'm doing it right or is there a better way. This course really does offer good basic knowledge to get you well on your way to creating beautiful arraignments. I absolutely love her first arraignment, so timeless.
Cynthia
Kelli is a wonderful teacher and I learned a lot.
Student Work
Related Classes
Floral Arranging