Lesson Info
7. Modern Centerpiece
Lessons
Lesson Info
Modern Centerpiece
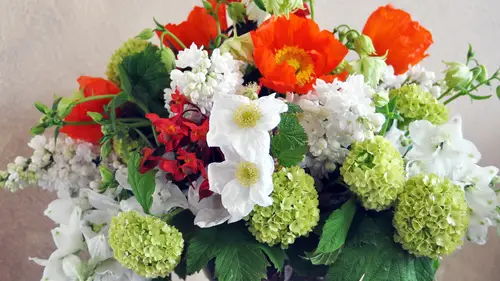
Ok, we are going to move on and do our last one which was our modern which luckily is not an especially long one to do which is good for us so between this up for a quick and you guys should have around, um around bass thank you that's clear and about a bucket of white stock from what I believe or white flowers I think we chose stock so modern to me thank you is is more clean lines so a lot of times I use clear glass for moderns um so like the's I liked losing glass just because when you fill it with water it's so reflective it adds a lot of movement that way it's great for floating candles so we're going to do a collection so when you go to like a hotel a large hotel and he come into their lobby many times, you'll see a big arrangement, right? Well, a lot of nowadays I'm seeing a lot more of these collections various size bases and they'll be monochromatic that I'll be the same color and in each faces one style of flour but they all go together because of the same color palette and th...
en your varying the shape so this is a really easy way to add a lot of drama without a ton of knowing how to blend and do that, so we're going to create one of those today and it's got this one just over to the edge for a minute. Leave him up here. We'll put it in our smaller one and I'm going to show you how you do a spiral arrangement like you do with a okay, so you can see how the stems on these are smiling around. You could easily just, you know, place the flowers together, but I think when you learn how to spiral them, they create a much nicer look and they feel the shape better and we're going to bind him just a little bit. You should have a few pieces of green tape on the edge of your desk. You can use a floral tape too, but I think hanging off the edge of your desk you have the binding tape, I cut you a few already, it just sticks a lot better, so we're going to use that and to just hold the stems together really quick. So let's, gather our stock that we have, um, I think hopefully you have maybe about ten stands something like that. Do you see your bucket? Yeah, they might be spread around a little bit, but we're hoping for more than five stones for sure, I think probably closer to ten would be ideal if we had that many and we're going to start by if you see any either have a little bit of greens left, most of these, we trained up ahead of time, so we should be okay, okay? That's probably good between the two of you and how that money. So this is really a balance of knowing how to hold with one hand while you arrange with the other, and it takes a little bit of practice. There's no denying that, but I'll give you the basics of kind of what it's like right now, so I'll hold it. I'm right handed, so I'm gonna hold it with my left, and I kind of create a circle with my fingers and that's what's going to hold it in place and that's, just what works for me really well, and I'm going to start with a center that's up, right? And I'm just holding it loosely there, and then I'm gonna start adding in with my other hand at, like, a forty five degree angle about, and I'll open my fingers and hold on to that one, and then I'm going to turn it just a little bit and put in another one again at an angle and hold it again, and he was starting to get your spiral I'm probably making this a little more dramatic than I need to, but you can see the stems are are coming at an angle I know it feels weird it feels weird it helps if you're holding it loosely so that the flowers air resting on your hand instead of trying to grab onto the steps a lower your flowers downs of the flower petals there you go are just kind of balancing their now you could see your stems air hanging out more yeah, that helps you don't want to, you know want to choke him too much? She just tryingto keep the shape while you hold it and spend so this is the basis of the hand type okay that's so popular with bryants granted, I don't typically do it all one flower I would be mixing flowers, shapes and colors as I go, but this is how you get that nice spiral spiral looked to have okay, so now I met about six flowers I'm going to try to do one more layer and I just keep fitting them in at an angle in between what was their already from spinning. You can adjust them a little bit if they're looking out of place, so we're going to see you guys are getting it, they're spreading out more than if you were to just cluster them up, right? So this also helps fill a vase fuller I would say with less flowers if you spiral um can I have a question from j cat would like to know, how do you determine the arrangement? Color palette, that's a good question. So, um, sometimes my clients will tell me, you know, that I'm doing whatever event or wedding and this is my colors, if I'm just choosing it on my own, um, you know, I just kind of go with what maybes in season or what, what I like, I I tend to like to dio, um, shades of one color, if that makes sense of very much like our vintage that we just did, where we dio a lot of shades of pinks from corals and explore that more than trying to trying to mix three or four colors together is a little harder in that you you need to know a bit more about color wheel and about what colors a complementary to each other, and I talk a lot more about that in the flower guides that we have available to you, so you can see how you could blend colors with more confidence, like, you know, blue and yellow are complimentary cause there across from each other or those kinds of skills, and that helps focus your color down more to so you know, what's going to look good together. Okay we got our bunches we're going to take our tape that you have sticking on your table going on and it's going to raise it up a little bit so I can get to my stems but still hold it and then I'm just going toe tape the base of it right where I was holding you know you'll get a little loose for a second but once you've made a circle to start tightening it it's going to hold its shape and see how once it sticks on each other on back onto itself it's a really good firm tape and it's green color you could always cover this with a better ribbon if he didn't like the look of the tape but I pretty much blends away um what the stems nicely we probably could use the clear take too if you chose to but this one stickier and then just to finish it I'm going tio stick it in this shorter vase so I'm going to cut the stems really short I want the flowers to rest at the top edge of my face so I'm going to try to determine how much I need to cut off and you can go shorter than the bottom of the base but you might have to test it a few times and sea not not quite see it sitting a little lopsided you wanted to sit how the flowers said right on the edge of the base there goes now I have my little collection that would be my interpretation of what a modern design could look like you could use any color that you choose to white goes with everything so that's why I chose that it's a very classic look you could do this and reds or blue anything that you chose to and I think it looks really great luck see here's to not perfect wallah right? You could do it with any fire it does great with roses works really great, but just having a massive one flower together looks really nice. Well, it also wear just put it right exactly would be much more upright and wouldn't be quite yeah yeah see nineteen to learn a new skill that I think anyone could could learn pretty easily on dh so definitely try that one at home so you definitely you need to trim a little more off probably depp yet little martin I know it feels like they're going to really short but that that would help it set perfectly. So I know that was really quick version of what a modern look like, but I think that's of the three designs we've done that's probably the most accessible for a lot of people it doesn't take a lot of flowers um and you can make a really nice dramatic impact she could definitely run this size all down a type table all together in that look right where you can cluster him like this. So how cool I don't think these ladies wanna stop arranging over here. They're going to say we're staying in the studio wear one of ours, okay question another question final question from she's about these arrangements that you just made ok, do you ever include the foliage in the spiral arrangement? When I'm making a bridal bouquet? I definitely do, but when I'm doing something that's a little more modern or for like centerpieces than I like to do, just just flowers yeah, and I think it's really great now this is this one has some foliage. I left the foliage on this plan, so that would be one way to kind of make at a little greenery to it, but I didn't blend it still just one flower, so yeah, great! What a fun day went by so fast in that it did you don't have to come by you come back and teach that would be great tell people online where they can find you again so my company is country but pays floral so country becase floral dot com and I'd be more than happy teo, you can always email me or check out my block I love communicating with other flower lovers so great thank you so much for coming thank you
Class Materials
bonus material with purchase
bonus material with enrollment
Ratings and Reviews
a Creativelive Student
I REALLY enjoyed this class. Great job, Kelli! The class made me feel like I can do simple live arrangements, which I've never had the courage to do before. Thanks for this great class!
a Creativelive Student
I love arranging my own flowers real and fake, but sometimes struggle with if I'm doing it right or is there a better way. This course really does offer good basic knowledge to get you well on your way to creating beautiful arraignments. I absolutely love her first arraignment, so timeless.
Cynthia
Kelli is a wonderful teacher and I learned a lot.
Student Work
Related Classes
Floral Arranging