Lessons
Class Introduction
03:39 2Sharp Images in Ambient Light
09:07 3Why Use Strobes
03:42 4Shutter Speed & Flash Duration
10:01 5Light Setup: Freezing Motion with Strobes
07:01 6Shoot: Freezing Motion with Strobes
18:23 7Shoot: Freezing Motion and Adding Haze
12:14 8Blending Constant Light and Freezing Subject
17:18Lesson Info
Class Introduction
We're gonna talk about controlling time and motion with flash. And I want to talk about not only freezing motion, which was originally the plan for this class, but how to kinda tell the story of time and a different understanding of time and shutter speed beyond just the basics. So I'm a teach you how to freeze motion with ambient light and flash and also how to do some cool things with dragging your shutter and understanding how adding some blur to an image can really help tell your story as far as time and motion's involved as well. So we have a lot going on. I want you to learn about the relationship of photography with time, how to give sharp photos, how to do it in natural light, and how to do it with strobe light. 'Cause that's what I do in my career a lot now as I'm photographing athletes. So they're fast-moving, they're running away from me a lot of the time, they're jumping, they're doing really cool, dynamic stuff. And I have to be able to freeze them to get a really impactfu...
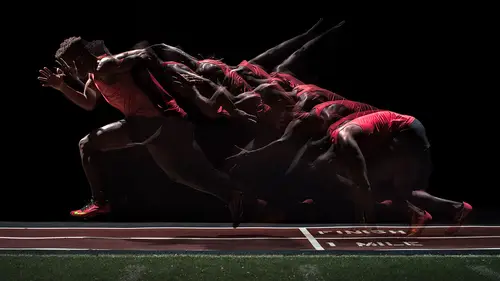
l photo, but also sometimes to creatively tell that story of how they move and what they're doing and what the motion is. 'Cause someone in the air frozen doesn't tell how they got there. So having multiple frames or stroboscopic images like this really tells more of the story of that moment. And that's what we're gonna get into today. So let me go ahead and jump in. Our first thing is gonna be understanding time and exposure over there. So this is gonna be really simple from a practical standpoint, all right? The practical. We use shutter speed to get a proper exposure. Most of the time, this is how we think about shutter speed. We're like, OK, this is something I've gotta do. I've gotta set my shutter speed. I've gotta set my aperture. I've gotta set my ISO. I just want the picture to be properly exposed, all right? What I want you to do is start thinking a little more conceptually with what we're doing. We're actually freezing a moment in time. And a photo is actually multiple instances, or we think of a photo as an instant. But it's really an infinite number of instances in a window of time of our choosing. So we might be like, Hey, show me a one-second window of time. Or a one-minute window of time if we're doing a really long exposure like a waterfall or a star trail shot. And what we're actually capturing are a thousand different instances within that second or that minute of exposure. And shutter speed controls that window of time. And what we wanna do is narrow the window enough to get a sharp photo. And sharp basically means there's not a bunch of stuff blurring on top of each other. So shutter speed is our time control, and this is what I mean. With a fast shutter speed, we're showing a very small window, or very small instance, and we're just capturing that instant and we have not much blur. But as we start to slow things down, we're getting multiple instances of our runner, or our waterfall, or our stars, and you start to get this blur because it's multiple instances stacking on top of each other. And that's that ghosting that we get, the ghosting through your image. So shutter speed is how we control that. We're also gonna control that with flash, 'cause flash is a neat way to selectively pick a moment in time. So this right here is a two-second exposure. And within this two seconds, I used strobes to isolate a couple instances. And this is what I'm talking about. People think two seconds, big blur, only one thing is happening. Well, no. There's a bunch of things happening within that two seconds. This is what it would look like if I just shot the two-second exposure with just ambient light. We'd get that motion blur. And this is what it would look like if I shot with a really fast shutter speed. It's a bad Photoshop job, but I just wanted to cut one guy out and show you if we were at 1/200 of a second, it would look like this. One two-second exposure, it would look like this. Or a two-second exposure with strobes, we can do something really unique. So we're gonna start out understanding just ambient light. And then we're gonna start talking about adding strobes to do some unique isolation effects like that. So it's really fun when you start dealing with time. You can really get conceptual about it and get really creative and take some unique images that might not be obvious to other photographers.
Ratings and Reviews
Dave Sincere
Let me say.. Erik Valind is my new favorite CreativeLive presenter. His videos are clear and precise. He doesn't waste time rambling about other things, he sticks to topic and subject at hand. This is my second class and I must say I'm presently impressed. I've been shooting for 2 years and I learned a few new tips on each vid.
richard.miller
I really enjoy Erik Valind’s instructional video. I think that I have seen them all – B&H event space, Kelby One, and now, Creativelive. This is another useful video and a lot of information. HOWEVER, I cringed every time (and I’m sure that Einstein did too) that Erik said that the strobes changed the speed of light!!! It was almost unbearable to listen to lesson 4 on flash duration. I know what he wanted to convey but what he said numerous times is wrong – the speed of light is the universal constant “c” such as in E = mc^2. It does not change. Erik likes Broncolor because their output is “powerful” and consistent enough to deliver a fairly high intensity of light over a short period of time – duration. But the speed of all the light emanating from the strobe is constant (the constant c) whether the duration is 1/500 or 1/5000 of a sec. Again, I really enjoy Erik’s work but this was like fingernails on a blackboard.
Adrian Clarke
Quick and to the point was always his style and this was no different. I was learning at a fast comfortable pace as he was along, another great tutorial Mr V. Now I want to do some boxing self portraits