Lessons
Class Introduction
03:39 2Sharp Images in Ambient Light
09:07 3Why Use Strobes
03:42 4Shutter Speed & Flash Duration
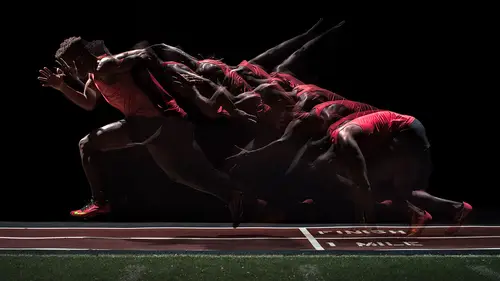
10:01 5Light Setup: Freezing Motion with Strobes
07:01 6Shoot: Freezing Motion with Strobes
18:23 7Shoot: Freezing Motion and Adding Haze
12:14 8Blending Constant Light and Freezing Subject
17:18Lesson Info
Sharp Images in Ambient Light
Well let's start out with sharpness, so, sharp images. What basically causes our blurry photos? Camera shake's gonna be one thing, and the other thing is gonna be motion blur. And I wanna talk about these because they are actually two separate things, all right? So, camera shake is gonna be this. It's gonna be too much coffee, it's gonna be a slow shutter speed, it's gonna be, you're on a boat, you know, or you're on a highway, and cars are driving by. Motion blur is because what you're photographing is doing the moving. So they're two separate problems that we need to solve. So, combating camera shake is the first thing I wanna look at, and there's a couple different ways to do it. There's the reciprocal rule. We can use a tripod, which is an obvious one. There's certain ways to hold your cameras, and there's also image stabilization in your camera. So this is the first rule I wanna talk about, because this rule is what give us, is a good way to know whether or not you're gonna get ca...
mera shake. So let me go ahead and throw all that up there. And I use a 200mm lens as an example here. So, the minimum hand-holding shutter speed, if you're a normal person, okay, is gonna be one over the focal length of the lens. So if I have a 200mm lens, like I do over here, which is a very popular portrait lens, how many of you guys shoot with a 70-200? A bunch of people, right? I love this lens. If I'm shooting with this lens, I need to be shooting at a shutter speed of faster than one over 200th of a second, and that means I'm not gonna get much camera shake. If I do anything slower, I'm zoomed in so much that my body movement, my breathing, my heart rate, is all gonna start adding some blur, some camera shake, to the image. So this is gonna be that hard-fast rule that we wanna maintain, and there's a couple different techniques that can allow us to break this rule. So, the other first thing is vibration compensation. Depending on your brand, they have a bunch of anacronyms for it. Image stabilization, vibration compensation, vibration reduction on Nikon. They call it a bunch of things, but basically what it does is it reduces camera shake, so it allows us to get those hand-held shots at much slower shutter speeds than we would normally be able to get. So, there are new lenses coming out. How many of you are in the market for new lenses? Always, like I'm always looking to buy new equipment, okay? The vibration compensation in those things that they advertise are actually something usable. A lot of the marketing garbage they throw at us is just to sell you new stuff, but this is something I found that actually works. So, I'm shooting on, this is like the Tamron 70-200, and they have a lot of vibration compensation. And I'll show you a photo shoot that I did recently that blew my mind, I was able to get photographs that I wasn't able to get in the past. But this is simply what it does. If I'm hand-holding a shot indoors, this is just a picture of a friend with a lamp light, some window light coming in, and the auto-camera on my setting, if I was on aperture priority, put me at f2.8, 1/15 of a second. And, it's too slow, 'cause I'm on a 24-70mm lens, so I'm breaking the reciprocal rule, the shutter speed is too slow, I'm getting a little motion blur. Now when I went ahead and turned on the vibration compensation, same shutter speed, I've got tack-sharp photos. So I don't know what they're doing in there, there's some, like, magic little elf inside there, moving your stuff around so it anticipates your shake and then gives you a sharp photo, but it's really cool what this allows you to do. Now, I wanted to push this to the extreme, it's one thing if you have, like, a friend just hanging out in the living room, but it's another thing if you're out there actually on a photo shoot. So, what this five stops of vibration compensation means is if I'm on a 200mm lens, I should be shooting at around 1/200 of a second. Anything slower, I'm getting into this range where I need something to come in and compensate. So, I did this photo shoot where I ran out into the desert, I had a friend that was gonna do some yoga for me. By the time we got out there, it was in Las Vegas, the sun had started to set. So I'm like, okay, I'll get some blue hour shots, all right? So we started shooting. This is the moon, that is not the sun, by the way. So I'm out there, I have no lights, no assistants, just me, a friend, and a 200mm lens, I turn on my vibration compensation and I'm able to shoot at 1/50 of a second, hand-held, using the moonlight to light my photos. That's the first time I've ever said that, "Hey, I had the moon, the moon lit my photos." It wasn't the sun, it wasn't a strobe, I was moonlighting out there. And it was really cool, you can see how these are tack-sharp, but that's only three stops of compensation. If I keep going, here's 1/20 of a second. We were really pushing the issue, right now. But 1/20 of a second, I was still getting tack-sharp photos, hand-held, and I'm a very energetic person, I bounce around a lot. So, that's four and a half stops of vibration compensation. So, technology's great. It's allowing us to take photographs in natural light, whether we're doing street photography or model portraiture, without having to use lights. I'll tell you why there's benefits to using lights, but I just wanted to make you guys aware, use that, find those lenses with that compensation and put it to use and get out there, and don't be afraid to break that reciprocal rule anymore. The next thing that we can talk about is, let me go back to a couple of the other ones, is how you hold your camera. So, we're in the age of iPhone here, so if you're using these slow shutter speeds, we're all used to having our iPhone and holding it out here to take photos, right? Do not photograph like this with your DSLRs, because by doing that, I mean, we get the live views, so we're very, you know, sometimes we're tempted to use the live view and do this, there's no support for your camera here. If I bring it close to me, now all of a sudden, I have support. So I see a lot of photographers actually brace it on their shoulder to take pictures, or three points of contact, where you've got your chest, here, or bring it around your shoulder, or just bringing your arms in is gonna give you a much steadier hold than like this. Although, the flip screens are kinda nice 'cause we can do this, so that's like an exception to the rule. But it's just something to think about when you're holding. So, look into using tripods for slow, when you have slow shutter speeds. Make sure you're holding your camera correctly when you're using slow shutter speeds. And then look into getting lenses with that nice image stabilization on there, too, which is really cool. The second kind of motion blur we have to deal with, or blurry photo, is motion blur. So this is when our subject is moving. So here is something really cool. Have you guys seen the sports photos, where they pan with the subject and everything's blurry but the subject? Well here's how you get those. Old option, you can pan with your subject or use faster shutter speeds. But to get those cool shots, let me flip this over. You could use a flash as well, we're gonna get into that. To get the shots like this, what I'm doing is I'm shooting indoors, I got to shoot some roller derby recently for Fuji, and it's like, really dim. Now a couple people in the audience were talking about shooting indoor sports. Like, you have high ISO, not a lot of light, so you're still getting slow shutter speeds, so if you just take this photo, notice how everyone's blurry, 'cause I have a slow shutter speed? But when you're using a slow shutter speed and you move, you track the movement of your subject, it keeps them in the same place in your lens, so when that exposure builds up, or those multiple instances build up, there still in the same place, and they're sharp, and then everything else blurs around it. So panning is something really cool, if you're shooting action or sports or your kids, don't be afraid of slow shutter speeds. Turn your vibration compensation on, and then pan with your subject. It's really cool. You get some really neat effects here. I mean, look how fast she's going. She wasn't really moving that fast, but, I mean, she looks much faster when the whole world's blurred around her kind of stuff. So panning is a really cool way to do that. You can also use faster shutter speeds, like we've talked about, that'll freeze people, so there's less sense of motion in there, but you also get tack-sharp photos. And it's cool 'cause you can freeze moments, like this poor girl's about to eat it right there. Capturing those moments, those instances. Roller derby's aggressive, this is the first time that I actually got to watch it and I got to photograph it as well. It is such a cool thing to watch. But it's very physical. So it was neat, I wanted to show the motion, athleticism, but also capture moments, so I went from panning with slow shutter to using faster shutter speeds. And here's kind of a general rule of thumb, when we're out there photographing people or action, if you're photographing people standing still, it can be about 1/60 to 1/125 of a second. Once you start getting into moving subjects, you want a lot faster shutter, so if you've got someone running, you should probably be around to a thousandth of a second, and if you've got someone doing crazy stuff, like I'm about to show you, 1/2000th of a second and beyond is a good place to start. So this is just a good kind of rule of thumb to figure out where your exposure are, where your shutter speed's gonna be. So if your subject matter and your camera settings don't match these recommendations, then you gotta start thinking, hey, do I pan here to get it sharp? Or do I put it on a tripod to get it sharp? Or what do I do? How do I get this image sharp? So these images right here, I shot at about, like, 1/4000 of a second, 'cause I wasn't gonna have this guy do this multiple times, and I wanted every single grain of sand to be tack-sharp. So this is natural light, I'm hand-holding, I didn't need to do any other techniques, I just used a really fast shutter speed 'cause fortunately we had good daylight here. And here, too, freezing motion. I love freezing motion, here I used the sand to give a sense of motion, so you could see the movement there. Here, it almost looks like he's levitating, right? So freezing time without any blur or any special effects makes things look like unreal. Levitation photos are really popular on Instagram right now, and how you get those is a really fast shutter speed. There's no telling how he got there. Did we drop him in? Did he jump in? Is this photoshop? So fast shutter speeds kind of give you a slice of time with a really interesting way to tell a story.
Ratings and Reviews
Dave Sincere
Let me say.. Erik Valind is my new favorite CreativeLive presenter. His videos are clear and precise. He doesn't waste time rambling about other things, he sticks to topic and subject at hand. This is my second class and I must say I'm presently impressed. I've been shooting for 2 years and I learned a few new tips on each vid.
richard.miller
I really enjoy Erik Valind’s instructional video. I think that I have seen them all – B&H event space, Kelby One, and now, Creativelive. This is another useful video and a lot of information. HOWEVER, I cringed every time (and I’m sure that Einstein did too) that Erik said that the strobes changed the speed of light!!! It was almost unbearable to listen to lesson 4 on flash duration. I know what he wanted to convey but what he said numerous times is wrong – the speed of light is the universal constant “c” such as in E = mc^2. It does not change. Erik likes Broncolor because their output is “powerful” and consistent enough to deliver a fairly high intensity of light over a short period of time – duration. But the speed of all the light emanating from the strobe is constant (the constant c) whether the duration is 1/500 or 1/5000 of a sec. Again, I really enjoy Erik’s work but this was like fingernails on a blackboard.
Adrian Clarke
Quick and to the point was always his style and this was no different. I was learning at a fast comfortable pace as he was along, another great tutorial Mr V. Now I want to do some boxing self portraits