Shoot: Freezing Motion and Adding Haze
Lesson 7 from: Controlling Time and Motion with FlashErik Valind
Shoot: Freezing Motion and Adding Haze
Lesson 7 from: Controlling Time and Motion with FlashErik Valind
Lesson Info
7. Shoot: Freezing Motion and Adding Haze
Lessons
Class Introduction
03:39 2Sharp Images in Ambient Light
09:07 3Why Use Strobes
03:42 4Shutter Speed & Flash Duration
10:01 5Light Setup: Freezing Motion with Strobes
07:01 6Shoot: Freezing Motion with Strobes
18:23 7Shoot: Freezing Motion and Adding Haze
12:14 8Blending Constant Light and Freezing Subject
17:18Lesson Info
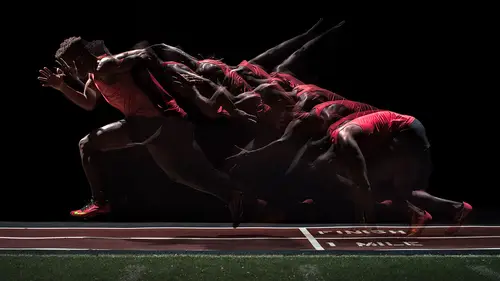
Shoot: Freezing Motion and Adding Haze
So I've got something really fun that we're gonna set up next. Before we wrap this, let's march the lights in a little closer behind him, the back lights. So what we're gonna do is kind of get some neat effect going on here. And let's, do we have gel's cut or am I throwing too many curve balls out there? I have gel cuts. He's got gels cut, Ken's amazing, okay. So what we're gonna do is we're gonna put gels on these back lights, and it's made a lot easier by the fact that I have these barn doors on here, and we're moving them in so they're gonna become lights in my photograph. Earlier they were just lights illuminating my subject, now they're actually going to be part of the picture. So let me head back here and I can help you out. What's that? Yeah let's do them on both. And then through that door I've got a couple pre-cut ones in there. In the roller case. Okay, cool, alright so this might not look pretty, but I'm gonna double wrap this over so its nice and thick. Oh yeah, perfect j...
ust grab the two-folds. So with gels, we're kind of over in our little messy corner over here, but you can get them cut to different sizes, like the sheets normally come pretty large like 20 by 24 inches. I like to go to Lee Gels or one of the manufacturers and they make like 12 by 12 inch ones that are a lot easier to just fold over. So that one looks like a full, and I'm gonna lower these down and you can get pre-cut gels for different barn doors and different brands and stuff like that. I'm cheap. I just get the sheets and I cut them down to the size of whatever I'm out of mine. I'm efficient. I'm saving money for new camera lenses and lights, not fancy gel holders. So I'm just gonna go ahead and cover this up. And this is thanks to this great question here in the studio audience. Let's go ahead and gel some stuff and make it look more interesting. Doesn't need to be pretty. Also don't have to worry about this overheating or melting cause we don't have a modeling light running constantly. Although we are firing this thing off like a machine gun, so who knows? We could see something smoke in the studio today. And I'm just a little under a full extension and we're gonna move these over and now what I wanna do is kinda get like cool stadium lighting kind of effect in the background going on. So let's set up our shot again. Alright, let's have you move over this way just a little bit. Perfect, alright this is just a test shot so don't have to do anything just yet. Oh, this is gonna look cool. This is gonna look so cool. Alright, let's go ahead and get a couple of you just running at me. (camera flashes) Perfect, cool. Alright let's let the poor computer melt down now as those all come in. Each of those files is like a 47 megapixel file. So as those come in I'm gonna introduce our cool little thing here. We were going through all of the studio supplies and we found some of the atmosphere in a can or fog in a can. Now when I'm on a bigger set and I've got budget and time and I'm not smokin' out the room and scarin' everyone in the audience here, I normally get a hazer and a generator and I plug it into the wall and I can just pour like a nice layer of haze in the background, but when you're in a pinch or you just need a little bit of fog for atmosphere, you can actually get like aerosol in a can, like aerosol fog now, which is really cool, and what we're gonna do, is I wanna add some depth to this. Previously I had this set up so I could shoot this as a composite. I wanted nice wrapping light so everything would be frozen, and then I also wanted him on a pure black background for easier selections in photoshop. Now we want a cool finished image, so what I'm gonna do is I'm gonna go ahead and give this light something to land on, and what I mean by that is light traveling through space, you don't actually see it until it hits something, until it hits our subject. Well, have you ever seen those cool back-lit shots in the rain? The light's hitting the rain. So if I throw a bunch of fog here, we're gonna finally see our light. It's traveling through here but now its gonna reflect off those little fog particles. So that's what we're lookin' for right there. I'm just gonna go ahead and put some of this up and I'll actually swap places with you if you wanna be my fog man. And the important thing with this is you wanna make sure it doesn't blow too much in front of the subject, because then all of this air and all of the light here is gonna refract off the fog and lower our contrast and it'd be like puttin' like an opaque sheet of glass in front of our subject. So this is gonna be cool. Let's fog it up. Just this whole area. Alright, go for it. Did we warn them that we're not burning down in here? That we found some fog in a can. Okay, cool. Alright, let me get one, like serious pose shot so you can put the hood back up for one of these. I know this is freezing motion but we're controlling time, too. Alright, excellent. We don't need to do 11 frames a second for a portrait. Oh, yeah, those are gonna look cool. Alright, nice. (camera flash) I'm gonna turn down the power on this just a little bit. Alright, perfect. (camera flash) I like that, awesome, hold that. And what I'm gonna do, is I'm shooting eye-level here, which I always joke is the most boring way to take a photo. The boringest, most boring. Alright, by getting down a little bit lower, we're over our background here, but it's gonna be a more epic shot, more heroic. So let's compare these two. So camera angle matters. Look at the difference in those shots just by our camera angle. Getting lower, I'm able to zoom out a little bit more. Well that's pretty close in focal length, but what it does is it creates this sense of looming. He's looming over the photograph. He's larger than life. He's big and intimidating. When I'm shooting down at someone, it's great for portraits because then they're looking up to you like kittens with big eyes and they're very endearing. And when you're shooting straight-on, you're not really telling a story with your angle at all, which isn't bad, it isn't good, it's just a neutral way to take a picture. So for this I'm really loving kind of that angle there, so let's get a couple really tough shots. (camera flashes) Nice, and let's get a couple of wide here so we get the lights in them actually. (camera flashes) Nice. These look cool. Killer, alright mission accomplished. Now, let's turn the speed up again. So we're waiting for - yes! Okay, so just to recap, what I'm doing is I have a high ISO and I'm at F and the higher ISO is allowing me to have a lower power setting on my flashes. Okay, the lower power setting allows me to recycle fast, and we saw over in our bran control app that these low power settings give us a lot of speed. I broke things here really quick so I'll let the app reset but you see we're almost at one eight-thousandth of a second over here. So let's go ahead and get some shots now. Perfect, alright. (camera flashes quickly) So fast! Alright, I think I might have pulled our tether out when I stepped on it. Yep, let me go ahead and plug this back in. This probably all went to card though, so we're good. We'll get those. Ken's laughing, he's like "yeah right." Oh that's so epic, okay cool. So, now we've kind of set the scene. You've seen what we've done here scaling-wise, okay? We just had our lights set up to normal but we wrapped him in light, so as he's warming up and as he's putting on his wraps and he's putting on his gloves I can let him freely go through the motions, okay? He doesn't have to pose for me because he's not a model, he's an athlete. It's like, people will get pissed at you if they're an athlete and you're stoppin' them and startin' them and stoppin' them and startin' them, so having fast flash duration and wrapping light and a base exposure that's not letting these lights in the room influence my photograph at all, I'm able to let him flow through his day and flow through his preparation and freeze the motion. And then going into speed mode, I'm able to really freeze motion. I mean we are super fast here, almost faster than your camera could ever go on its own, and that allows him to just box me as fast as he wants, which is incredible. And then, now putting the haze out there, we're getting some atmosphere and it's giving the light something to visualize and land on and shine through in the background. So that's how we set our scene, that's how we work through the flow, and then again, the high ISO and the low power allows me to recycle really quickly too, so I can have my camera going as fast as it can go. So we're basically stressing everything out. We're just maxin' it all out. And the result is cool photographs. I agree, yup, okay cool. Let's fog it up. Let's take a half-step over this way for me. Perfect, alright, and go. (quick camera flashes) Alright, we're gonna cherry-pick one of those. Cool, so yeah, let's see if we have any more questions, and then we'll move on to the next one. Awesome, do we have any questions in studio? Yeah? I was wondering if you change your setting when you're using like a portable flash, like how would you consider -- A portable one? So like a speed light? Yeah, like a speed light. Yeah, so with a speed light, can you go through and maybe cherry-pick maybe one or two of those and put a star on them? So the only difference to the speed light, two differences, you're not gonna get that kind of recycle time out of them. It's a couple seconds when they're at full power, so how I would change things up is I would continue to use an efficient modifier like this, but instead of the parabolic, I would the Westcott seven-foot umbrella. We actually have one that I'm gonna use in tomorrow's class, and it's a seven-foot umbrella with a little bit of a parabolic shape. It's not like a full, true parabolic but it still manages to gather the light and send it out efficiently so that it makes the flash almost brighter than the flash would be by itself. So I would use very efficient modifiers. I would try to bring them in as close as possible, cause the farther your light is away, the more powerful it has to be to be able to illuminate the subject. So I'd use a big, bright, silver reflective modifier or shaper. I wouldn't use a soft box because a soft box will absorb light. And I'll bring it in really, really close. And I would have to be more careful with timing. So here, it's almost comical that I'm shooting at nine frames a second, But I would have to start timing a little bit more, cause I only get one shot, and that one shot would have to freeze it. So I might try to work together, and try to anticipate when he's gonna get at full extension and I would take the shot. So it would be a lot more trial and error, but you'd be able to do the same thing, cause you saw that the speed light was at one six-thousandth of a second, so the flash duration on the speed light is enough to freeze him. You just wouldn't have the ability to multi-shot like this. So yeah, I started out with speed lights for years and was still doing this kind of stuff, and I still do now. You saw the shot with the volleyball guy. I wasn't bursting. I had to like have them throw the volleyball at him multiple times and then time it perfectly for him to get the dig and we got the shot. Had I done that with these, I would have been able to just burst motor drive. So final result, you can do the same thing with a speed light. The process of getting there is quicker and easier with the bigger strobes, but it's still one of those things that isn't inaccessible if you're just using small flash. So, cool, yeah great question, because like I started doing this with small flash and I don't want you to think you have to have all brancolor gear to do it. It just makes it quicker. And the reason I do it is because this is my living so I invested in that so it's faster and easier for me in front of clients, but if I had to go tomorrow and get the same shot, I'd just tell the client to go wait in the other room and maybe trial and error with a speed light, we'd get it. We'd definitely get it. So, cool, good question. We got a couple here. I like them. Can we zoom in on one, two maybe? Tap sharp, awesome. Maybe get the glove. Did we get the glove in focus on that one? Yes, yes, okay awesome. That one's a little farther out. That's incredible. Okay, cool, that's it. That's how quick and easy it is. Well not quick and easy, we just went through the whole process.
Ratings and Reviews
Dave Sincere
Let me say.. Erik Valind is my new favorite CreativeLive presenter. His videos are clear and precise. He doesn't waste time rambling about other things, he sticks to topic and subject at hand. This is my second class and I must say I'm presently impressed. I've been shooting for 2 years and I learned a few new tips on each vid.
richard.miller
I really enjoy Erik Valind’s instructional video. I think that I have seen them all – B&H event space, Kelby One, and now, Creativelive. This is another useful video and a lot of information. HOWEVER, I cringed every time (and I’m sure that Einstein did too) that Erik said that the strobes changed the speed of light!!! It was almost unbearable to listen to lesson 4 on flash duration. I know what he wanted to convey but what he said numerous times is wrong – the speed of light is the universal constant “c” such as in E = mc^2. It does not change. Erik likes Broncolor because their output is “powerful” and consistent enough to deliver a fairly high intensity of light over a short period of time – duration. But the speed of all the light emanating from the strobe is constant (the constant c) whether the duration is 1/500 or 1/5000 of a sec. Again, I really enjoy Erik’s work but this was like fingernails on a blackboard.
Adrian Clarke
Quick and to the point was always his style and this was no different. I was learning at a fast comfortable pace as he was along, another great tutorial Mr V. Now I want to do some boxing self portraits