Blending Constant Light and Freezing Subject
Lesson 8 from: Controlling Time and Motion with FlashErik Valind
Blending Constant Light and Freezing Subject
Lesson 8 from: Controlling Time and Motion with FlashErik Valind
Lesson Info
8. Blending Constant Light and Freezing Subject
Lessons
Class Introduction
03:39 2Sharp Images in Ambient Light
09:07 3Why Use Strobes
03:42 4Shutter Speed & Flash Duration
10:01 5Light Setup: Freezing Motion with Strobes
07:01 6Shoot: Freezing Motion with Strobes
18:23 7Shoot: Freezing Motion and Adding Haze
12:14 8Blending Constant Light and Freezing Subject
17:18Lesson Info
Blending Constant Light and Freezing Subject
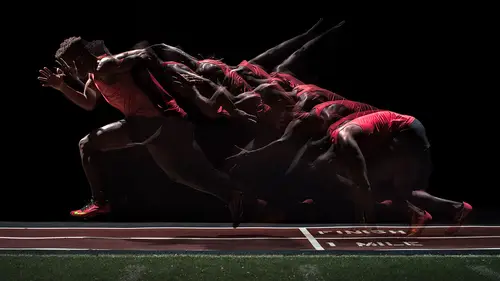
We've been talking about one part of the equation so far, remember I gave you that conceptual stuff at the beginning and I was like: "Ah! You know its all about an instance in time." Well, we've been cutting out a super small window of time in showing that one instance. I wanna show how with this conceptual understanding of time and shutter speed and light we can now combine these two, and have a larger window of time and really get some awesome shots. So, we're going to do a complete switch here. So, give me two seconds, alright? We might look at some questions or something but I'm gonna have to give him a hand to swap these out, 'cause we're doing a complete rebuilt. And what I'm gonna do, is show you how to mix slower shutter speeds with strobes and with continuous lights, to get some really cool shots all in camera, like no Photoshop involved. And then a disclaimer, I'm using its like a nicer LED that we got from the rental house. But you can do the same thing with an LED or a home...
shop light from home depot or something like that. Again, its just rental houses are here and you can rent gear for pretty affordable rates. So, we got these from Glazers down the street but most major markets have rental houses. Or what is it? LensRentals.com, and LensProToGo, and all those places will ship you these toys to try out. So, if you get this brainstorm of a creative idea, rent the gear you don't have to buy it, you know, and then shoot for the weekend and come away with some really cool shots. And then hit me up on social media if you have questions on how to do it, if you haven't bought the class for the replay yet. So, I'm gonna slide that out. Erik, I think you can just keep talking us through what Yeah. what you're doing. Okay. And, I would love to give, once again give a shout out to Brian Keller and to Glazers. For helping us out with this class and all the gear in the spirit of education and free education. Yeah. So, what I'm doing is I'm switching my key light over here, and you're gonna be like: "Erik, you just told me why you don't use soft boxes for this setup." In this instance, I'm not going to gonna be doing this super rapid bursting that I was doing there. I'm just gonna get, I need one shot from my strobe for this next technique. And the soft box is gonna give me, a nice big spread of light, and soft boxes are also really easy to put grids on. So the grid is gonna allow me to focus my light a lot more. So lets have you, if we can roll that completely out of the studio and pull these two lights completely out of the side, just so we've got a lot of space. What the grid is gonna do, its gonna allow me to focus the light and I'm gonna use a slow shutter speed for this technique. And slow shutter speed means its gonna give the ambient light a lot of time to build up the exposure. So, previously the ambience light wasn't doing anything, now I want some ambient light cause I wanna, I wanna see him move. Like these are cool because we're freezing motion and time and with a naked eye we don't see that, cause he's moving so fast, so this was one objective. Next objective is if the client comes to me and is like: "Hey, I wanna see the fluidity and movement of these athletes. Its cool that you froze them, but I wanna see how they got there," kinda thing. So instead of levitation, we want to see the whole process, without rolling video. How do you do that in a still photo? Okay? So, I'm gonna use a one second exposure, and I'm gonna be around F11 again and IS0 400. 400, F11. And I'm gonna go down to one second, one second, perfect. Cool. And what I'm gonna do is I do want to freeze part of this shot. Okay? So I'm gonna bring the light over here and the light is gonna strike him, and you gonna freeze him. When this flash fires. So this is one part of the equation, we're gonna build on what we just did. The second thing is this guy. So lets turn this guy on. This is an LED. I got it. Got it? So this is a continuous light source, and you see this very familiar, right? I got my barn doors on this, same reason I had 'em on earlier. I want my background to go completely pitch dark. Okay? So we're gonna have, it's gonna get spooky in here. Once we get this set up and everything's dialed in, we're gonna have to kill the house lights. Because I want this light right here, our constant light, over the course of my one second exposure to document the blurry journey of how he gets in, steps in, and strikes. Okay? I need to show that all. And it's gonna take him about a second to go through the process. But you saw the first that I showed you of the runner? I don't want him to just be a blob of blur, I don't want all those instances to stack up on each other and muddy the photo. I want all those instances to show me the journey and then I want the flash to freeze the destination. So we're gonna get a frozen ending and we're gonna get this cool journey and his body movement across the scene. So, lets go ahead and have you step in. Perfect. And you're gonna start here. And we rehearsed this a little bit before you guys got here. So normally this would take a couple minutes of communication. So you're gonna step here and just like you did, I'm gonna have you step over and end. And then, at the end of your strike just hold it, like don't pull it back right away. Yeah, yeah , yeah. Left handed, or however you need to, to keep your face open to the camera. So if you can start switching and then, your opposite way though normally? Yeah I could do this. Okay. He's like "Man, I can just Southpaw it, I got it all. Its cool." Alright. So, this is another reason why we have all this control. Tomorrows class I'm gonna talk a lot more about grids and barn doors and all that. But you're getting the preview of tomorrows class today. And this is gonna go ahead and stop the light from hitting the wall and the background there. I just want this to be a rim light on him and I also want to protect my camera. So right now, this bright light is shining right into my camera lens, that's going to give me flare, blur, and all that kinda stuff I don't want. So, this barn doors' now, protecting my camera from direct light spill and its also gonna protect the wall from bouncing light back and in the background everything there. So, I'm gonna keep this nice and narrow. Alright. Perfect. And, we have our finishing point right here. And, again, I'm gonna feather it, so I'm gonna open it up a little bit this way. And what that's gonna do is this grid is now funneling all the light across the front of him to freeze him, but it ends here. Its not gonna spill on my background, so hopefully we're not gonna get much of an exposure on the background. I say hopefully cause its a lot of moving parts here. Alright. Alright, and the final thing, is I'm gonna set my camera on rear-curtain sync. So normally your camera is set to front-curtain sync, which means when you push your shutter button down, your front curtain opens to allow exposure on to the sensor or film, and the flash will fire right when it opens. And then, it'll make the exposure and the rear-curtain will close up. Rear-curtain sync is just what it sounds like. Its gonna time it with the back curtain. So what that means, is when I take the picture and I yell go he's gonna be able to slide in like that, and the constant light, and my one second exposure is gonna build up this trail and then when the real curtain starts to close, the flash will fire at the end of the exposure and that will freeze him in his punch. So we have to think about time in an instant and all the instances, within that one second exposure as well. So we're like "Oh my God, time has doubled." Alright? So lets give this a shot. You want the house lights off? Yep, let's kill the house lights. And the reason we're or actually nah, no! Lets leave the house's on for a second. Curve ball. (audience laughter) Let's try this shot with the house lights on, first. Alright? Let me lock down here. Alright, so I'm gonna say go and then just a fraction of a second wait and then punch. Okay? Okay. And go. Cool. So lets let that come through. Its not auto advancing, we have to turn it Yes. Oh, okay we lost camera again. Oops, I might of bumped the cable again so what we do is turn off the camera, recede it, turn the camera back on, cross our fingers, do a dance, and then it'll start to say camera attached. Boom, there we go. Okay, lets try that one more time. Ready? And go. So our image should come in now. That's what happens with our house lights. Too much light, all blurry, blown out exposure. So lets kill the house lights, because I want control over what we're gonna see in this one second. And I'm gonna paint him, and anything I paint him with this constant light is gonna be what we're gonna get. Maybe we shouldn't of smoked because now there's like, there's haze everywhere. That's the fun of haze. Okay, lets try it again. So again I'm gonna say go, and just give me just a small pause and then go. So, go. Awesome. Lets see what we got. Alright, we're starting to get something. I like it. And you know what it is? Lets go here, ISO, go back down a little bit. Alright, lets give it one more shot. Ready? And, go. Cool. So, we might have to whaff out a little bit of the haze. (laughs) We have some haze coming in. But what we're starting to get now, is our exposure through him and then we're gonna freeze him at the end here. So, let me turn up the brightness on this. Its cool because I've got independent control of what's going on here, alright? So, if I look and I'm like alright "Him; the blurry part of him is too bright." Well, I can just go to a shorter exposure, right? Cause the blurry part of him is my shutter speed. And then if I look at the front of him, and I'm like "Okay cool, this is what we need to freeze, that's way too dark", see that highlight right there? So then I can turn up my strobe independently. So just like we're controlling time independently. We're able to control the different aspects of this exposure independently. That should be good, I don't know how much of it we're actually gonna be able to get out of here. So that's the fun of life, we're like: "hey, lets add smoke and do something different," they're like "oh, wait hang on, we just fogged up the room for the next shot." Okay. Alright, so I'll have you come a little bit more towards me. A little bit more, a little bit more. Keep coming. Right there, alright perfect. Alright, and same thing. Ready and go. There we go! Now we're starting to get what we're looking for. So remember your starting point 'cause I'm gonna have you start from the exact same point, every single time. Cool, and I'm gonna have you looking up right into this, like you just like punched right through the guys head. Alright. Alright, ready? And, go. I'm liking that. Okay, so our timing was a little early, so this is timing there's no perfectness to this. We're playing with a second of time and trying to get multiple exposures. Alright, lets do it again. And, go. So, again, remember keep all the way out, like fully extended. Oh, I'm liking that. Okay, cool. I like how this is looking. So what I'm gonna do is I'm gonna go, I'm gonna try to bring the brightness on his shoulder a little bit. So how do I do that? That's our ambient exposure there. So I can control ambient through shutter speed. So slowing down my shutter speed a little bit, will make the light on his shoulder a little less bright; Cause its almost overexposed. So right now, I'm at one second, so I'm just gonna go a little bit shorter than one second. Alright, and I'm gonna go ahead and I want a little brighter exposure on him. So I'm gonna go ahead and turn this up. About two thirds of a stop. So lets go ahead and do this again. You want me to hold the punch at the end? Yeah, at the end just like stick and yeah hold it. Alright, and ready and go. Nice. Cool. Now we're starting to get what we're looking for. Awesome, alright, ready and go. And can do a little bit bigger of a step? Yup. Okay. Alright, ready, and go. Oh, I'll give you a little bit less than a pause. Actually, just step and punch when I say go. Alright? Ready, go. Nice. There we go, I'm liking that. Okay, cool. So you see what we're doing here, we're getting the motion and because we're synchronizing our flash with the end, we're also freezing him as well. So the reason why I want him to hold the pose at the end, isn't cause he needs to hold the pose or the punch to freeze it, its frozen. That flash is at one fourth thousand of a second, its just because its easier for my timing. Because if he punches and leaves it there, if my timing is off a little bit, it'll still be there when the flash fires. So, that's what I want you guys to consider here. He can do no wrong in the movement department, any movement he does, the reason I asked for a bigger step is cause I wanted a bigger stretch of movement blur. Cause the bigger the stretch, the look like, the more it looks like he's throwing into it. Alright, so this is always gonna be tack sharp, and then we're gonna have a nice movement here. So, now the final thing to consider is our focus. So, let me go ahead and can I have someone stand in actually or do you want to stand in for a second? So this is where our fist is gonna be, right about here right? So, if I have Ken stand, and just hold the light on yourself. What I'm gonna do is, is that I'm gonna pre-focus on that mark, so that perfect. I've been in auto focus continuous, so far, so its been trying to track him. But it's kinda a lot for me to ask the camera to track something in the dark that's moving as fast as he's moving. So what I'm gonna do, is I'm gonna focus on where his fist is gonna end, like that. Hold it, yeah, perfect. Got it? Can you (laughter) No! No! Thank you for not punching him. (laughs) Alright good. So now I'm pre focusing, and pre focusing is something you do a lot as sports or athletes photographer. Cause our auto focus didn't use to be as good as it has gotten in the past year or two. So, I used to find where the action was gonna happen or anticipate and you'd focus on a zone or a space and then you take your shot when the action got there. So now that we've kinda worked out timing a little bit, you see how a dance this is. Cause we're really, we're balancing a lot here. Now I'm gonna go ahead, we've done the dance, I know where he's gonna end his strike. I've pre focused on that. And now lets go back to getting the timing, and again the bigger the step you take, the more blur we're gonna get. And just hold it at the end, not because I need to freeze it but because I want it to be there just in case I'm a little late on the jump. Alright, and go. Oh, I was a little early, and reset. We'll just do this like five or six times. Alright and go. Nice. And go, alright. And just a little bit, split the difference, so like not as far, okay? And ready and go. Oh, I was late that one. Alright, ready and go. Cool. And one more. Nice, I was a little early on that one. Alright so lets slip over the screen and see what we got. Dude, that's cool. Go back to, yeah that one's neat too. Oh, I love that. Okay, can you bring that over in exposure and just give me a little, you don't have to do a comparison. Just hit command key and just give me a little bump and exposure on that. So what I'm doing now, is I'm just having him turn up the exposure a little bit. So I can do the same thing with ISO, I just want to make sure it looks good on the monitors and piping everyone at home. So, I'm gonna go ahead and turn up ISO one stop, but I mean look at that. That is what I was trying to get. So that is the process guys. That is understanding time, not just so we can be like mechanical about this and be like "gotta freeze it, gotta freeze it, gotta use the tech, gotta use the tech." With a greater understanding of time, we can show time in a single photo. We don't need video. We can show the flow of time, and we can still freeze time. We can show how people got there, we can show the grace of their movements. You see this a lot with ballerinas, where they just blow across the stage and it looks like someone just went wild, with like a paintbrush and then they get frozen on the end. So having an understanding of time, allows you to freeze things for practical matters to get a proper exposure, to freeze a subject, but allows you to get really creative too. So, this was just 90 minutes, but I really hope this kinda opens your guy's minds and inspires you a little bit to go out there and start playing with some long exposures or flash or multiple exposures or stroboscopic. And hopefully CreativeLive will have me back and we can do this for a whole day or two, and ill teach ya how I got that stroboscopic shot, that we did at the beginning. So on Instagram and Twitter I'm @ErikVPhoto, and that's the best way to get ahold of me, if you wanna drop like a quick line or if you have a question on a recent photo shoot. I also post my finished work and a lot of behind the scenes in camera settings there. But for everyone tuning in to CreativeLive, this link is not on my website, you have to go directly to it. Its not like in a dropdown menu, so only you guys get this. So, if you sign up to the mailing list at: ErikValind.com/CreativeLive, what I'm gonna do is send out a pdf after this, with every lighting set up, for every class I'm teaching during photo week with all of the camera settings in there and lighting diagrams. So, you're going to be able to recreate exactly what I shot in all of my classes and you'll have every setting to do it. And then, maybe you know, once a quarter I'll send a news blast out there with upcoming workshops or something, so its a trade. But yeah that's definitely the best way to get all the info.
Ratings and Reviews
Dave Sincere
Let me say.. Erik Valind is my new favorite CreativeLive presenter. His videos are clear and precise. He doesn't waste time rambling about other things, he sticks to topic and subject at hand. This is my second class and I must say I'm presently impressed. I've been shooting for 2 years and I learned a few new tips on each vid.
richard.miller
I really enjoy Erik Valind’s instructional video. I think that I have seen them all – B&H event space, Kelby One, and now, Creativelive. This is another useful video and a lot of information. HOWEVER, I cringed every time (and I’m sure that Einstein did too) that Erik said that the strobes changed the speed of light!!! It was almost unbearable to listen to lesson 4 on flash duration. I know what he wanted to convey but what he said numerous times is wrong – the speed of light is the universal constant “c” such as in E = mc^2. It does not change. Erik likes Broncolor because their output is “powerful” and consistent enough to deliver a fairly high intensity of light over a short period of time – duration. But the speed of all the light emanating from the strobe is constant (the constant c) whether the duration is 1/500 or 1/5000 of a sec. Again, I really enjoy Erik’s work but this was like fingernails on a blackboard.
Adrian Clarke
Quick and to the point was always his style and this was no different. I was learning at a fast comfortable pace as he was along, another great tutorial Mr V. Now I want to do some boxing self portraits