Lessons
Day 1
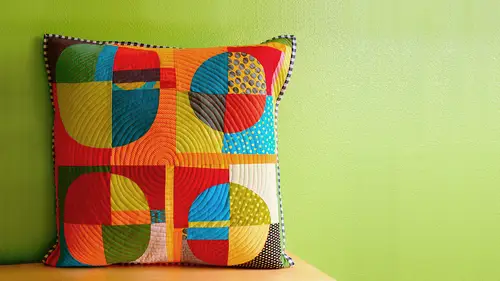
1Ways to Love Improvisational Quilting
21:40 2Building a Square with the Rotary Cutter
30:58 3Building a Square with Scissors
30:03 4Nate Quilt: Simple Log Cabin
36:43 5Building the Cabin: Adding More Rows
18:15 6Building Housetop Blocks - Part 1
31:14 7Building Housetop Blocks - Part 2
34:54Log Cabin Variations: Courthouse Steps
23:00 9Improvising with Triangles
33:40 10Using Triangles: Zig Zag
17:26 11Using Triangles: Star
26:43Day 2
12Improvising with Triangles: Flying Geese
33:18 13More Triangle Fun: Pyramids
26:09 14Creatively Combining Blocks
25:42 15Piecing Curves: Drunkard's Path
33:54 16Circle Variations: Half Moon Rising
23:58 17Improv Lines & Stripes Block
28:36 18Piecing the Stripe Blocks Together
17:46 19Improv String Diamond
32:33 20Finishing Your Quilt
22:03 21Basting & Binding Your Quilt
32:45 22Single & Double Fold Binding
26:51Lesson Info
Finishing Your Quilt
It's great to make lots and lots of blocks and it's it's wonderful to see the fabrics come together but we've got to make them into quilt s o I in this segment we're going to focus on finishing your quilt and there are there's several different ways andi actually j k a reference one way it's a way that I one way of finishing a quilt that I've actually never done before not because there's anything wrong with it only because I just have never gotten around to doing it and that is tio you know quilt is obviously it's what makes it a quilt are all the stitches on top you know the stitches that go through three layers a layer of the top layer of the batting and layer of the backing um and so you there are a lot of ways to finish it in one of the ways he referred to is how you bring the back the backing over to the top and then folded under and use it is binding we're not goingto no we're going to focus on a different binding method but that's certainly a very popular and easy to do method ...
as well but first let's talk about what makes up our quilt sandwich and it literally is called the quilt sandwich which is it's great so again we're gonna have we have a top and we've got batting we're going to do a little teeny tiny many colts this time they they're more than many they're like you know, super mini and and the backing and I mentioned in a previous segment that a lot of people like to peace backings will values leftover blocks that they might not have gotten to use in the main or they'll use um favorite fabric they wanted to use so that's certainly an option I'm really a you know, I like I put all my energy into the top and when I get to the backing I just won like so some fabrics together and just put it out there um so I didn't want to talk about some ways before you can do any quilting whether it's by machine or by hand you need to secure the three layers of your sandwich together we're going to have a really easy time securing our three layers because ours are so tiny but what if you have a really, really big welt? What are you going to do then? First of all, if you have a really big quilt you want you're backing and you're batting to be substance not substantially but several inches you want clearance of four to five inches all around so if you're your quilt is sixty by ninety, you're backing in batting especially if you're going to do a machine process or tying I need to be sixty five by or seventy by by one hundred so you want clearance on all the sides if you're going to dio where you use a hoop, you might even want a little bit more because you're going to need a little extra fabric along the corners for the for the hoop to fit in so you also you you want a big space because if you got a base you gotto kind of temporarily put the three layers together before you take it to the machine or if you're really lucky take it to a long armor or hand quilted or tie it or whatever. So if you've got a really big quilt there's there some options for you and in some involved a fair amount of pain because if this is what I would do when I had when I would have done a king size quote where I had to move furniture out of my living room so that I could lay backing down and you put it down wrong side facing up tape it to the floor with masking tape because you don't want it to be there forever to masking tape is temporary lay your bad batting on top of that and then lay your quilt on top of that always centering the quilt within the backing and and batting on dh then starting from the center out based that now if it's on the floor guess what? So are you um and uh so that's why this size is so great because we don't even need masking tape for this um well we are going to need and so we're going to different quilts quilts today by that I mean you're going students here are going to pick one of their blocks and finish them well it's one we're going to do is going to be what I call like the pillow method I don't even know what the real method was the name of it is but it's basically we're going tio um we're going toe um so the backing onto the onto the quilt with it right sides together like you would a pillow then turn it out leaving a little opening turn it turn it out and then baste it so that we could then quilted we're obviously going to close that little opening and another is just kind of a traditional standard binding so yes exactly that's done in that kind of pillow method um so but but was there much quilting done after you before huh how do you put the backing on? Okay so the backings not quilted tio that is not because it's just another option actually but um yeah that's another option but it doesn't it doesn't work in the same way you know you're backing is loose back there you know yes it is tiny but like works for a wall hanging were great for wall hanging but if you had a big quilt then eventually the fact that anyone I'm kind of secured to the top, my kind of cause it to be a little bit off kilter, the backing and kind of, you know, when you wash, it would kind of start to kind of it has come up from the front, you know, where it wouldn't lay, is nice and flat and look good for you. Um, so let's, start with the pillow kind of version of it. And since our since our quilts are not two standard sizes, we can't just, like, cut a square, you know, this is not, like, eight by eight, so we just gotta cut in an eight by ten inch square, we're actually going to lay it face down and trace it, you know? And, um so that ah, we can, um, when we so it's, not like we're sowing, um, you know, where we want to make sure we so exactly otherwise we won't secure it. So what I'm going to do is trace my top um and I mean, you want to be pretty accurate because you're just going to use a quarter and seem allowance here. And the nice thing about this is, um, thie. If you used a backing that had a definite right side and wrong side, you obviously want to put them right sides together and flip it, but this doesn't the white it's white out both directions, so that is mighty convenient. What I'm going to do is pin that leave a gap here so I can turn it right side out, you know? I could be as generous as I want to be, and then I'm gonna hand so the opening closed and then I'm going toe based it for quilting again, I'm going to tell you that this is so small, I don't really need to baste it, but I want you all to know what the what it looks like and to do it yourselves. So I'm just, you know, in my own mind, I'm just going to know that I'm gonna leave an opening about this gay big it was that six inches bring it over to my machine, and when I turn it out, I'm going to catch that backing inside, I'll trim it, you know? I know I don't need all this excess back batting, but for right now it doesn't make a difference, okay? You should be able to just pivot around these corners, add a little sewing snafu so I didn't get to pivot try reading this things obviously stuck here so there's several ways you can, you khun machine quilt your quilt, you can get a walking foot and that will help regulate that the feeding of the of the thread of from the bottom in the top. You can do that. Um, and most machines have a walking foot attachment. Um, I'd really recommend that if you get a walking foot that you make sure that it appropriate to your machines. So if I was going to get a walking put for this machine, I would definitely get a singer walking foot and not just a universal walking put. You can oftentimes goto a fabric store or both store, and they'll I tell you that you could go ahead and get a universal walking foot, but that's not true. You'll be so sorry you did that, um and singer makes I'm sure they make a walking put specific to their machines and it just attach it to the shank here, um, on dh or you can do something called free motion quilting, which, you know a lot of people are very intimidated by, but they really, really shouldn't be because it's just a matter of a little bit of practice in so much fun so if you know if you look on your machine at home or here you'll see that machine has some little teeth underneath the um underneath the presser foot and uh those air called feed dogs every machine probably post nineteen seventy has a button or switch or sometimes it's a lever on the machine to basically drop the three jobs to where they're no longer engage on when and using that in conjunction with a darning foot which again you can get specific to your machine you can basically quilt such that you could move your fabric anyway you want you want to go in circles no problem you want to go backwards not a problem you can move the fabric in any direction that you want and it just takes a little bit of practice in terms of understanding the speed they want tio beam you know, moving your stitches at our you know, moving, you're moving, you're creating stitches versus how fast you want to move your hands, but you could just make a few little practice peoples and practice it and it's really not a difficult process at all and again it is super fun and all of those kind of spiral quilting that you see on some of the quotes that I've made all that is done free motion on my home machine um ma'am, sony, the batting and they're white peace and you're piecing together how does it go on the no no, the the white piece needs to be on top right piece on top? Yeah, and then when we flip it out, we'll flip it towards the back. If you want to wait a second, I'll show because I'm almost there, so you wanted to put the backing or that's why I'm calling that with that white pieces, you're backing right sides together with the batting at the bottom. So your sin, which is kind of in a reverse situation. So here is your backing, and here is your top and here's your batting, ok, someone take my pins off and trim away this excess batting because it's really not helping me at all and now and you know what? I'm even going to trim these corners just cause it's gonna meet easier to poke them out later and hopefully I left enough of a gap, but either way, I can liken and good natured outs, and now I'm going to turn it right sides out. So the that will in case the batting in my little hello that I made, basically, but we got to pretend that it's a full size quilt, so can everyone pretend there you've got are no binding finish to r r said, do you understand what I'm saying? That's unclear so by putting the backing and the top right sides together and sewing them together like that then I could turn it out in case ah batting inside my sandwich makes sense so and then we can just basically slip stitch this closed which you'll have lord knows you have plenty of thread there but you don't have any sewing needles and I'll come around and hand out some sewing needles I'd press it alone once but yeah therefore the for the trying you and I have I have regular sewing needles trio so when you're doing a big quote like a bed times quote will use this method still uh no you bind yeah because I'll tell you why because even on a you know, quote this big it's really hard to get it I mean in a way I would love to um and if folks have suggestions on how you could use it but um so you know when you base to quote and you know this you want to start in the center and work out because you don't want to get need puckers, air bubbles or whatever in in uh as you work and you based it that way you so it that way you know you want to deal with you want to move any excess out to the edges, you know, um and so with this I've already kind of finished off the lows now I'm goingto buying based it obviously this size I don't need to base but I'm going to um so it's sort of like you can't control that that bubbling family the way you could if you if you used of a binding you can't quilt it out you can only quote it to the edge is what I would do instead if I really wanted to preserve the edges is I would quilt take like within an inch or so of the edge and then turn those corners in to meet each other yeah, that would that would work much better I've been doing this method yeah ok, so I'm gonna come around and hand gilson deals here keep an eye on because it's not the biggest thing in the world on dh then of course you'll have plenty of thread right? There you go. Thank you um and so we're going to close that that open seam of just using a simple slip stitch and all demo that and and white thread obviously if your quilt was purple, then you'd want to use purple threat because it would it wouldn't show up you wanted you want that to be as discreet as possible to pretty discreet little stitch, but you still wanted to be discreet, so I'm gonna thread my needle tuck that in you could pin this might not be a bad idea to just kind of pin it close while you work way and ah, I usually don't even make it not I just kind of start working and into the same spot a couple times and that in and of itself makes a nod and then you're just catch one side of your quilt and catch the other side back and forth working back and forth until you close that opening now malka in terms of the stitching that you're using for your quarter projects are personal chat room is asking do you hand long arm hand quilting or stitch in the ditch acceptable? What do you actually use and what's your preference? I always do free motion machine quilting now sometimes I do that through a long arm not not my long are my rent I send it out to a long armor but for instance, all the pieces here that I've been showing over the course of the of the class I did on my own machine at home using free motion um I have done I have done some hand quoting in the past um it's just I really like machine quilting um but hand quilting there's you know, a lot of people find it very relaxing I'm going to briefly talk about the process, but just because of the nature of my work, I you know, it's a very long process, and I sadly I don't have I don't know if sadly, I'd like to pretend that it's sadly, but sadly, I I love the way machine quoting looks and the one big advantage, though to hand quilting, is that you can change your mind. There's not that many stitches to take out, you know, if you say, oh, you know, this spirals not looking right for me, you know, but machine quilting taking out machine quilting stitch is once you start machine quilting something you am I right? What? What? You're committed that's it because taking out all those stitches, forget it. You know, it ain't happening. Pardon my grammar, but, um and s o stitching in the ditch that the person the chat room mentioned means literally stitching in the kind of the well, the seam that the cold pattern makes I I almost never do stitching the ditch its I really like to let the fabric that's in my quilts kind of dictate how I'm going. Tio quilt something. So I think stitching the ditch, though, is a great technique. If you, for instance, if you were making that the stripe quilted, we talked about it in a previous segment you know again let's say you realized you know, you know, a week before the baby shower that oh my goodness my sister in law is having a baby that and you made the cool top real fast I could see how machine quilting it's stitch in the ditch you could use ah walking for you could do that free motion as well would be really fast and convenient and secure the layers and still make a beautiful quote so you are a complete novice is of that what is stitching the ditch me okay, so I said it so you see all these seems here all the seams are the ditch you know? So if I was going to stitch in the ditch I would eso along this sick and then so along this scene and then so along this same I would just basically mirror the seams so I'm always done closing up my little opening so that everyone understand howto kind of flip it out way outlining a purse and you just leave that opening, which I almost always forget at some point but I'm wondering where your top is where you're batting is oh, I don't I mean you're backing part of jenna you just can't see it oh you're gonna go in the other direction yeah, ok that's fine, yes so the alison give the folks a favor explain, eh? So you just decided to do it differently by putting the the instead of putting the backing wrong side facing you put the top right? I broke the top of its head up because I have a lot of intersections on the corners here where I had these have scored triangles, and I wanted to make sure that they stayed flat when I stitched over them and I didn't have a lot of extra bumps. Okay, that's, why? I put it on top. Great. I think if this was a quote that I was actually, you know, wanting to finish finish, you know, maybe I want to give it to somebody. I probably go back over these stitches again. Just because hand stitching is not going to be is secure as machine stitching, no matter what grandma says, um so, um, but since this is just kind of a demo piece and that's going to do one row and finish it off most going to tell you that I never double up thread um but if it's your preference to double it up and use, you know, kind of ah, two lanes that wife and by all means do that I just find that I get endless tangles and knots if I do that
Class Materials
bonus material with purchase
Ratings and Reviews
Me F
Another great class. I love the approach that encourages spontaneity and decision-making throughout the process! I was not at all put off by Malka's speaking style -- I found her informative, articulate, thoughtful and funny. I would, however, have appreciated much less time watching her sew, although I realize she likely did that in this class to allow her in-person students to have time as well. A bit tedious, however, when it's not live or you're not sewing along. I loved the idea from another reviewer to have samples of Malka's quilts hanging in the studio throughout all the sessions so we could refer to a finished piece that demonstrated the skill she was teaching. I would recommend this course to anyone who loves quilting or wants to learn.
user-5fbbc1
It was interesting to see how Malka goes about improv piecing and making her design choices. She makes visually interesting quilts with wonderful use of color. On the down side: 1.Technical issues need to be worked out. Chat did not work for me. I use Apple products. 2.Malka needs to find alternatives to "um" and "kind of". The course was too long. We do not need to watch Malka sewing so much...some is ok. More samples partially done would cut way down on sewing time. I would prefer to see examples of Malka's work hanging on the walls behind her, so we could see where she was going with her demos and give us some fabulous quilts to admire. I believe the sewers on the set would also have benefited from seeing samples hanging on the walls.
Sarah H
I have only watched one session, as I live in the UK and I did not watch it live. I have a busy schedule at present so will take awhile to work though them, initial thoughts were very good, I do like Malka's engery and free use of pallet. I look forward to watching them over the coming weeks and get back to you. I do like the concept of these classes and find them very useful. Thanks