Piecing Curves: Drunkard's Path
Lesson 15 from: 10 Ways to Love Improvisational QuiltingMalka Dubrawsky
Piecing Curves: Drunkard's Path
Lesson 15 from: 10 Ways to Love Improvisational QuiltingMalka Dubrawsky
Lessons
Day 1
1Ways to Love Improvisational Quilting
21:40 2Building a Square with the Rotary Cutter
30:58 3Building a Square with Scissors
30:03 4Nate Quilt: Simple Log Cabin
36:43 5Building the Cabin: Adding More Rows
18:15 6Building Housetop Blocks - Part 1
31:14 7Building Housetop Blocks - Part 2
34:54Log Cabin Variations: Courthouse Steps
23:00 9Improvising with Triangles
33:40 10Using Triangles: Zig Zag
17:26 11Using Triangles: Star
26:43Day 2
12Improvising with Triangles: Flying Geese
33:18 13More Triangle Fun: Pyramids
26:09 14Creatively Combining Blocks
25:42 15Piecing Curves: Drunkard's Path
33:54 16Circle Variations: Half Moon Rising
23:58 17Improv Lines & Stripes Block
28:36 18Piecing the Stripe Blocks Together
17:46 19Improv String Diamond
32:33 20Finishing Your Quilt
22:03 21Basting & Binding Your Quilt
32:45 22Single & Double Fold Binding
26:51Lesson Info
Piecing Curves: Drunkard's Path
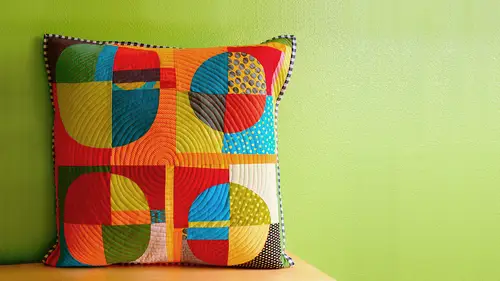
So in the previous segment, we talked about using a a new existing piece of fabric or an existing cut as a template for another cut, and that is the key to making ah curves in and I touched on it when I said let's say you have a curvy edge and you want to make it um you want toe so it an edge it's not the same kind of curve that you need toe lay those two on top of each other and apply the first is a template for the second, so it's in credit it's key to making curves, eh? So what I've done here in our little sample block is taken the the most kind of traditional curved block drunkards path and does it doesn't done it improvisational e s o here's an example of a finished piece pillow quilted pillow top again it's the it's, the drunkards past made into a circle there other kind of configurations for drunkards path there's this one there's one that there's there's really great one that I've been seeing around that that I've even made myself that makes it into a flower if you combine it w...
ith, uh, with square blocks and if we have a second, I'll demo that as well um, this is just a detail of the circle so obviously doesn't make as it doesn't make us you know, a circle lee I wouldn't you know, get a compass and compare that kind of circle to this circle as you would with a drunkards path but it makes a circular it's circular here's another variation of it the um ah I I used to create this pillow I called half moon rising it potentially has another name, but I actually saw this I was inspired by that image I saw in print rest of a floor and it remind and so I wanted to try it as these air nothing more than drunkard path quarters just position differently um and so it's just another way to kind of take the blocks and put them together differently but let me go ahead and show you all how tio make these curves and then we can kind of play with making them not only in black and white but hopefully making them into in colors and maybe even some different configurations if we have the time. So let me set this aside, don't I'm going to do it first in black and white? I just did one in color just because it would be fun um so first thing I'm going to do something earlier and I think I said and if I didn't, I'm going to repeat myself that once you know how block has put together once, you know kind of the architecture of that block you can improvise it and so it in drunkards path I know that it's made out of a curved piece I'm having a little there we go a curved peace and what I'm going to call the framing piece I don't know that it's called the framing piece I'm just going to call it that um so and actually I think I might want to re cut my curveball because I don't like that curve ball you know what I will use this curved piece that's fine so here's my curved peace and from this piece I'm going to cut this piece of black I'm going to cut my framing piece and I'm going to lay that here I definitely want extra room I won't need this extra room it's going to get e I won't I won't be needing it in the final piecing but I'd rather have extra um and so I called the framing piece because it goes it frames my little quarter quarter circle okay um so what I'm going to do is actually use that as my template used my curved piece I could have also drawn this framing piece or drawn cut this framing piece first I would've been fine to work in the other direction but I decided to go ahead and cut the curve piece first um this is one of the few times that I'm actually going to like I'm gonna fold this in half and I'm going to mark the center point by kind of creasing it with my finger clipping away a little bit and I made a little v shape I'm going to do the exact same thing on my framing piece pinching it with my finger cut a little a little corner or look the shaped piece away that is like a super important because that's where we're going to start our pinning so and we're gonna pin this um this is not something that that you can not pin eso first thing I'm going to do is put them right sides together. I really really like to do it to do my pinning from the framing peace side it's a lot easier to ease that part around and I'm going to put a pin there and then I'm going to just very gently you don't want to tug I'm going to put a pin I mean it's not even three quarters of an inch away and another pin again about three quarters of an inch away and then continue until I get through one side and I've got that whole framing piece pin to my curve edge along this one edge along this one half of my curve and then I'm going to proceed to do that on the other side as well go a little ways penn go a little ways and pan all the way to the end of my curve the reason I wanna pin so extensively is ah I don't want any I don't want it tio kind of in this one's actually not a really good job I didn't put it where I wanted to um I don't want any kind of bunching up I want tio be able to easily ease it around and you see it's like I said, I got a lot of extra here great extra is good not enough kind of a problem and I'm going to go ahead and I had replaced the bobbin earlier on my machine so thread that baby up and bring up the bobbin and so around a curve let's bring up that bob and here you really wantto follow you're going to follow that top piece keep that quarter in same allowance so relatively slow so you have time to take out the pins before you get to them before you so over them on the way and I did so over pins didn't all my talk about not listen didn't make that clunk sound okay, so here we go here again it's not about idea to clip these curves just go ahead and make a little tiny kind of flashes about, you know, three eighths of an inch apart and there we go and now we can open this up and we're going to see that yes, my framing pieces is larger but that's ok I find it naturally wants to press to the side of the framing piece I don't know why but that's been my experience and now I contribute away but since I have extra I don't have to worry about trimming it and there's a quarter of my of my circle um unbelievable you know even though I haven't done this in the past I'm going to go ahead and make all four corners are for court quadrants of my circle before I start to piece it together because for me uh how the circle fits together is actually really important so I'm going to want to play with that so let's go ahead and make those four quadrants and then we'll talk about putting it together putting the circle together all right so I'm going to keep up with the black white thing even though so I'm actually gonna make these guys go over here like I had intended to somehow make them different it's a design element it's not a mistake it's a design element so minutes more black fabric it's white fabric and definitely wanna press wrinkles out go ahead and make some more circles here is where you really want to have a nice sharp rotary cutter you know you can replace the blades on these rotary cutters so you know if your blade it's getting kind of dull definitely where you want a sharp rotary cutter so I'm going to make myself another and the nice thing is you can actually so I had cut this for a different framing piece I guess you mean it's fun to save them and then use them you know all these like so I'm going to cut for instance I'm gonna cut and uh one of the ark piece is one of the okay um and so I've got a framing piece here even though I'm not planning on using it right now I got a perfectly find favoring piece I could then apply it to another piece of fabric and use it that way so again it doesn't seem like it's going to give me enough extra I want I'd rather have way more extra than then be tied on things cut away what is not going to be part of my framing piece and then follow the curve of my basically rotary cut drawn arc pull that away and then go ahead and mark my mid points by folding and clipping and doing the same with my framing piece put those together and like I said it really like to work from the framing peace side of things line them up because I feel like they're not lined up well right now yeah when you start applying those pins so that when I get to selling it goes easily across better my machine no puckers we'll see no parkers the way I figured out how to do this is I had made you know, some traditional I'd even drafted some traditional kind of drunkards path, which is just those two pieces. Um and once I knew basically how the block went together otherwise how it went together, not improvisational e I could apply that to improvisation also, you have to kind of you have to think a little bit differently classify had wanted in the traditional block the framing piece and the ark piece overlap each other by a corner orange. Um and um, and you have to draft it actually with an extra half inch because of that. And so if I had been married to this idea that they would overlap each other, that it would work exactly like it does in the traditional block, I think I might have been in a little bit more difficulty than if I just say, well, I'd rather make it too big and trim it down, take my pins out all right? That's great, so I'm about to have three and then four, then we'll talk about how to put it together the four quadrants of your several, ma'am. You sure when you're doing this particle circles would unique? They're seen before your press? Yes, I talked about that in the previous when I made this one that you could go ahead and clip those curves, but absolutely, yes so yes so you call it making the same but yes, just kind of cutting into him a little bit to release attention that fabric is gonna have when it goes around a curve like that man so when you fold your quarter circle and how or when you mark the center of your quarter circle are you lining up the sign no the ark okay to arc points so here so if this is my this is my arc here of all folded together like this okay, hold those in my in my fingers bring that to a point and then clip there okay? So the edge doesn't actually meet up at that no, I think from pending the edge is starting to center but it doesn't ever meet up, you know? Not necessarily no and I like I said I'd rather have way more extra then um so now I have I have three and one is substantial I mean, this one just made is substantially larger so I'm gonna have to do some adjustments to get it to fit I have to make the other one first. You know what? I'm going to go ahead and uses since already have it and I talked about how it's kind of fun to recycle it um I'm gonna stand by what I said, um we got a great question from lad honey who's watching and they're saying marco you seem to be a rule breaker do you think we sometimes stifle our creativity by being too married to the rule? Wow, that is a great it's like a big philosophical question yeah, I should just answer forty two uh yeah, I do think I mean so one of the things that they were a fair number of improvisational pieces or quilts in my book fresh quilting and one of the criticisms had to do with that it didn't seem um did they I didn't follow the rules, you know and whatever those rules aren't, I didn't follow them and I just you know, yeah, I think that we're a little too a little too worried about that and it's like my number one rule relax it's just it's just not that critical, you know, um so yes, and we do stifle our creativity because we're afraid because when you try something new and you're going to fail, sometimes you're gonna feel most of the time, you know, but you know, honestly and everything I've seen you do, I can't see how you could fail because the improv attitude is just, you know, you can you incorporate you're mistaking if you'd have you cut something too short, you had a really cool color frayed well, I guess we don't trust ourselves maybe, you know, yeah I also think that's the joy of crafting and making your own things if you want something absolutely perfect and machine may go gun buy something was machine made right? You know there are a lot of craft traditions where they will intentionally make some kind of mistake you know, there's this wonderful kind of body of japanese quilts and they hand peces amazing quote I mean not just amazing because they're like, you know, beautifully done or beautiful patterns but because they are meticulous, you know? But they often times will add to some little feature that you didn't I mean still meticulously crafted but maybe it's all you know, triangles and all of a sudden there's just an empty patch there they'll add something to make it a little less than perfect in the same thing like in the navajo tradition they would always have what they call this spirit line so they make a weaving and there's always a path you know, for some kind of imperfection, you know, spirit line supposed to let the spirit out but it's also about not yeah, that there you know, we are people and we are not perfect and we should embrace that rather than rather than run from it so I'm gonna pin this again my pinning has happened up here so I should keep that up you're sowing looking at the outside edge the framing piece is that on when I pin it, I pin from the framing piece on right and when you so it you're still yeah, I definitely wanted I wanted so where I pinned yes, humble bumble great name well done, I'm not sure I'm going to have to be sure about this, so I'll say exactly how it's written in america when you cut your curve for the circle, why not put your white piece on top of the black and then cut your circle through both? Then you would have a perfect match? Well, it would be justice well, because I still need that quarter inch overlay and if I cut it the exact same size than the my curve is actually going to be smaller than my framing piece when it's all pinned together because I haven't accounted for the for the for the quarter inch seem allowance loss, here we go, that's the answer thank you! Earlier, we were talking about the normal cutting that's in the self healing one mallon, you said that you know you're talking about cutting boards. Is there actually a difference between the normal in the self healing one if they can't actually find one, does it because at the end of the world they they have the plastic cutting boards air just four ling your fabric out, pinning and cutting with scissors but not whatyou rotary cutter already kind of you do need to self you do need to sell feeling for that there was rotary cutter thank you so much and I think sometimes I don't know where but I sometimes used a cutting that that's got a bit of a tooth to it and your cutter gets stuck on it you know have you ever experience us? Yes, I haven't played my yet though, but I do have that you're supposed to clean them yeah, way to play them to get the the the fibrous out of the cut marks on the fabric. I don't know, I don't know that holly you working your dining room table so presumably you have a healing man but I do those on the floor if you do all your cutting on the floor to you wow, you got a strong back to a lot of yoga e I still don't want to do my cutting on the for well, I try it on the table but my cat thinks it's a playground so she like likes toe bath the things off the table she thinks that's really fun game I'm alan you were mentioning earlier how you like to put down a piece of fabric and then lay out all your cuts the and see how it's going to going to be now we have had a really exciting class I'm not that long ago on creative I would die angular land she did t shirt quilting on that's exactly how she did it. She got a huge white sheet and she laid everything else. I do want to remind everybody that's available in our catalogue. It was really exciting class reviews and beautiful fabric and earn its in our catalogue. It was two day course, actually talk tussle the techniques to use to design a quilt using a ll the beloved t shirts we have in our draws that we love too much to throw away s o diana some really easy techniques to create a path in that even a beginner quilter canoes. And you could find that course in our catalogs. Definitely checked it out. Holly was here for that one out to you both actually let's. Take a look at this now, because I think this is something that this is really inspiring for a lot of our viewers that holly actually put together from that t shirt quoting class on these air or t shirt scrap sor that she put together and then she embroidered each one and this is actually specifically made for creative life is something that we really appreciate what you're gonna hang this in the office, it has our be inspired to see, and the el and then the photography is sewing on remind me what the cat was for everybody seems to be it was like a lot of cat talk going on in the last class that was a really busy you actually made here in the class yet to check that check out diana gilleland class thank you holly for that from creative life all right, so I've got number four so knob no, I've got to cut the curve so it's a great sound all right? I'm gonna trim the excess from my framing piece and kind of look at them all four together so now I have some design decisions to make um I really want them to not only meet in the outer kind of circumference but in the center as well. So I'm going to have to make some adjustments for that. I think my first step that I'm going to do is but these two guys together and then adjust these teo well, for one thing I can tell right now that right now, um, I mean, I could trim this off pretty easily yeah, they'll they'll they'll come together and I actually don't have this many adjustments as I thought I did so let's start with putting these two guys together um and to do that I'm actually going tio flip this seem over a little bit I want to nest those seems I want to make sure I know that they're not going to overlap. Exactly, but I want to make sure that they meet up like I want them to. And if you if you wanted to kind of base the's together using a basing stitch, which means a really big stitch on your machine, then you could. And then you can adjust afterwards way too. No, I think it's perfect, it's. Perfect. If it's not it's, even better. It's perfect. So it's on lee. Okay, it's, not it's. Not even better. So we came together exactly like I wanted to, um, press that to one side. It could press the seem open. And the nice thing about clipping the curves is it's not a big deal to have been that bent that little bit over doesn't been my whole seem kind of totally out of whack, so I'm gonna trim thes to each other and maybe even trim this even though I don't really have to deal with that right now. Um, and now the issue is what's gonna happen. So these air probably up up here, I can tell the once I overlap them. I'll have seems that meet up here, and I could just say, ok, we'll do the same thing I will as I did here I will put these two guys together and trim this excess off but it might be kind of fun to add a bit of something right there noting that I want part of it to be part of my framing peace and part of it to be part of my circle so I'm actually going to do that um do I want to add this I mean well it already exists and so part of me kind of one of us wants to already at it um it's awfully thin though so if you know I can't tell if I lose a quarter inch here and a quarter inch here there's not much to it so it's a little on the feudal side um I'm gonna add real color so I had a little bit of yellow and then some black go ahead and peace I'm gonna pee cease to strips together kind of being my first step and again I could just have so in those together and trim them to fit the smaller blue and black quadrant and that would work fine too but I want to do something a little bit different so and since this this seem already faces out towards the edge of the framing piece I'm going to make my strip peace seem face the other direction so they will nest into each other and then I'm going to put that in now here I have to account for the fact if I just go straight like that, they're not going toe if I just go seem to seem point to point like that and what's going to happen is it's it's not going to land in the right place? I have to account for the fact that I've got it but that this is the quarter inch mark right there, so I'm going to actually invent my black piece in a tiny bit kind of hold those together now I can put the two quadrants into upper quadrants together and yes, this one pardon me made this way um way don't know they're all that much smaller than these, you know? So I mean, I guess you could make him small like say, this show us what you're doing cara you could tell she was already outed you oh yeah, you know, I can't wait to see what she comes up with you yeah, we'll see how it goes I think I don't have enough allowance, so am I you really want to go less than quarter inch seam allowance so they have a very wonderful artistic eye because you've taken some of marcus ideas and concepts have really done some very unusual things already just in this class which a beautiful many your zig zag pattern there yeah, as I was cutting them out, I had sorry he has to come I had stripped just black and white fabric and so I ended up these off cuts and I kind of like to use them for something you figure out passengers great she's a weaver she's a study has traditional swedish weaving in all this and you get patterns so I think that plays in their system that's me right there yeah way really embodying here I think what marco is teaching because she's showing us all the great steps that have to do curves and diamonds and everything but then you're taking it to the next step in putting your own twist on it which is which is fantastic. Okay, it's work actually it's not gonna I'm not gonna have the exact match up that I wanted to I could actually um go in and make this seem just a little bit a little bit wider I mean, basically re so the same so that it comes in in a different spot in the center and then they match up exactly um yeah, you know that kind of market so I'm just gonna add another powerful pop. Yeah, yes, good you will you door hopefully good. So yeah, especially in this block all sorts of design decisions to make along the way and that that makes it a lot of fun it's not the fastest sewing in the world because of that but ah it's it's a lot of fun now, just to remind everybody at home as well that if you've been creating anything while we've bean learning to quilt with malka, we'd love to see your work we need to do is go to the course page click to share your world button and then if you have anything you've been producing of the last of the session one second to or indeed other clocks you've made in the past we'd love to see them just taken image and upload them I think we've got eleven contribution so far I know marcus looking forward to seeing all of those at the end of the course is well, so please keep our sharing your work use that upload button I'm sure chris will drop that into the chat rooms for you to follow yeah, so now I could have mohr of what I wanted, which was for them to meet at that point I mean, so yeah, I made decisions about about what what was most important to me what was most important to me was where the outer edges, what would have been fine to feel otherwise to feel like, oh, I really wanted to meet exactly in the middle of the of the circle of the quadrant wait, go all right, even so, it didn't exactly come at the point that that's ok that's that's all part of it the montreal. So it isn't laundry and circle. I was thinking the same thing, it's. Great. So, yeah, now here, I would just, you know, from this in this edge as well. I could even maybe trim it down across the top a little bit and there's the first of my circles. So the idea is that I would make for those circles, and that would be a block.
Class Materials
bonus material with purchase
Ratings and Reviews
Me F
Another great class. I love the approach that encourages spontaneity and decision-making throughout the process! I was not at all put off by Malka's speaking style -- I found her informative, articulate, thoughtful and funny. I would, however, have appreciated much less time watching her sew, although I realize she likely did that in this class to allow her in-person students to have time as well. A bit tedious, however, when it's not live or you're not sewing along. I loved the idea from another reviewer to have samples of Malka's quilts hanging in the studio throughout all the sessions so we could refer to a finished piece that demonstrated the skill she was teaching. I would recommend this course to anyone who loves quilting or wants to learn.
user-5fbbc1
It was interesting to see how Malka goes about improv piecing and making her design choices. She makes visually interesting quilts with wonderful use of color. On the down side: 1.Technical issues need to be worked out. Chat did not work for me. I use Apple products. 2.Malka needs to find alternatives to "um" and "kind of". The course was too long. We do not need to watch Malka sewing so much...some is ok. More samples partially done would cut way down on sewing time. I would prefer to see examples of Malka's work hanging on the walls behind her, so we could see where she was going with her demos and give us some fabulous quilts to admire. I believe the sewers on the set would also have benefited from seeing samples hanging on the walls.
Sarah H
I have only watched one session, as I live in the UK and I did not watch it live. I have a busy schedule at present so will take awhile to work though them, initial thoughts were very good, I do like Malka's engery and free use of pallet. I look forward to watching them over the coming weeks and get back to you. I do like the concept of these classes and find them very useful. Thanks