Sketches of Interior of Street Sweeper
Lesson 12 from: Sketch like an Industrial DesignerJorge Paricio
Sketches of Interior of Street Sweeper
Lesson 12 from: Sketch like an Industrial DesignerJorge Paricio
Lesson Info
12. Sketches of Interior of Street Sweeper
Lessons
Introduction
06:17 2Preliminary Sketches of Different Products
05:53 3Steps of Rendering Coffee Maker
06:02 4How to Create Quick Orthographic Views
20:35 5Description of Isometric, Oblique, 1-2-3 Point Perspective Views
11:03 6Best Angle for Perspective View
06:16 7Perspective View on Graphics 360 Paper using Different Materials
13:31 8Final Render of Coffee Maker
15:19Working with Preliminary Sketches of Street Cleaner
16:25 10Chrome and Reflective Materials
10:42 11Final Render of Exterior of Street Cleaner
06:41 12Sketches of Interior of Street Sweeper
09:18 13Design Concepts for the Interior
07:20 14Final Rendering of Interior and Exterior of Sweeper
17:47 15Defining Final Outlines and Contrast
08:04 16Creating Texture and Composition
04:31Lesson Info
Sketches of Interior of Street Sweeper
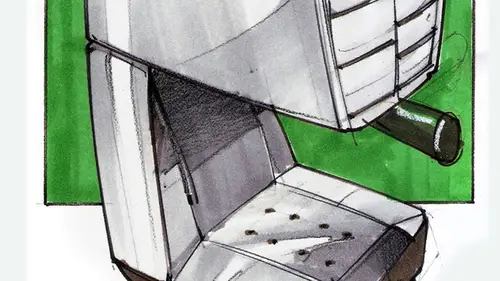
all right. In this next face, we are working with the inside of these street sweeper. And once I've gone online and saw how this cabin really was working, I got a big surprise. Guess what? They have two steering wheels to places to run this vehicle from the left or from the right. What a great design. So, in other words, if you are a day driver, you could be in one side making sure you don't step on the, uh, on your neighbor's lawn or something. Or if you clean the opposite side of the street, you can sit on the other side and then make sure that you get to the right edge the correct edge. What a great design. So everything is duplicated. So what I did here was just the, um, get a sense of how the interior would be like before I got to this scene. Let's step my my design, just one tiny step backwards. This is kind of looks complicated, but let's simplify it into simple geometric shapes. Remember when we were doing the geometric shapes for the products right? The speaker, for example, o...
r the coffee maker, right? Or the furniture piece we got the three dimensions on the inside is different. It's like being inside the box and see how it looks like. So what we have on the inside would be something like this. It's actually an interior, so we just have the cabin. Since we're looking from above, I really had to add a little bit off 1/3 vanishing point coming down to add a bit more of a drama in the scene. So these are not pal. I brought the lines in once I got this one and I started adding more details such as the windshield coming forward. So if it comes forward, it needs to be designed like that, right? But then it has a window. Since it is a symmetrical design, exactly symmetrical somewhere here, whatever I do on one side needs to be added to the other. But I am favoring more on the right side. So I Seymour of the side of the paper. So you see the windows and two sides and then I start adding my main elements. We have one blogged over here, which is the main unit to call it something, and then I have or control panels and then a box on the other side, slightly smaller because I favor decides that this one is smaller and then to a steering wheels. So in other words, if we do this, it has two steering wheels. Rendering the inside of a car regular car would be a lot easier, right? Because we just have to deal with one of everything not to, um, so the same thing that we have done before. I worked for us with very thin black pencil lines to get my main structure going. You see my main pencil lines just very loose just to get everything going. And then I got We live with a blue pencil, defined my shapes, and it'll be more to clean them up. And that's how I got it. Um, and I put this under so that I would be able to see better. You always have. If you render on tracing paper on your surface is not white with a white piece of paper under, so that you can really see where you're going. Your eyes will thank us for less the design. You can really see it better, you see, for the steering wheels. I used again my templates just to make sure that I would get good ellipsis. All right, the next phase watch, too. And that's what the first stage was. Just to get the main shapes going on over here, I just had fun. You see the fast and furious. What I was mentioning earlier applies also to the interior fighting a different way. It's fast and furious but symmetrical and also, um, has to be lose. But there is a lot of detail going on. How am I get a hold of owner on all that? First you come down and you say, Well, OK, what's important over here, the console still looks very boxy lot. So let's I was thinking over here. What if I added, you know, kind of angled cuts at either side? And then instead of the controls being analog? What if I added, since I need to be operating this designed from either side of the cabin? What if I actually had a shriveled screen? So I went from digital. I mean, from analog to digital. What if I had a main control over here, a screen that could be kind of tilted so that I would be able to see if I'm sitting over here, I would just push it with one finger on the screen would be rotated to one side. Or if I'm sitting over here the opposite. All right. So I added some curves, redesigned the upholstery. Some lines may be different ways off. Kind of breaking the simplicity of just the regular seed with nothing on it. A joystick over here just to have better control. And then the panel over here with some curves that replicate what we had on the outside, which is some curves on the top and on the front, on the top hood and on the front. So I'm bringing a little bit of the outside inside with more curves. So this was my first attempt, and I said, Okay, well, this is looking good, but I still not happy. Let's explore more. So I went with something like this. All right, so now it's an excess. Nice of showing. Still using recess. My starting point, I put it under always. You're working layers, right? This is something that we're getting out of this class. The years is the trick. It's very hard to come up with a great drawing from the get go. So make sure that you work slowly. All right. So I added more on top. And then you see, when you put your legs when you say, imagine that you say it in front of your car right where you have your legs and the bottom part of your extremities, right? It's kind of shaded. So what I did there is that kind of picked up. It's not fully black. It's actually see eight or C nine Cool gray, very dark added very dark tones over there to push it to the background and then some intermediate gray tones to separate what's outside. In other words, what's glass from what is actually the main structure and then worked more with black lines? Different line waits. In this case, we have a single line Wait over here. All right, Over here, you see how I'm starting to add a second line weight pressing more, um, my pencil lines just to define the main objects. You can do that to you, see how the volumes really comes up. Life really becomes more interesting once you work with at least two line weights. So I took that and applied it over here. So we have actually three line weights, very thick to define the main perimeter off the areas that I want to design further. You know, this central console thes two consoles, the outline off the steering wheels on the outline of the seats, intermediate line waits for inside lines and, um, very thin lines to do some hatching to create shadows, but maybe not as dark. And you can do them at places where you would think would be secondary but still interesting. For example, there on the handle on the side panel. Um, maybe the steering wheel over here could receive more hatched lines as well as these two controls, some hatch lines and then some shadows here on the actual that controls that holds theist hearing wheel. All right, so the only thing that I used over here was thin intermediate, um, sick black pen, which I will find and then to gray tones very dark and then lighter for the stones suggest this elements five. But you can already get very good results This way. Whenever we have a window, you can draw diagonal lines to suggest that fetus a window on not nothing else, so that it really shows more like the material without really rendering it in blue Good.
Class Materials
Bonus Materials with Purchase
Ratings and Reviews
Mike
I thought this was a well rounded introduction to this subject. Really liked the teachers attitude as well - very inspiring!