Lesson Info
13. Design Concepts for the Interior
Lessons
Introduction
06:17 2Preliminary Sketches of Different Products
05:53 3Steps of Rendering Coffee Maker
06:02 4How to Create Quick Orthographic Views
20:35 5Description of Isometric, Oblique, 1-2-3 Point Perspective Views
11:03 6Best Angle for Perspective View
06:16 7Perspective View on Graphics 360 Paper using Different Materials
13:31 8Final Render of Coffee Maker
15:19Working with Preliminary Sketches of Street Cleaner
16:25 10Chrome and Reflective Materials
10:42 11Final Render of Exterior of Street Cleaner
06:41 12Sketches of Interior of Street Sweeper
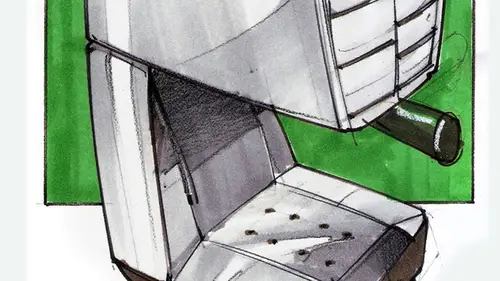
09:18 13Design Concepts for the Interior
07:20 14Final Rendering of Interior and Exterior of Sweeper
17:47 15Defining Final Outlines and Contrast
08:04 16Creating Texture and Composition
04:31Lesson Info
Design Concepts for the Interior
next phase was okay. No, I got figured out. I already understood how the interior was looking. Now let's have some fun with more concepts. So I to removed again. My black lines foot it under you see, we're working in layers, put another layer on tough and said, OK, let's design it even further. At this point, I, uh, wanted to get something out of these. So I went to the store and said, OK, when you're a designer, you have to pick up inspiration from all different sources. Let's find out pickup trucks, how they looked like from the outside and from the inside. So you just and you need to make a promise for yourself not to read the entire article, because then you're losing the point. Imagine that you let's say that you could not read. You can only see pictures. All right, so you remove the layout of your brain. I don't know how to read. You just look at pictures and you just let the pages and see the ones that you like. And that's exactly what I did. You look at different interiors and ...
you're like, Ooh, I like what I see here. or like this controls. I like this, um, Vince, that they have their circular. I have some areas that are kind of cut at an angle. Oh, that reminds me what I did on the front and on the back. I like that. At that point, Trust me, it started to just get your magazine out, and then you kind of rip that page. And you have that as a reference on that you keep on flipping pages and anything that you find interesting. Just take it out full. I like what I have here. Thesis. Chrome's makes with the color darker with a dark. I don't know if it is navy, blue or black, but I like this high contrast. The front grill is powerful. Reminds me a little bit of my drill that I had divided into thicker and thinner. I like that. So you start collecting not only from one magazine for any magazines that you find it interesting, Vera library and you can really rape books apart. You take pictures, and then you bring them later and you have your own reference. You need to have some sort of a visual reference off. What's out there not so much the copy at this point, I need to be very clear. You don't want to copy original designs because that would be plagiarism when you can get in big trouble. But what you can do is get inspired from what it's been Donald very far in a generic way. Oh, I like this cut over here. Who? I like the contrast. You know, I went through that already, so just make sure that you make that distinction clearly. All right, so at this point, I was looking at the magazine, and I really liked how they had on some design, some upscale designs. I went to all their magazines and I liked from how their interiors. Some cars have two different forms. That makes it very fun. What if I had, like, fake wood on some parts over here, even in the seat who I would be fantastic. So I made a note of that. Then I continued working with my dark tones on the bottom, but not as pronounced. And then I had some vents that I looked on the magazine that I liked, and then I included them here. Since this design is symmetrical, I am working with my symmetry left and right. And still I can make a good design, right? Um, single screen that you could tell one side or another. I decided to break it into two. So that's why I have this parting line over here. So they would be it would be angled this way and another one pointing this way. It's like this. The design is moving forward. I'm starting to suggest texture. You see how I added some dots for texture on the seats here and there on this t on the steering wheel. I have more texture on the bottom of it. And over here, because I like it. That would be like my zero point and then some very quick hatching just to create some depth on my drawing. And I forgot to add it on the previous drawings through the windshield. I can still see the front hood. So this is what I added over here, and this links back to my original drawing. I could see a little bit off the front lights through the windshield, so I added that as well. And these are my reflections cutting across the side windows, so I get a good sense of this. But then I was not happy still. So this is looking very good and I am getting to the good point over here. But I will. I am, like, not fully done just yet. Let's do one more and see how I get to my next face on. This is my next face. Next faces like Okay, let's move even further. Let's that I like that idea of brown on the inside. Let's bring those brown tones even further, but now I'll work with more angles coming in. So I feel that I would be kind of nested in. I said on this chairs And this Brown is kind of surrounding me, kind of coming at a V behind me so we can do something like that. And then the chisel edges that I had on the cutouts on the front. I incorporated them on both sides till just to make it more interesting. You see, we tried to get your design cohesively from one end to the outside, front and back, and the inside, too. The chisel cuts that I liked on my original design on the outside. I brought them in here you see this chisel edge over here, this chiseled edge over here he's worse, even a loser's catch. I didn't even worry about what I would see beyond, so I did not even add my top structure because I wanted to focus more. It's almost like if I had the camera here, I kind of tilted it more this way. So the focus is here. Not so much here, just the intersection between the seeds and the under control panels. And then I wanted to make a point of what's important to control panel, so I kind of marked them in dark green so that I would have a good sense of where they are. All right, so I feel at this point that I have a good grasp on where would have the different materials going. We have some would lie minutes here. We have a sense of texture, which I have added lightly on this on my seats regarding the steering wheel. I'd rather recuperate, recover some of the ideas here and bring them here. And this is how the interior was really figured out little by little. All right, promise me you will not do your good design from zero on the same page from 0 200 You have to work in stages. You saw me pulling papers under. All right, so this finishes this stage in the next stage will compile all these drawings into one final rendering.
Class Materials
Bonus Materials with Purchase
Ratings and Reviews
Mike
I thought this was a well rounded introduction to this subject. Really liked the teachers attitude as well - very inspiring!