Lesson Info
6. Best Angle for Perspective View
Lessons
Introduction
06:17 2Preliminary Sketches of Different Products
05:53 3Steps of Rendering Coffee Maker
06:02 4How to Create Quick Orthographic Views
20:35 5Description of Isometric, Oblique, 1-2-3 Point Perspective Views
11:03 6Best Angle for Perspective View
06:16 7Perspective View on Graphics 360 Paper using Different Materials
13:31 8Final Render of Coffee Maker
15:19Working with Preliminary Sketches of Street Cleaner
16:25 10Chrome and Reflective Materials
10:42 11Final Render of Exterior of Street Cleaner
06:41 12Sketches of Interior of Street Sweeper
09:18 13Design Concepts for the Interior
07:20 14Final Rendering of Interior and Exterior of Sweeper
17:47 15Defining Final Outlines and Contrast
08:04 16Creating Texture and Composition
04:31Lesson Info
Best Angle for Perspective View
all right in this next face, we're going to be covering the best angle for our perspective. You. Yet one more time. We have figured out already that we need to have the horizon line slightly higher for most products. Um, and then we need to figure out the right angle, the correct angle, so that we really represent the object correctly just to step back from what we have learned before. This is another example of this is safe table, and I did the same thing. This is something that we have to keep in mind. Sometimes there may be cases when the object, it's actually very hollow. You know the words. It's not like a tower or an object that is solid. You might just have three planes. Very simple design in this case, this table, right, we have a top. We have four legs that are actually constructed using two pieces of plywood that are intersecting very simple. In other words, we have a lot of negative space. Still, in this option, we want to start first by drawing the box in which this table w...
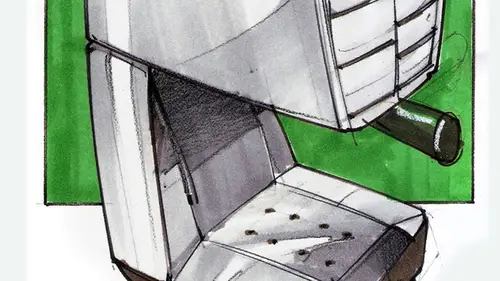
ould fit, almost as if we were going to put it inside a box and ship it to another part of the country. You would want to buy the box that would fit the most snag. You know the object inside, but stand in other words, you need to have how deep it is, how wide and how tall your three dimensions. All right and work From there, vertical lines remained vertical. Then we have the two vanishing points. Got it When we work. In this case, we have a different example. We have a little I came up with a different design all together. Now, this is a little speaker quarters speaker for a computer. All right, so now we're working on how to find the best angle for a product. All right, So we have over here is I already did some preliminary, um, non photo blue sketches just to find the right angle. Right. And then I worked with black lines to define the main shape, and I just had fun with it. Remember, we use one or two shades off marker. Very simple strokes without really reinventing the wheel. But you want to see if you guys remember? What did I say about being fast and what fast and furious. That's right. No fear. All right. You do your sketches, you worry about if your designs are good or not later, you just get it down If you mess up, this is one thing that you would never do. You never cross out your sketches. One that would look horrible today or that's might look better to you later. So take a break. If you think you're tired, go to the kitchen, get some water. Your favorite snack. Come back and then you would see your designs. Look, uh, I was actually too harsh on myself. They start actually better than I thought, or you would be the opposite. Like I don't know what I was thinking. Let's start all over again. But again, you would render them very quickly without really thinking of the consequences is like being a child all over again. You just play Children play because they don't think of the consequences, their Children. I'm asking you to be in that mood when you sketch your ideas. If they could talk, they will say thank you. Thank you for allowing me to be playful. You have to really have that mood. Will your sketch All right. So again, we have covered that before. Very simple, very simple outlines. Very simple grace. And just to find your shapes little by little fast and detail. Little by limits. The opposite. Very lose and playful. All right, Anything goes, we'll worry about things later. All right? So you get a bunch of sketches going on from different points of view. Once I covered that stage, I can really say, Okay, uh, I'm ready to go into the next face. I feel that I have explored enough sketches. This is when you would put instead of your crazy music that they're going down and then would make you just jump around. Or just be fun. Maybe you put some classical music's that you get in the zone, and then you really spend more time, and then you do a bunch of sketches Second face to those. Remember, if you like one sketch but use you feel that you can do more with it, you slide it under and then you retrace your shapes and you define you. Refine it away. This is how I did some of this. Then once I get, I got this three going. I'm like, uh, I really feel I need to be even more playful. So I ended up doing two more. That word completely unrelated to the 1st 3 Still a speaker. I don't know what I was thinking about here. I'll worry about that later. Maybe some small handle that I would carry with just one finger. This is my speaker that I would just carry and place it. I don't know. I worry about my concept later, but this is just, you know, the preliminary sketching. So I did a bunch of these. You see how much I exaggerated my my texture? I really wanted to do that to really show that this is a foamy type of material. So can you tell me where the sound would come off based on my sketch? Here. We're here. Yes, you got it. So that's the idea, right? So you get the idea that this is more if they follow me, you know, material, right? I don't know yet what type of material, but it would allow the sound to travel through. All right, so that's what I mean about being playful. Don't worry about if the dots are too big. Just get the main concept down. The main idea of the material
Class Materials
Bonus Materials with Purchase
Ratings and Reviews
Mike
I thought this was a well rounded introduction to this subject. Really liked the teachers attitude as well - very inspiring!