Outdoor Lighting Examples
Lesson 9 from: Editorial Portrait Photography for High School SeniorsDan Brouillette
Outdoor Lighting Examples
Lesson 9 from: Editorial Portrait Photography for High School SeniorsDan Brouillette
Lessons
Class Introduction
15:18 2How to Make Senior Photos Stand Out
05:48 3What is Lighting in Layers?
16:49 4Build a Lighting Foundation
18:28 5Layer One: Main Light
06:17 6Layer Two: Fill Light
08:29 7Layer Three: Accent Light
04:29 8Layer Four: Additional Light
11:46Outdoor Lighting Examples
15:56 10Outdoor Lighting Equipment
03:34 11Outdoor Lighting Camera Settings
09:31 12Outdoor Camera Settings Examples
14:32 13Outdoor Lighting Q&A
12:44 14Live Shoot: In-Studio Lighting
20:52 15Live Shoot: Metering
04:17 16Live Shoot: Large Soft Light Setups
12:13 17Live Shoot: On Camera Flash
14:07 18Live Shoot: 2 Light Set-up
16:29 19Live Shoot: Accent Light
05:06 20Live Shoot: Hard Light
11:30 21Live Shoot: Create White Backdrop
08:32 22Introduction to Direction
28:42 23Live Shoot: Photo Booth Direction
11:13 24Live Shoot: Basics of Direction
19:34 25Live Shoot: Beauty Dish Close Up
08:22 26Live Shoot: Subtle Cues through Direction
19:33 27Location Shoot: Senior Introduction to Shoot
11:33 28Location Shoot: Use Location to Your Advantage
29:43 29Location Shoot: Create Scenarios
19:50 30Location Shoot: The Walk Plus Variations
10:50 31Location Shoot: Outdoor Lighting
15:18 32Pre-Session Consultation
12:35 33Prep Clients for Purchase
06:47 34Get to Know the Client before Session
08:04 35Decide Clothing Options Prior to Session
13:14 36Client Interaction
09:14 37Pre Session Consult Q&A
12:35 38Image Workflow Overview
15:41 39RAW Editing Workflow
27:29 40Basic Photoshop Editing
13:58 41AlienSkin Exposure Color Toning
26:27 42Marketing to Seniors Overview
05:18 43Marketing to Seniors
16:24 44Alternative Income in Any Market
03:57 45High School Posters as Marketing
10:38 46Seeing Moments Differently
17:27Lesson Info
Outdoor Lighting Examples
Bringing your studio strobes outdoors, and like I said earlier, one of the things when I first got into lighting, was the images that really drew me in were images that kind of tricked my mind a little bit. It didn't look natural, but there was something about it that I wanted to know more, and those all had to do with outdoor images that were lit with studio strobes, where people basically manipulated the ambient light to a way that it almost had a surreal effect. So whether it was because the sky was extra blue and you could see the definition of the clouds that you normally couldn't see in a photo taken with natural light, or you know, just a look where the light was coming from multiple sources, and it was almost you know, it just had that surreal quality where I couldn't exactly pinpoint it, but I really wanted to learn how to do it, because to me, that was not something I'd seen in senior portraits before. And the other thing about it is at the time, I was actually working for th...
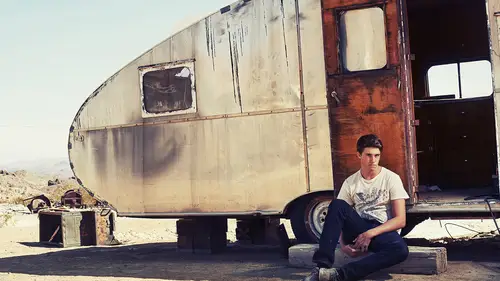
e school newspaper at Iowa State, the Iowa State Daily. So as a school newspaper, there wasn't a whole lot of creativity going on, unfortunately. You know, from a journalistic standpoint you're not allowed to do any of the Photoshop, moving pixels or any of that sort of stuff. But you still can manipulate light on the front end to make things look how you want in camera. And nobody was doing that, but at the time when I was intrigued by this outdoor lighting, that was, other than the seniors in the summer, I was still in college, so during the school year I worked for the Iowa State Daily. We got a nice fee of $10 per photo that ran in the paper, and if they didn't run the story, you didn't get any money. So yay, not so awesome. But luckily for me, having this background and real want to do portraits, the editor, I was pretty good friends with the photo editor for the newspaper, and he knew that my goal was portraits and lighting and all that, so he gave me a lot of the athlete portraits. So you know, let's say on Saturday, a football player scored a couple touchdowns and the next week they were doing a story, rather than just pull only game action shots, which they usually did on the weekend edition, they would do a story about that player and then they would send me out to create a portrait. And that was where I really got to try using the lighting, and in a setting that wasn't too high pressure because again, there wasn't, you know, the high standard for the school paper wasn't that of we need this lit portrait. It was more like I would get the safe shot that was expected and then I got to play, and they told the athlete ahead of time through the athletic department, you know, we need 30 minutes with this guy. So I would spend five minutes getting the safe, natural light shot, and then the next 25 minutes doing stuff for me that I could either use to build a portfolio or experiment and I had access to arenas, locations and things like that I wouldn't normally get as just a normal college student. So one of the things that came up was all these different portraits and I got to shoot and test whether it was outside on location, on a football field, or in a basketball arena. So either way, they're not all outdoor locations but they are dealing with multiple light sources, not just your controlled studio light. And that's what I mean by outdoor lighting isn't necessarily just a portrait of a guy outside in the sun. It can also be in a basketball arena, in an office. It's where you're combining these multiple light sources and other lights are affecting your shot, whether it be the sun, you know, fluorescent lights, anything like that. So what I want to talk about is all the different ways that you can light outside, the equipment I use, the mindset behind it, the techniques to get different looks that you want to achieve from things that look more surreal to the more natural looks, and the kinda the three basic styles I use when lighting outside. I do want to tell a little more stories now that we kinda have started building this foundation of lighting knowledge, so that way the terms I'm going to use now you should be familiar with. So this was a shot taken outside of Las Vegas. It was at a senior, like a workshop type of thing. We had actual seniors as models, and we got to know them. And his name's also Dan, so we kinda hit it off with the whole name deal. And once I hung out with him for a little bit, we had a two hour shoot together, at this location. He was real big into comedy, so he really liked goofing around and all that stuff. So we did a whole series of him capturing his personality with natural light. And then once we got into the stuff I wanted to do, which was more of this type of thing, we found these locations and for me, seeing something like this, there's all the-- As you guys looking at this for the first time, or second time, or whatever, there's a breakdown that I go through, even with my own work looking back on it. So what I saw here when I got to the location was we have this old trailer which is creating nice texture. It's also a spot of open shade. This shot was not at the ideal time of day. This was probably two in the afternoon in the desert, so we're talking about really harsh lighting. He was sitting in open shade, so if I didn't have any lights here, what would happen is I would take a photo of him for his face to be properly exposed. Everything else would be blown out, right? Because he's sitting in the shade. So to combat that, the first thing I think of when making a photo is-- Well, not necessarily the first thing, because I'm not even referring to the lighting yet. The composition, how do I want this frame to set up? So for me, I'm always big on not only rule of thirds, but even more exaggerated than that, was I wanted to sweep the left edge of the frame with the curve of this trailer. So I had that almost go out to the edge. I wanted to have him in the bottom right third just to kinda compliment it with that juxtaposition. And then I really wanted to frame him up, not in front of any of the silver, but frame him up perfectly in front of the back side of that wood door, so we had this nice texture where he's framed in. And then what that does is two things. It adds a good point for your eye to go to, but it also means that since his face, I always want people's face to be a real center of interest within a photo, so even though there's all this bright stuff going on, your eye still goes back to him because he's framed up in this dark area of the photo. So once I had the framing down, that's kinda the first thing I do. We're not even speaking at this point, me and the subject. I get all the technical stuff out of my head before we really start the shoot, because like I said earlier, I do want that interaction with them where I can get personality, where they can feel like the attention's on them. Because I don't know if you've ever had a photo taken or been in a situation where you're taking a photo of someone and something with your lights is wrong, or your camera settings, and in your mind you think you're being present with that subject or if you're on the other side of the camera, you can tell when the photographer is distracted, so I don't want that to happen to my subject. I don't want that awkwardness of like, oh, is something wrong? Especially with a senior, you know? Think about a 17 year old senior girl, if I'm doing that photo shoot and something is distracting me as a photographer, she's probably thinking, "Oh, is something messed up with my face? Is my hair okay?" I don't ever want that to come in, because I want their confidence to show through and I want to have all that technical stuff that could distract me out of the way before we start that connection. So even with him, I wanted to get that composition. That was the image I saw in my head, was that composition. Then I had him sit and he-- One of the things I like to do, and we'll talk about this more with direction, is I like to let people kind of lead the way with what they naturally do. So a lot of times we want to overpose and overdirect. He sat there and he was doing this while I'm fiddling with the lights. And I thought, you know, what are you gonna pose him? Something like where he's leaning forward like the classic senior picture? No, he got into this position and he was messing with his fingers and you know, just kind of throwing-- He was messing with the sand and all that, and he had this look and I thought it looks pretty serious, but there's a hint of a grin in there too, and knowing him and that he had this comedy background, it was kinda like what are you doing with this trailer? Is there some sort of mystery here? But at the same time, I just kinda let him be, and he sat into a position that I liked. So it's like all right, just hang out right there. When it gets into the technical standpoint of exposure, I was thinking all right, I don't want anything that blown out, but I also don't want to bring in the sky too much. So you can see there is a gradient of a real pale gray-blue in the sky in the top left corner. I wanted that to stay there so the first thing I do, and we'll get into this, is I make a photo of the space without anybody in it, with outdoor photos. So basically I took the photo and I thought, all right, I want the sky and those mountains to look that way. My light, which is gonna be over here, isn't gonna have any effect on that, so I'm gonna set my camera up as if I'm just taking a photo of this trailer with all that stuff, and then you leave it. Then my other thought was back to lighting. Do I want hard or soft light? We are in the desert. He's in front of this gritty old camper. The natural light is really harsh. Nothing about it to me said I need a giant softbox that's nice, pretty, soft light. It kinda said let's use hard light and just almost amplify the current situation. So what I did is I used that Magnum reflector I talked about earlier. I put a grid on it so I could control some of the light spill because I didn't want to light up all this shadow. I wanted that to still remain. And I put that light right here and I aimed it right at his head, because the other thing you can think about with outdoor lighting is light placement. If you look at where your shadows are naturally falling, you'll see the shadow of that cooler or whatever it is off to the left is falling off that way, the shadow of this camper's falling off that way, so I try and mimic the same angle of the sun on him so it looks like it's all coming from the same spot. And I don't always do that. That's just what I did for this shot. So I put my hard Magnum reflector up here, and I had already set my camera settings for that whole background. So now I just needed to make sure that the power of the light matched the aperture on my camera and that's where you use your meter. And we'll get into that more here in a little bit too, and there you go. So that's kinda the story behind the image of how it all came together, and that's how a lot of the stuff goes with any of my shots, not necessarily outdoors or with a senior, but anything in general. I have this mindset of let me frame it out in my head first, because then that tells me this is the lens I want to use. This is the height. Rarely do I stand. I'm 5'10, rarely am I standing taking photos at 5'10. I'm sitting on apple boxes all the time. I'm standing on apple boxes. I have a little stepladder I'll stand on because I like to create some sort of illusion that it's not just the way I see things every day when I'm walking around, but it's a different perspective. And sometimes it's really exaggerated. You'll see, even from the pre-shoot, I'm laying down on the ground a decent amount, and I know from other shoots I've done, sometimes it's like hey, is there any way I can get up there because I love converging lines and dealing with composition. So it's whatever I can do to create interesting framing. So that's kinda how that all came together, and you'll see some more shots of him later where we really caught his personality with natural light, and it's just a totally different look, but we'll talk through those as well. This was another one where there isn't the whole factor of the sky in the shot, and that's something you need to take-- This could have been in a studio, you know? If you looked at this it looks like, oh it's a studio shot with the blue background. No, this was outside on a patio, and that was a blue stucco-type wall that just had, I thought the texture and the paint color were cool. She had crazy blue eyes that just looked awesome. She had a dress that was this cream color with hints of pale yellow and blue, so to me that all, it just needed to be photographed right there. However, the natural light, this was on the side of a building outside that was in open shade. While it was a pretty photo in itself, and I'm sure I took that one, I wanted it to have a little more pop. So similar to the photo I showed you in the previous segment, of the girl against the white wall, this is basically the same thing. You can see the hard edge of that shadow, which tells me the shadow's going off to the right. The light must be just off to the left. Same with her nose shadow. So this was just one light off to the left, and me placing her slightly off-center in that lower right third, and letting all of that negative space kind of bring you into her. So again, just another thing when you're shooting outdoors, you can almost treat it as if it's a studio. And we'll talk about your question earlier about using fill with outdoor lighting. This is a good sample of that, so we'll probably come back to it. But I want to explain the basics here first. So that was just one light. Again, it's a pretty hard light, as you can tell by the shadow, outside, and a lot of times you can treat the outside just like it's the studio. Next up, this was another senior. I love putting seniors in different scenarios, and we'll talk about that more when we get into direction. But this was in a parking garage. There was a guy who was-- There was a car in the garage that was like a late '80s Mercedes. So just a car that, you know, she kinda had this like retro vibe to her based on styling, her look, hair, everything about it, and there was this car that's like 30 years old. And it was just parked there and for some reason, I don't remember, the guy was walking by and I don't know if he joked or if someone knew him, but basically he was like, "Oh, you want to use that?" And I said, "Yep." So he let us use it, and this was a combination of using-- This was in a parking garage and off to the left was like those little, tiny openings for light in a parking garage, where the light comes into the concrete cave you're in. So coming from our left is a little bit of natural light. The other thing is parking garages have that really nasty orange light, most of them do. There was one of those overhead, so you can see a little bit of that tint on her hair and everything, but through Photoshop I kinda toned it more green. So my light here isn't necessarily making it look surreal. It's just simply massaging the ambient light that was already happening to make it so her face was in flattering light. 'Cause otherwise she had that overhead orange light, and it was not good. So this was a combination of using ambient light that's coming in from the left side, accenting that with strobe, but not overpowering it to make it look surreal. A lot of times, this shot just looks like it was lit naturally, but it definitely wasn't because there was not good light at that part of the garage. And then again, this is also, as I said before, when we're talking about direction, putting someone into a scenario, so she was in a different mindset. All right, and this is moving back outside into that midday sun. This was obviously shot in New York City. This was again, you can see the Empire State Building in the background. Before he ever got to this frame, I knew I wanted the Empire State Building to be in that left upper third. I wanted all these leading lines of the concrete wall and the fence to kinda converge on the subject, and I wanted the light to come the same angle as the sun. So as you can see by looking at the Empire State Building, the left side of it's in sun, the shadow's on the right. You can see by his shadows, they're all coming from the same angle, and that concrete wall is in full sun. So this, I just used a beauty dish with no grid, no nothing, just bare bulb, beauty dish, just outside of the frame on the left to kinda fill in and overpower the sun. Because otherwise, this was midday. He had such dark circles on his eyes you couldn't see him at all, so I wanted just a little touch of fill. So this is kind of a better example of using the sun as your main light, and using your strobe as a little bit of a fill to just kinda make the light a little more polished than it looks naturally.
Class Materials
Bonus Materials
Bonus Materials with Purchase
Ratings and Reviews
pete hopkins
awesome teacher and awesome technique. after soooo many webinars, it's really great to see someone break it down to the bare bones of lighting with exceptional quality results. i can listen to Dan all day. no pretense, no over the top emotional pleas, no drama! did i say awesome!!!! Plus, I'm a huge fan of the B! and B2 systems. Freedom is key. Now I can shoot anywhere, anytime. Thanks Dan.
user-2f7caa
This is by far the best class on senior photography I have found on creativelive. Dan explains the technical aspects in an easy to understand format. He does a great job going through studio shots, outdoor shots, editing and marketing. He's given me some great ideas and inspired me to be more creative. I am going to rewatch the lighting set up for the "hero shot". It's super cool!
Tristanne Endrina
Dan was great. His class was very comprehensive but easy to follow. The slides he used weren't flashy. Instead, they were simple and he went at a good pace. I left feeling like I could really pull off the lighting techniques he taught. I'm excited to put what I learned into my photography. :) Thanks, Dan.
Student Work
Related Classes
Portrait Photography