Adding Stamps & Coloring
Lesson 7 from: Photo Transfers for Mixed Media Collage WorkStephenie Hamen
Adding Stamps & Coloring
Lesson 7 from: Photo Transfers for Mixed Media Collage WorkStephenie Hamen
Lessons
Lesson Info
Adding Stamps & Coloring
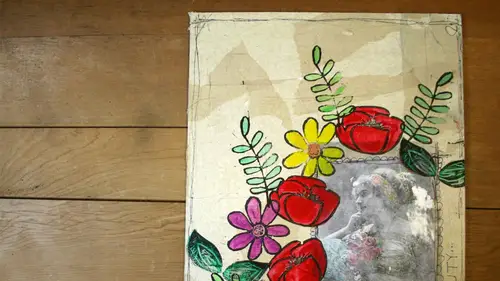
All right, so this is now dry, and I'm going to put all this over here, I'm gonna grab my stamps, and now it becomes about adding color and really finalizing our peace. So I want to add a few flowers around here, and then what I'm gonna do is use the gel otto's to add color into the flowers. But then also, I'm going to attend some parts of the black and white photo so you can take george a lot of ways to do that. If you're a home and you don't have the jola does I've also I'm going to show you I can find it, put it down here, I think some examples of using other things to do the coloring of the stamps and stuff so you can use water color. I went ahead and put the, um the clear just so down to get some grip, but there was still a little bit of pooling and here just because of the bumps within that, but you can definitely use water color or you could even use, like the stress markers or other art markers to do this. Um and you still you get different looks, it kind of provides a differen...
t perspective and a different look to it there's lots of different ways you can add color. Um to these and you could do the same thing with your image as well. When you go to change your image, you can use marker but just know that you're going to get different results in their different depths of color and brightness and things like that. So there are other options for doing that, but we're gonna roll with the jill otto's here, so I've got my own leaf stamp that I carved and I'm just going to take that up, and I'm just gonna put it in a few spots around on my piece, I just want to make sure that I really think it every time to get a nice crisp results here, maybe I'll put one yeah, about that nifty tool you got there, this this is a missile stand press and you can buyem in stamp departments in different stores. It's really cool because it's got the little phone feet on it and I'm I'm fine with the stand black most of the time, but sometimes I still get a little nervous about it, so I'll use this a lot when it that way I can see where it's going to go over the spot before I push it down. You've got that gap in between of, like, who do I want it like this? So I want like that without having ink on it and your stand block is now left you a little present that you didn't want necessarily on your on your piece but it works really well it's probably one of those things that I use the most when I'm stamping so it's just a fun little it's one of those gidget gadget things that you don't have to have it when you stamp at all but if you it's like ferris bueller if you have the means I highly recommend picking one up so um I think they're like fifteen twelve fifteen dollars or something like that but if you do a lot of stamping or if you want to do more stamping and you're not comfortable with the block it's a great way to help you get started on that ad in just a couple more little flowers here and there and then I'm gonna share out there with girls in case they didn't get done with their carving and then I've got adhesive to if you guys want china just a little bit on your blacks to get them to stay the other thing you can do is like with this leaf pattern if I just want a few leaves and I don't want the stem I can just get a little bit of it and press it down you don't have to thank the entire the entire piece and then it almost kind of fades off into the background I was just kind of a nice results and I'm just using a black archival anc but there's lots of banks out there that you can use I just like using an archival inc when I'm doing this because when we go to paint over it, then it's not going tio mover smear when we d'oh one more relief and then I'll be good and some people online are wondering how you would hear the stamps to the block is that tape that just ok? I just use tape runner um to get it to say because these don't when you buy like the the pre done stamps, they cling right to it but this material won't so I just run a stamp or tape runner on there to put the stamp on it just make sure that if you do that whatever you're using is kind of like a dedicated thing because it's going toe day like that so if you've got a really nice block that you don't want to do that too, I would totally understand that, so all right I'm gonna call this good for our purposes I'm gonna go share this stuff out there. The other thing I did I mentioned it earlier is but I ran these tio went through like a sticker maker, which is another adhesive product out there and now the whole thing's got adhesive on the back of it so I can put it on and take it off um as I want so all right wanted carry these out here so here's you guys to try the press if you want some extra stamps and some pieces for you guys okay so now I'm actually going to be really annoying and heat the anc even though it's probably completely dry already but before I start painting over it I just want to make sure it's totally dry especially in the spots where it's like a big chunk of bank okay so what I've done is I've just taken some of my jola does and I just put the colors down into my palate and I'm gonna grab my water pen which I know was hiding under here and I'm just going to start painting this the same way that I would anything else I might pick up my color of my gelato and just go in and add that color to the piece what I like is just how bright it is compared to the rest of it the flowers when you use this just are so bright but they just jump right off the piece but if you want them to be more of a watercolor effect you khun just water that down a lot and go for a much lighter effect like that you can go really dark if you want or you can just start to water them down and get a much subtler results and again because we're using the gel otto's if you're not happy with it you can take a baby wipe and uh I don't need to follow by the same one um take your baby wipe and just kind of dab and pull up that color too so if you're not happy with it you can erase it for now and it'll be ok to start over so actually I put some more reading another ones that it's not completely watered down keep working on this was gonna add my color and and this just is that fun part of coloring and painting and putting your own stamp and said it again and I don't mean it as pun putting your own signature look teo the peace and this is why when you get to the point where you're carving your own stamps it really does add another personal touch to it whether it is your own fight that you've done with your own handwriting or your own doodles and your own drawings that just adds another layer of personal and put into your piece just keep painting these and I just for this when I really liked going dark and vibrant and just have a lot of that color saturation so that you just get a ton of it against the off white background in the black and white photo is just in really nice bit of interests that you get with the piece hello here my yellow how are you guys feeling over there have you started stamping your stamps? I almost can't wait to see how they all turn out once you start stamping them have a question coming in from online do you clean the stamp you made like you airplane manufacturers stamps? Is that something that you d'oh that would require me to clean manufacturing and I typically I'm really bad I because I use a lot of permanent thank so by the time they're done it's black anc stuck on there anyway so I typically just leave them um yes if you like to clean your stamps just a regular stamp cleaner or um you can use things like wipes to do it. The only thing with that is you have to be careful of the chemical compounds and there don't affect the rubber or the media that you're using the stamp sometimes that over time will break down if you really scrub it and scrub it and scrub it you may see some breakdown in the stamp itself um, which is the rationality I used for never cleaning mine but um you can you can do that. I just tend to leave mine can go steal water like quick from you guys and peek at what you're doing while I do it sneak a peek I think it's okay, because it's dark enough you're good, ok, you're more than good with that see everybody's like I'm thinking about it I'm trying to figure out what I want to dio oh, I like the iv use the one that has the colors to it that's really cool see, it all starts a different major all that's really cute who okay, they did a good job on their stamp carving we're excited because they're really cool I love it so now it's just about adding the pretty to her piece get in here and just let my color and some of them I've done some hombre effects were like the colors kind of either light in their change but really khun dio but everyone I just like playing around with color and mixing in shading it's mine it's crafting it's going to be amassing it's totally okay this is the neatest workspace I've used in years let me be riel because it comes down to the more space you have, the more stuff you have which no matter how big your table is, it comes down to that eighteen by twelve space in the center that you work on and you can have a huge table or a tiny table and no matter what there's stuff all over it except for that one little space in the middle that you saved to work unless you're super clean but I am I am not what I create I wish I wass but I am getting better about cleaning up as I go, but I'm notorious for doing ten fifteen projects and then looking around and realizing I can't even walk out of the room because their stuff all over the floor so I've had to get better about that plus we got a new puppy who's decided that he really likes things like phone brushes to chew on he doesn't swallow it but I will say this if peter is watching he doesn't swallow anything he has it hasn't eaten anything he had just it's like his way of like you're not playing with me right now so this I know belongs to you so I'm gonna take it and that we hope that when you find it you will play with me and I had all of these canvas banners that I was using to make this big banner piece and a couple of um or on the floor and I go upstairs and he hides things underneath our end table and up there was a canvas banner that he'd grabbed a phone brush half of a cran and I'm like he's either collecting things to make an art project or he's saying you need to play with me during the day a little bit more and that's when I went I've got to get stuff off my floor because we do a better job of keeping it meet because he's going to steal everything if I don't after I add all this color on I'm gonna show you guys how I tent the the photos big lobster guys don't okay over there giggles either minutes it's going really well or something's just comical e don't know why she would warning about stealing stuff okay one flower left I'm here and I guess I should say teo if you hadn't I watched them the other segments this is a really great tool it's from ranger who's one of our sponsors but it's meant for their alcohol inks and I love this with the jill otto's because it helps me take the mine the ghost if I don't want to take all these individual little tubes I can just color them in here and take this little palate with me and I'm all set the other nice thing is you can also use this to mix so if you wanted to take a couple of colors to create a custom color you can do that in there and then that color saved within that little space so just makes a little bit more portable and a little bit more on the go if you do that alive and I just really I really love doing that so for me that's kind of a fun thing I'm just going to finish this one when I tempt the photo I'm definitely watering these down because I don't want it to be as in your face bold as the flowers are. I wanted to be very subtle. And, um, stick with that with the photo look. But I also think it's kind of fun, to just add a little bit of vibrancy to those to the old photos.
Class Materials
Bonus Materials With Purchase
Bonus Materials with RSVP
Ratings and Reviews
user-156703
I like the class overall and it was nice to see a process with easy to find materials. It would be very useful for the students taking the class to have a list of materials needed. Clear Gesso, Decoupage and matte medium were mentioned... but which ones specifically and what brands? Also, I didn't see the use of watercolors (only gelatos). I wanted to see watercolors being used as mentioned in the class info.
Becky Holaway
I've taken both of Stephenie Hamen's classes on Creative Live. She's a great teacher, and I thoroughly enjoyed the class.
Rachel Franklin
All new crafting for me. Loved it. Great tips and advice!