Lesson Info
12. Colorizing Your Black & White Images
Lessons
Introduction to Class
02:44 2Simple Color Restoration
02:29 3Getting Rid of Spots in Old Photos
06:46 4Removing Stains From Photos
02:55 5Adding Contrast to Your Black & White Images
05:24 6Using the Dodge & Burn Tool
01:35 7Techniques to Cleanup Image Backgrounds
13:01 8Fixing a Torn Image
03:08Lesson Info
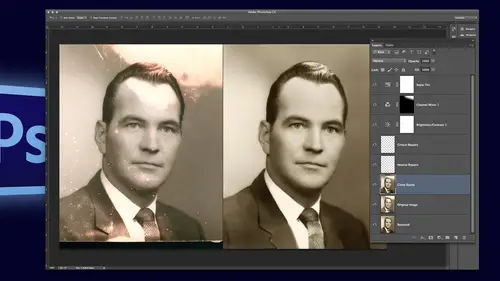
Colorizing Your Black & White Images
Colorizing iss really helpful as well there's a lot to images that just come alive when you color and this is my mom she's so cute and I actually had the a frame to sixteen by twenty of this in really good condition and it was actually hand tinted these colors but it belonged to my aunt and she was not parting with it, so I photographed it and so I had the black and white and I actually tented it actually years ago I tinted it by hand with photo oils on fiber paper I loved it, but since then I've done it digitally. I have a question I can see it brewing right over here. Copyrights are you concerned about if it's within twenty years you doing things copyrights are beyond twenty years? Um if there is any way to find the maker it's on the back of the picture, whatever, I will try to find them if at all possible because I want my copyrights respected. So therefore I would do that for the photographers, but most of them are from long past in aa lot of them don't have any information on who ...
the original photographer wass, but yeah, I would research that if at all possible yeah, so let's, take this one and color eyes it um tenting is really fun, okay, so I used to do this a long time ago, I would make a blank layer, and I would put the color on it and painstakingly shape it, and I have come to believe in a different way and that's using adjustment layers, and you could see all the adjustment layers that I've used on this and how it works it's so much easier to use adjustment layers, and then when it comes to making the shapes of each area that you're painting, you're just cleaning up the mask. You're literally working on a mask groups so everything that you do is on a mask and it's, very easy to control the edges of the mask and it's very forgiving with selections. You could just make a sloppy selection, whatever the tool gives you, and then you can clean it up later with masking. You have ultimate control over every little part of it, and then you can change the color anytime you want to suit your client. So this is definitely the most flexible way to go. Now I have I made a little color palette, which which helps to do this quickly for you because you can agonize over the color and try a million different shades until you get just the right one, but these are the colors that I used, so let me turn these off, um, initially the image doesn't really need a whole lot of retouching it's in pretty good shape there's a couple little dots on it and I always start off with the skin usually and their skin I've actually sometimes you really agonized over the skin color but what I have is a an image it's a colored guide for faces and I have been using this for years this is actually free download if anybody wants to download this one eight by ten and well it's a digital file made to be an eight by ten and it's for a free download if you go to shops do that dot com so you can download this file color guard color guide of faces and it's all different ethnicities and yes I have a model release on all these people and it's a great way to establish what is good color on people because you know you got think people you got warm people and you got light and dark and there's a lot of different acceptable colors how do you know so I use this a lot but what I did here is I averaged all the faces I made a selection of the faces and average those colors and those are some of the colors that I use in my tenting to find out what what color is skin anyway we're just poking around the dark guessing sometimes so typically I'll end up using the lighter ones a lot because the darker ones it seems like they're muddy when you put it on gray in a black and white so I like the lighter ones but anyway so I will start off with making the selection of the skin so the easiest way to do this typically is w which is the wand quick selection tool and I basically dragged through the face now why is it not selecting the face look what layer I'm on I'm on a layer that's not even showing but you need to be on the image layer to make a good selection so I'm just going to drag through her face and I'm not concerned with making it let super perfect and dragged through her arms which is a little trickier control z in fact I remember last time I did this I couldn't get it tio select right so I'm just going to do the face for now I can have the armed player just make a selection at an adjustment layer the top one called solid color and oh I forgot to leave my little palate here so um let's pick a color wow is that a bad choice so I'm just going to go open up well there's open up this and we'll um eye for eye dropper click color we'll try that so I could go here and I can change it to that color and say ok and it's so easy to change it on the fly and if I just put it in soft light for the skin is soft light yes, it softly and you know what? I use a darker color for skin on this particular one I used that color it's not a whole lot. No, there it is soft light for skin I guess I'm just so used to seeing a colored I'm like that's not dark enough so then I'm going to go want again? Oh, and remember to get back on the retouch layer and select the arms and all to drag to the areas that you don't want and then on that mask I'm going to fill it with white now white is my background color. The shortcut is control back space or command early on a mac so filled with background colors, usually to corner keys and that is a really fast way to go. So then when it comes to doing the chief's way want the cheeks to be pinker and it's still similar to skin color, but they're in a different mode typically. So how do I get that nice soft cheek color? Oh, by the way, I do usually on the face erase away the eyes so I will go uh be well it's already on black hundred percent small brush and o b for brush percent there you go so raise it off the eyes and you see, I missed the year so I could just paint with white and add in the year ad in little pieces here that's why I'm not too concerned about making it perfect right now I can refine it later so for the lips, what I'm gonna do is I'm gonna choose the color for the lips I mean, I I've got it right here and I'm going to make oh takes first that's right? I'm sorry, thank you so I want to teach to be very soft and I wanted to be that soft pink and what I usually do is I go to my quick mass and I will use my brush a soft soft edge brush and in quick mask I can paint on my cheeks and I go out a quick mask and those are my selections it's soft feathered because it's a little bit easier when you're making adjustment layers to make the adjustment first and make a selection first and then go teo adjustment pick the one you want I forgot to inverse you can always invert your mask if you do it backwards don't don't panic just say ok, go to your mask and do command control I to invert so that doesn't look right right so all you need to do is put it in color mode, which is a little bit intense so I usually turned down the opacity now if you put it in soft light it's lighter than medium tone or dark oven medium tone it shifts the exposure to so I usually use color so that just gives it that pinker look but it doesn't shift the exposure and it just seems to work better then you can go of course, to be for brush and black and to erase it off the ear or any place that's just a little bit too much so the lips air similar in fact, a lot of times I'll just could do control j to duplicate that one and I made make the lips there's a little bit darker and instead of the red cheeks I just take away the black I mean I take black on the mask and I paint it off and go white and put it on the lips there you go and it's already pretty close it's already a thirty two percent like the cheeks are so it's a time saving thing to duplicate that make it a little darker wash away the black paint on the way now for eyes it doesn't seem worth it to me to add a whole layer of blue just for eyes so what I usually d'oh so I just make a blank layer and I go pick blue and small brush and a little bit of blue and put it in soft light there you go. Now, if it's too bright or whatever control you allows me to change the color if I want and change the saturation or the lightness or darkness, I could just modify it to get exactly the look and the shade and everything I want instantly. So that's kind of the easier way for me. Just with ice, I do that in color images to I want to intensify the colors of the eyes. I do that. Okay, let me show you the hair. That hair is a little bit tricky because of all the little wispy things. We're going to select her hair. And I know this is going to be really rough it's going to make it worse before I make it better and we're going to do solid color and we're going to choose that brown and one hundred percent black. Get rid of this. Okay? So I'm going to put this in the blend mode of multiply and I know that's really black and ugly. But I want this to all be on let's. See white. I want this, teo. All be in all these curls so I will usually make it just a little bit more. But I wanted to just apply to the curls so here's a little magic trick. You're going to totally love this. Let me take a little bit of a detour first so I can show you on a different image will make more sense to understand how it works. Let me just open up another image you got to see. This is local. Okay, so this is the logo for my lab. A photo and you're wondering why is she using that? Well, I want to show you this cool thing called blend. If so, a lot of times you might use a logo where you need to drop out the white, you drag it on you like felt it looks great except for the white around it. Right? Okay, so this is a super speedy way to blend away an image based on its content or the content below. So check this out. This layer the logo if I double click on it and I go to where I would like at a bevel or drop shadow or something right here where it says layer style, where we just gloss over this window all the time, right? Right here where it says, blend if if I take this white slider poof, all my white just blended away so that easy if I keep going it takes care of the colors the grey then the white now if I want to get rid of the black eye do the black end got rid of the bay in the photo so that right there will allow me tio blend away part of my image or what's below it what if I say if the underlying layer is dark look at that see how the boat just split through there okay, so now you kind of have the idea right? So I just did this blob of hair color and I'm not going to do all that little painstaking little stuff on the curls, right? Yeah, I'm smarter than that so I'm gonna take this and while I haven't and multiply where you really see what's going on I'm going to say when this layer well I can't do this layer it's all brown there's no black and white I have to do when the underlying layer is dark or light which would be light blended away look at that that's a smart way to go so I can blend away all of the white so it only applies where there's dark hair now it's kind of dogg right you can see it's kind of jaggi so here's the savior thing right here there's a split so you hold all too and you say split that in its feathers who? Yeah, that's also. Okay, so, yeah, it still looks fake because I did it in multiplies so you can see what's going on then when I'm done, I will change it. Teo, I think it's overlay I don't know. I agonize over what color to do the hair and it probably depends on the hair vivid lights too much. Which one is it? Let's go with overlay anyway. So that is a huge timesaving tip for color rising an area where you can just do use photo shop to do the blending. I'm not going address how to do the dress it's the same thing selecting with the wand adding adjustment layer let me go back to this original image. This right here is why I do an adjustment layer for all the colors because when you're done and you take this to your client and they're like, oh, that wasn't the color of blue it was like a navy blue are an aqua blue or no, I was purple now wasn't it green and helen wasn't it green? Yeah, right so seriously, you can change it to any shade you want on the fly afterwards and it's instantly you get to see exactly what it looks like so I can modify it to make it lighter, darker, whatever sometimes you need to change the mode. Soft light doesn't work for everything, or, in this case, overlay color is way too radical, and you have to change the capacity a lot of times with that. But the cheeks, the skin, the chair, changing the chair color makes a huge difference as well. Wow, that was the wrong answer. So all of these things could be changed instantly with the adjustment layers.
Class Materials
bonus material with purchase
Ratings and Reviews
Audrey Agin
I have really learned a lot from Suzette’s instruction. Photo restoration requires a lot of skill sets in Photoshop. This class is not for a beginner- the title says "Advanced." Watch Ben Willmore courses first, when you understand his retouching, then watch Suzette's course. Most videos of YouTube, teaches the same basics, over and over again. It is hard to find advanced photo retouching classes that are spot on. Suzette gave instruction on how to fix things that I have come across in my family photos and business. True she did not work a complete photo, but she showed how to fix hard or unique problems in photo restoration. I loved the Dust and scratches fix on Grandmother-WOW!. This can be used on most old photos. Yes, I had to do some more research to get the hang of it, but now I have made my own action for it. Wish I had known about this years ago. Plus she showed how to fix other problems in the Grandmother photo. I watched the Action classes of Ben Willmore and Dave Cross. There are Actions in the classes of Blake and Kristna, I recommend Actions for everyone. Actions are easier to learn than some other things in PS, Just need to watch a course on it. Each instructor teaches different Actions, so you should find something that will help you. – Now back to Suzette. If Suzette had fixed a complete picture, I would not have learned as much. I was needing everything she taught & better techniques. I hope CreativeLive has her do another advanced photo restoration class of things that were not covered in this class. Her skills in Photoshop & restoration, should motivate people to learn more about Photoshop through other classes here at CreativeLive. Then come back and watch her class again. If you do not understand the technique she is demonstrating, you need more foundation work in that area. …Example- her demonstrating “Dust and Scratches removal” motivated me to learning Actions- now I am using some type of Action in most photos I work on. Thank you. Thank you.
Doug Currie
This is a great course for someone interested in offering a photo restoration service, perhaps as a business opportunity. However, it does require an above average skill level in using Photoshop. I would strongly recommend Ben Willmore's course also offered here on CreativeLive first as a prerequisite before taking this course. Also, in the course, Suzette recommends a free color guide for faces, that can be obtained from her website, but I have tried and cannot find it at all. It would have been great if it was provided as course material for subscribers to this course! Anyone knowing where we can download the file she quotes: "ColorGuideFaces.jpg", please let us know.
Kristin K Hand
Amazing! Suzette shows you techniques that are SO much simpler than you have used in the past to remove spots, cracks, and tears. Faster, more effective, and BETTER end results! The technique to colorize an old B&W photo was fabulous! I used to do handpainting black & whites by hand. With the skills Suzette shows you, you can now do this beautifully and easily in Photoshop. She uses restoration examples in this class, but the skills could be used with any new photos, as well. Thank you, Suzette!