Lessons
Lesson Info
Basic Recording Setup
As you said, this is an intro to home recording class so thie idea is basically teo provide you guys the tools to be able to set up a session and record a song in your bedroom, which is a really cool concept when I first started getting into recording and just messing around in my parentsbasement ahs a teenager I was trying to capture the songs that I was writing and figuring out how I could layer different parts and it's amazing to me in the last ten years how many tools have come out to be able to enable people to make really high quality recordings just right in their basement used to be you had to book time in a big studio and know a bunch of musicians and save a bunch of money to be able to make a a successful sounding record and really in the last ten years tools have come out that have allowed people to make professional sounding records in their home in their basement. So the goal today is basically to give you sort of an overview of the whole process of recording from the very...
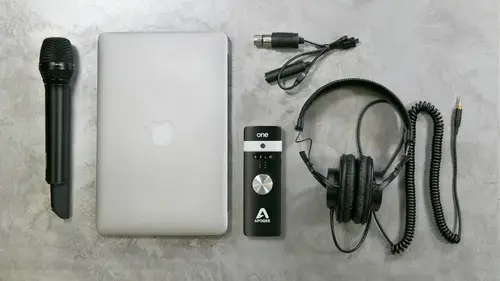
beginning of just like getting down a scratch track all the way to like bouncing down the final mix so really excited to have you guys here and have you guys participate in this class josh is going to help us a zoo musician he shared a song with us and through a partnership with gobbler, were actually able to offer you the whole session that you can download that we created so that you can actually download that session, you can click on the link right there in the chat window on, be able to get the entire pro tools session that we're working with, so you can hear the tracks that josh did, and be able to program your own drums to them, be able to add your own parts in sort of play along with us as we start to pull up this session and create this song from scratch. So we're really excited for that opportunity, both from gobbler and for josh to be able to share a song that he wrote that weaken, be able to do that with. So, yeah, let's, just jump right in. So before we get into, like, actually starting the session, we're going to throw a few terms that you just so we can make sure that we're on the same page. I know that the audience is probably all over the place, as far as background you might have recorded in studios before, and you just want more of a specific understanding of the tools that are available now for home recording, or you might have never even pick up a microphone or anything, so we're going to try to just run through some specific concepts really quick, just so we're all on the same page that you could get going. So the first thing you see, we have a bunch of tools sitting here that we're working with, so I'm just going to kind of go through and talk about what you basically need to get set up with just to start recording. The first thing is obviously a computer. When I first started recording, I had a little four track cassette deck, and I was bouncing around with that, and I have moved on since then to the computer age, the digital age, so we're working primarily with the mac book here. Most software works really well with mac books, with all sort of mac products, um, and there's a lot of different as software based platforms that we can use that air called the recording world. They're called dia w's, which stands for digital audio workstation. So, like apple's ships with garage band, they also have logic, which is really popular today. We're going to be using pro tools, which is probably the most industry standard recording pot, former dea w that weird to you? So we've got a laptop we've got w called pro tools andan the interface that we're working with was made by apogee it's actually called the quartet and I'm gonna break down in just a second one and interfaces we also have just kind of a small mini controller which is basically a keyboard that doesn't actually create any sounds that just program sounds inside the computer to be able to playthings like guitars and bases and pianos that are all virtual instruments that were going to get into today as well. We also have a number of different types of plug ins and virtual instruments that were using within pro tools that will get into today from everything from easy drummer to some different plug ins from waves and some virtual instruments provided by avid s so we've got a number different tools we can work with along with the interface we also have just kind of a standard large diaphragm condenser microphone that we're going to use for vocals and just a direct input from a guitar so that's sort of the basic setup we have here that we're just going to kind of run with really quick I just want to explain really fast when an interface is a lot of people might not know specifically what interface does so typically in the recording world in a big studio you'd have a microphone which plugs into something called a pre amplifier which basically just increases the signal that goes into what's called an eighty converter for digital recording which takes all of that analog signal and makes it digital so that it's translated into zeros and ones in the computer can understand it and then lastly you have an interface and the interface takes all that digital information and puts it inside the computer that allows you to sort of manipulate with it like I said in a big studio those air usually three separate things but with home recording usually all three of those things were sort of compacted into one interface that you can just kind of plug in your computer and go so that's where we get to the apogee quartet which is a really cool product both the quartet and the duet that was also made by apogee or awesome products that have really great sounding preempts awesome sounding converters and they're becoming really popular for people to be able to record, you know, a couple different individual tracks in their home studio s o this specific device the quartet has four inputs so we could record for and puts it at one time with just this interface today we're going to be using two of those inputs for a microphone on the guitar and then as we start to layer instruments we'll kind of see how we can use some of those inputs on the actual interface so yeah that's sort of like the basic of recording those the basics things that we need to sort of get started let's go ahead and just open a session and start and just kind of jump right in and kind of see how this goes so like I said, we're using pro tools so we're gonna go and open pro tools eleven which like I said is a digital audio workstation as it opens you'll see a number of different things that pop up that we're just going to kind of run through really quick and explain exactly what it is that we're looking at so we know what some of these terms mean ahs we start to open a session so the approach was first opens up the very first thing we want to do is make sure that we're using the right her face so I'm gonna go up to the set up and go to playback engine and make sure that I'm selecting the correct playback engine that I want to use the playback engine basically says you've got a number of different interfaces attached to your computer that you could use the built in interface the hd at my interface which one do you want to use? We want to make sure that we're using the quartet the apogee quartet so we're going to click on that and click ok and that will bring us to a place where we can actually start using that we're going to create a new session we're going to create a session from scratch just a blank session and it gives me a couple different options here first is the bit depth without getting too much into specifics around sort of the theory behind digital recording. Basically, the way digital recording works is digital recording records, a number of different samples, and each one of those samples has a certain length of resolution. S o b death basically says, how big is that resolution? How, how many characters aaron each digital word that's being stored twenty four bit is sort of the standard for high definition recording when you bounced down to a cd or usually an mp three usually gets down to sixteen bit, but we're going to start with twenty four bit um, the sample rate says basically, how many of those samples per per minute do you want to record? So we're going to record it forty eight k, which means forty eight thousand samples for that recording, so we're going to go forty eight k twenty four bit, which is pretty much your standard setup for recording. We're going to think, ok, the file type there's a couple different options waiver I ff most them are pretty universal itt's not a huge concern as to which filed type you're using so as we start the session it's not going to ask us to save the session of quick know about pro tools that's really important, understand at first if you're used to saving anything you haven't recorded before like if you have just a saving a document on a computer like in microsoft word, usually all that information is stored just right there in the file in pro tools just the session file on ly contains sort of the data about the session in all of the actual audio is stored in a separate folder called audio files along with a number of other different things, including plug in settings and all different kinds of stuff. So pro tools actually stores all this information in a project folder so that all that stuff could be held in one place. So where you choose to place that is actually really important on your desk top to make sure that you're storing all of the information for the session in one place, so if you want to move it somewhere else, you're moving the entire session with it and not just the session and missing some of the audio files, so we're gonna go ahead and put this just right on the documents folder we're going to create a session called creative live and it's going to create a folder for us it's going to create the pro tools session and all the necessary folders that all the other files go in so all that stuff is stored right in the same spot um yeah, we basically started pro tools we've created a session. We're ready to get started before we start setting up some of the different file types I kind of want to run through just really quickly what pro tools is and how it looks and how you can sort of use different parts of it so we can sort of zoom around and have a better understanding. So there's basically two windows and pro tools, one is called the mixed window, which is basically set up like a mixer. If you've ever seen like, a big mixing board in a studio with lots of knobs, that's basically the mixed window, like how can you control the sounds, the levels on dh, sort of the panning and all the different plug ins of what you're going to hear. That's basically mixed window the next window, which you can switch to pretty quickly with hockey and pro tools that just as command equals, you can switch back and forth between the two. The next one is called the edit window, and the window is basically like the tape back back in the day. So you've got the mixer in the tape deck and the tape back this is basically showing you all the recorded audio. In a nonlinear fashion, which means you can actually see the entire track that you've recorded from beginning to end and be able to edit it offline without having to edit it in real time. So it's really helpful to be able to use that the mixed window since we haven't added any tracks yet, it's blank, there's basically nothing there, as you can see before we start adding tracks that just kind of wanted to run through some of the features of the edit window just so you can look at it and kind of get a sense for what some things are. Um, up in the upper center, the edit window here's what's called the transport and the transport basically says, like, where are you in the session? And where is your cursor? What have you selected and how are you measuring time? Basically, in pro tools eso you khun, click on the soul of down arrow and decide how you want to measure time or how you want to see the grid that's that's built on the in the edit window for this class. Because we're going to be doing everything with a click track, we're actually going to be creating a session based on measures were actually going to keep it with bars and beats and the way that that's organized as it actually says that there's certain measures that you can record too just like in music so there's like four four measures or three four measures you can change the meter and we'll talk about how you do that by switch two minutes and seconds instead of looking at the whole grid as faras bars and beats, I'd be looking at minutes and seconds, so saying how long have I been recording for those air? Probably the two most common that you'll ever use you could look at timecode I probably wouldn't be using time code unless you working, sinking with video track somewhere feet and frames and samples are probably the same there's not a lot of people that use that feature most of the time it's either bars or beats in minutes and seconds we're going to switch backto bars and beats as you can see on the grid up here at the top it's showing you all the different beats are all the different measures that you're working with and they're all sort of laid out you can zoom out to show more bars or you can zoom into so just a few bars and we'll kind of get into that a little bit more as we start recording um appear and next to the transport you basically have all of the different tools that you can use and as we start to get into editing once we get some tracks down I'll get more specific into how you use those different tools what they're used for the most common one that I think most pro tools engineers use is called the multi tool which allows you to use all three tools and one depending on where your cursor is in the track you've got the zoom features right here next to that that basically shows how zoomed in you are in the edit window and then you've got the four edit modes for the most part you want to make sure that you start off either slip motor grid mode as you start to edit stuff on pro tools and well as we get into working especially with virtual drums we'll have a little bit of a better understanding of how all that kind of stuff works so that's sort of the basic setup of where pro tools is real quick drew did you want to see if there's any questions so far and just sort of like the basic idea of pro tools either from online or from our totally one guy had a question about w what is dear wxyz digital audio workstation so that's like garage band that's any app that you're using on a computer to rick cord basically yes exactly yeah ok dia w's basically any sort of digital audio workstation so there's literally dozens you can choose from, I think the most popularly to pro tools, logic or garage man it's kind of an intro level. Yeah, and so any any app that anybody's using to record these things are like global and they apply to all that, like your sample rate. You're setting up the session it's gonna look different, right? But it's all the same parameters. Yeah. That's correct. So the concepts aaron digital recording are all pretty much the same with, like, sampling rate, bit depth and the session type. All that kind of stuff is pretty similar, and even most of the controls are all pretty similar and most in most applications. Some of them have a little bit different ways of doing them or where you find them or how you edit them. Each platform has this kind of own unique set up, but that's basically the sort of the intro to two most dea w's awesome. Somebody decided question just came in. Could this course be helpful for windows users? Absolutely. Yes, absolutely. So pro tools and a number of other platforms are also available on windows computers. I've used innuendo, which is also a program that's very popular on pcs. It's not used on max is much eso. Most of those proper forms are agnostic to this happy computer
Ratings and Reviews
kyle
Clear, concise, interesting! Zach presents a lot of information in the context of an actual song being constructed from start to finish. The entire process was easy to follow, and Zach provides key insights for each step. For example, when starting a project, I've never known what to do first - lay down a drum track, record guitar, record vocal ... ? After watching this course, I have a much better idea about how to decide which thing to do first, and the concept of scratch tracks adds a lot of flexibility to the process. The addition of doubled tracks and other instrument layers ("overdubs") made a huge impact on the overall sound and these seem like very achievable steps for a home studio. I've done some home recording and mixing with garage band and an old version of logic. This course is a great update on that. While Zach demonstrates protools, I think it's pretty easy to map most of what he did to other apps like garageband (which admittedly has more restricted functionality). I'm looking forward to starting my next recording project using what I've learned here!
Mark73
This was a great course! I've found some valuable information over the years here and there, but this is the first time I've actually found a substantial amount of stuff I can actually use in the same place. It's the best course I could've imagined taking on the subject and I even learned a thing or two about other products and plugins that I may use in the future. Right now I'm using the simplest version of Pro Tools available (SE), but even so, I learned a few new functions on it that I had no idea how to perform before taking this class, as well as some valuable recording techniques and concepts that will help me for years to come. Best class I've ever taken and I look forward to taking several others! Many thanks!
Don Trapani
This was a great course for beginners, it was a true introduction. Of course the instructor used high-end software and equipment; he is a professional music producer, and is comfortable with the tools he uses on an everyday basis. I did not hear him say you had to get the products he was using, he just identified the tools so anyone watching can do their own research. After watching this class, I checked out several sources for more info, and found that you can get a basic interface that comes with the DAW software, for as little as $100. If you have an interest at all in home recording but don't know where to start, this is the course for you. 5 stars.
Student Work
Related Classes
Sound Mixing