Lessons
Lesson Info
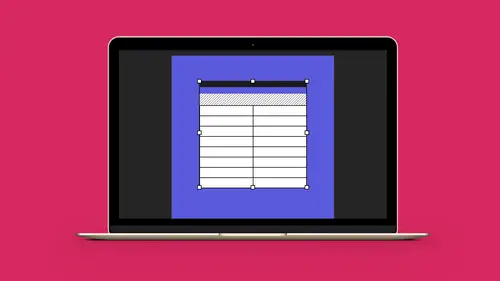
Add Rows & Columns to Table
So, setting the size of your rows and columns so that they're going to be a certain size you can do in your control bar. We have two different settings, which at first seems a little bit odd, and the two settings are At Least and Exactly. And what does that mean? Well, Exactly means when I set the height and I say I want the height of each of my rows to be exactly a quarter of an inch, then I put content in here and those rows will stay exactly one quarter of an inch high. That's it, nothing else, and they will not grow or shrink. I can go through and I can set all the widths overall so they will be exactly that size. This is fine if I want to make sure everything's the same, but where it doesn't work very well is when you have content differences. And what I mean by, when I set this to be At Least and I say I want my rows to be At Least a quarter of an inch high, that means they will not get any smaller than that but if I type in I would like them to grow, so that they will expand. On...
ce I take content out, it will automatically go back so that At Least and Exactly, Exactly means it is that size regardless of what you do. At Least means it won't get smaller than that, but it will expand when you put more content in. That's nice to have. Being able to set this via the numbers is fine, but what happens when you want to go in and you'd like to take your content and you'd like to give it some more space? Well, I have this table up here that I've kind of set up right here and I'm gonna show you how we've done this, and I wanna go in and I wanna do some adjustments here. All of these are At Least a certain size and they're all the same size, 'cause I'd like it all consistent. But then, I'd like to go in and I'd like to put some more space in overall. I'm not quite sure how much I want, I just want to go through and open this up a little bit more. If I click on any of the column or row dividers, I can simply click and pull on any one of those and it will simply move that divider and expand all the content past that. It's not gonna do everything at once. If I go to the bottom, then it's just going to do the bottom row. If I do one of the middle dividers, it will just take and it'll just push all the content over. But if I'd like to expand everything and keep everything in proportion, size, height wise, What I'm gonna do is I'm gonna hold down my Shift key and if I click on the bottom or the right and I hold down my Shift key and pull, that is going to expand everything in proportion so I don't have to worry about going through and setting a very specific size in my control bar. I just went in here, held down my Shift key, and took everything and simply pulled or pushed with the Shift key held down, and then it just went and it stretched everything universally. It does not stretch what's in the containers, it just simply grows the containers. So that's really nice to be able to do when you just want to go in and make something slightly larger overall and you really don't care what the measurements are. So, that works quite nicely. The one frustrating thing is this: because you can go in and you can just move these dividers here, sometimes I want to go in and I want to move this divider over, but then I lose the width of my entire overall frame. I want it to be this size, 'cause this is exactly the size that I need, but if I move my divider then I gotta go back and I then have to reposition all my other dividers and get them back to where they were, and they're no longer the same here. So then I have to select all of these and I have to go in and I have to make them the same and make sure they all work and then keep resetting it, and that's a real pain. So, what I do here, is when I do go in and I do move something here, I don't wanna change the width of my document. So if I move them freely, it's going to simply move that column and then adjust everything from there. But if I hold down my Shift key while I'm moving any of the dividers, that Shift key will allow me to move that divider without repositioning everything else overall in the table. So, hold down the Shift key, reposition these. I can get everything that I want to where it belongs without going in and changing the size constantly. Quite nice. So, if I do that horizontally or vertically, this allows me to change it without going through and changing absolutely everything in my table and actually creating a different size. So that's a nice feature there, to be able to shift all that in there. Easy to set back to where it is, select everything. I can say okay, I want the heights to be the same, everything's the same there, and I can keep the widths totally different. Now, the content inside here I can simply type in and when I do, I go in and it's just like a normal text container. The text then sits right up against the edge of my container and I can set little buffer zones, 'cause in many cases I will have a border or a stroke around each and every one of the cells. By default, when I create a normal table, I have a slight buffer zone, top, bottom, left, and right. This is the text inset, that little buffer zone that buffers my text inside that cell. In some of these, because the border doesn't print, I don't care about them running all the way over to the edge, in fact, I like that because in Preview mode here when I look at this, I don't have any divider bars here. And so everything looks good. The fill here and this all run right up to the edge here. So that's not a big deal. But if I did have row strokes and I wanted to make sure that I had a buffer zone, especially if these were filled with a color, I'd want that buffer zone to be honored. So, I could go in and I could put in that little buffer zone on all of my cells, and I've selected all my cells. It then puts that buffer zone in so that no matter what I put in here, it will always honor that buffer zone. Works fine. I can also go in and have everything positioned at the top, middle, or bottom of those cells. Doesn't look like there's much of a change. We'll open it up more so there's at the top of the cells, middle, and the bottom of the cells. Position them wherever you want them to be so that you get the look and the feel that you're going for. All great. There it is. Very simple to go in and introduce a table to your document. Now, I wanna go in and I want to add some basic grow strokes, column strokes as well. And here, I've gone in and I've applied just a fill to this one line. Now, when you select a row or a column, it's just like selecting a container to fill or put a stroke around the container. It's really quite easy. If I select a row or a column and I'd like to add a color to that, just click on it with my Type tool, get the arrow, select it. I can go into my Swatch panel and I can apply any color and any tint of that color to that entire row or column. Works just fine. What's kind of interesting here is that this will override itself from time to time. You notice I went in and I did this entire row in cyan at 10%. If I go in and I fill this with black at 10%, it will go ahead and fill it all with black at 10%, where the 10% was, but fill it with black with everything else. If I fill this with black, now this has all been filled with black and you'll notice that now my blue line is lost. And this happens because when I apply something to a cell, whatever I last applied to the cell is going to win over everything else. And you're gonna see that especially when we go in and we do cell borders and stuff, because it could be an issue as you do this. Now I'd have to go back and select the row and I'd have to go and select that color and bring it back if I'd like to bring it in that way. It's just one of those weird things. Whatever you do last for fills and/or cell strokes, it will override what you've done before. But it's still like selecting a container. You can put a fill and a stroke on your object and everything works just fine. When it comes to row and column strokes here, it's a little bit different. If I select my entire table and I would like to put strokes on all of my horizontal rows, I will have to go in and click on my little picture here. I'm gonna turn off all the areas that I don't want to stroke on and I'm going to click on the center stroke here, which is going to mean any horizontal strokes that are not the top and the bottom are gonna get filled in. Even though I've got multiple ones here, I'm gonna select the picture where it says that just the horizontal strokes in the box are going to be stroked like that. So I'm going to go ahead and select a color. I'm gonna select a size, and then that goes in and that gives me a stroke along there. I'm just gonna hit my preview here so I can see that, great. So now that goes in and that selects all my horizontal row strokes and it goes in and puts a two point stroke on there. I didn't have the top or bottom selected, so it doesn't do the actual edge of the table, it just does the dividers. If I go in and I do a vertical divider here and I go ahead and choose a color and a size of that, too, and I just choose the vertical divider, it only does the vertical dividers, but not the edges, 'cause I did not select the edges. So there is my table with my vertical and horizontal strokes in here and everything is set, okay? If I want a border around this, as well, I'm gonna need to select the whole thing and then I will need to select just the border all around here. Turn off everything else that I don't want, select that, select the border that I want to have around there, and then that allows me to apply the border separately, as well. Definitely gets a little bit more tricky as we go. But, pretty basic, pretty easy to do, pretty easy to use. Simple stuff.
Ratings and Reviews
Student Work
Related Classes
Adobe InDesign