Lessons
Lesson Info
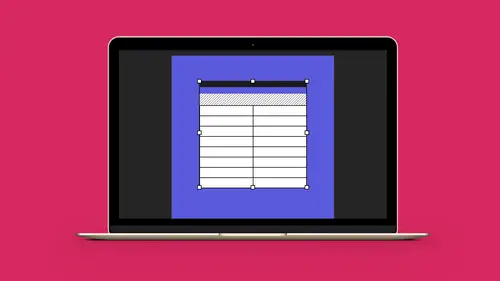
Edit Columns in Table
What I wanna show you here is, I'm gonna run through really quick. And I'd pulled this off one of the websites yesterday, and it's a cool little thing that we're gonna go and do, and it's just a picture here, I was just looking for a quick chart that we could build. And this is pretty easy here, and we're gonna run through some of the features on how we can build this really quick. And we're gonna set up styles here so that we could recreate this, as well. There's a couple things that don't work here, like this little piece, I'm actually gonna turn sideways. But we're gonna just recreate this really quickly. We're gonna show you what to do. Gonna show you some quick features on how to set things up as well, and moving things around too. So what I'm gonna do is, I've got how many columns? One, two, three, four, five, six, seven, eight, nine. And one, two, three, four, five, six, seven, eight, nine, 10, 11. So I can create a table. And I can have nine rows and I could have 11 columns. I ...
can always edit this afterwards. I'm gonna draw this so it looks like that, and there it all is, nice and easy. Okay, first thing is I want this to all be one cell because I wanna have this headline right here. If I start to type inside here, it's just going to fill just this, and it doesn't work. So I'm gonna select all of my columns here, and I wanna merge them all together. Now I have my Table menu which allows me to go and merge all the cells. But the easiest way to do this, is because I'm working on tables, I'm gonna just right click on anything that I'm doing, which is gonna bring up all of my menu that I need. Instead of having to leave and go up to my toolbar, I can go directly to this and call up my options. So I'm gonna right click and I'm gonna merge these cells all together which takes all these cells, and I can go in and type it in, and this acts all as one column. And it's interesting 'coz when I select the first column, you'll see how that whole one gets selected 'coz that's where it originated from, but it is now all one cell. By the way, a couple different ways if you wanna go in and you wanna select a cell, or a row, or a column based on where your cursor is, when you right click on here it just calls up all of your text editing. But if you go under Table, we have different shortcuts here to select a cell which is Command + /, select a row, or select a column. So these are quick shortcuts there so that if you are here and you wanna go in and you wanna select the entire cell, you can do that without having to go up under your table and select something like that. So those shortcuts, Table, Select, learn those shortcuts. That's gonna make it a little bit easier for you to go in and select them, and you don't have to move your cursor. So this is great, I've got my headline right here. I could select that and I could fill this whole thing with a color, like so. And I could also select my Type using my type tool, like I normally would. I could fill that with a color. And of course I could go and I could fill or change the type to something here. Here it is, there's my headline. And I could go under my paragraph formatting, center that right in there. 'Coz again it's just a text container, great. Now I realize that I have to have this word Donor across the top here like they've done here. So I'm gonna select all these cells, right click, and I'm gonna merge those cells together. And then I'm going to have the word Donor. And I'm just gonna use my eyedropper tool to pick up the content here from this and put it on here, and it picks up all that. But now I've gotta go in and I've gotta select this cell. Now if you don't know the shortcuts for these, of course you can always go under your Table and Select right here. But a quick way to select this cell is this, if you put your cursor in the cell, and then just put it anywhere, if you got type, you can select it, and then just take your cursor and touch the edge of your cell. That's gonna select the entire cell. It's just a really quick way to do that. Then I can go in, fill it with a color, and I've got that right there. One thing I don't like about this is it has Recipient over here and it takes up the big box right here. So I'd like to go in and I'd like to merge these together, or I wanna go in and I wanna put Recipient here but I wanna have it vertical so that we can have it so that it doesn't run here. Actually what we need to do is adjust, this whole thing needs to become Recipient right here. Merge these cells together. I can copy this from this text container, paste it in here, and then select that entire cell, fill that with red, and I find out that my word Donor isn't there because it's too long. And I wanna turn that so I can turn it this way, 'coz I can rotate the content within the cell. You're gonna see me jumping back and forth between my table panel because the reason why I did this over here is because in my paragraph panel here, you see that I don't have any flip type because I didn't go in and actually adjust the cell, select it all. If I did then I would get these redundant features. Because it was horizontal, it was too wide, it wouldn't fit the cell, so I needed to then rotate that, fit it right there. If I want this to be just like an x or something, one of the features I do have is I could select that cell, if I could go under my Table menu, I can go under my Cell Options, and because I have just this one cell selected, one of the things that they have here is Diagonal Lines. So I could actually go in and say, you know what, there is no content here, I could simply put a diagonal line in there which means this cell has nothing to do with anything, put an x, whatever it is, and click OK. So that doesn't pertain to a single thing. Awesome, there we go. So this is looking pretty good as I go along here. And now I could just go in here and I can type with my font. But what I'm gonna do is I'm gonna copy this font first and put it in here, select that, and I'm gonna make sure that this font is going to be the right color 'coz I'm gonna make this really easy, I'm just gonna copy and paste this all the way on through. So I'll take this and I'm going to copy this. Now here is a nice feature, if you wanna get from cell to cell really quickly, instead of moving the cursor every single time, just hit tab. I'm gonna hit tab and I'm gonna hit paste, tab, paste, tab, paste tab, paste, you get the idea, okay. There it is. So now I can go in very quickly. I've got all my content in here. I can recreate this quite easily. Little did I know how many different types of blood there really are. It's actually kind of been an interesting chart. I never really though about this. But now we have to. Let's see, we've got the two A's, we've got the two B's, the two O's. Now I can have, copy this, put it in there, okay, there it is. Not enough space in here 'coz it keeps disappearing, and it's like, okay, now, now what do I do? Well I need to make my table a little bit larger. Well I'm gonna go in to the far right-hand side, hold down my shift key, pull a little bit bigger, and get all my content so that it actually shows up in there. And it's still not showing up 'coz I don't have enough space. I'm gonna grab that, make it a little bit bigger as well. Here's another thing, when you're working on this table, I try to go in and select the end of the table, but because of my text container being closed up here, I'd have to click on the text container first, and then click on my table, 'coz if I go over here and just take my Type tool, and try to work on my table, sometimes it doesn't recognize it. So you have to go in and kinda control where the end of your text container is. And it's weird 'coz sometimes you'll think that's a divider right there, you see that and you're like, what's going on? Well it's the end of your text container. It can get frustrating. So here I needed some more space so I go in and I copy all these, put it in, and, there's all my content. Now I realize that I have too many extra rows here, the way I set this up. Simple, I can go in here and I can select those columns, right click and I can simply delete those columns right there, and done, that fast, there it is. And I realize, you know, I deleted those and I needed to move everything over because I had to go in and have an extra row in here. Not a problem, I can always click this and I can go in here, and I can insert a column or a row, and I'm gonna insert one to the Left of this, and it's going to put it in, and it's going to mirror the one that's right next to it. Now when I did this I now have all of these which I can now fill in all of my content here, and I can merge these two together 'coz it put in a new column. I'm gonna merge those. And these are all going to be white as well. So I can just select those, fill them with paper, there it is. So now I'm going to take my content here and I'm going to put it in. You see when I paste it in there, it's mirroring this. So I'm gonna select all of my rows here, and I'm going to make sure my Type is going to be vertical so I don't mess up with this. And I'm going to copy this and I'm going to paste this into here so I can quickly change them. And I realize that I'm running out of rows here. So I'm gonna show you another trick of how I can add other content in here. So there it is, there's my A positive, there's my B negative. And I need more rows. So I could click on this row, say, I want more rows, right click, but you know what, I'm lazy, so this is something that I came up with not too long ago. I'm just gonna go and I'm gonna copy the existing row that I have. Before I couldn't do this, I'd have to go in here, right click, insert, say I want more rows here, above or below, and it's then going to match exactly what's there. I don't have that patience, and neither do you. So I'm gonna select the row or column, I'm gonna hold down my option key and with this selected right here, I'm going to hold down my option key, and I want to copy this. Now what's tricky here is because this is a merged cell right here, I can't go in and I can't copy this which is really frustrating. So I have to go in and insert two more rows below, there it is. We're gonna show you the copy feature because it is pretty awesome. But you notice when I hadn't copied this, it copied all the attributes. I now need to merge this together right there, so that all X's are new, awesome. So there it is, nice and easy, works really good. Now I can go in and I can put in my little check marks right here, and it's like, oh, I don't know what a check mark is. Not a problem, Type menu, call up my Glyphs panel, see if the font that I'm using here actually has a check mark in it. And, no, I don't wanna use minion here. I wanna use something else. What's my font that I'm using? Railway, okay. So Type, Glyphs, and there's Railway. Let's see if they have a check mark in here or something. Do they have a little check mark in the Glyphs panel right there. I don't see it. 'Coz these are all the hidden characters that they have right there. So I'm gonna go and I'm going to use the classic Wingdings which is gonna give me, of course, all of my check marks, everything that I need. So I could copy these Wingdings. Okay, that doesn't have a little check mark. Let's check the Webdings right there, all that. We got the little, oh, there's a check mark right there, there's an x right there, awesome. So I can do that. Let's make sure I put this in the right position. There we go. There's my Wingdings, do we have a check mark in there? Nothing good. Oh, here it is. So I'm gonna do my check mark there. I can also do my little x right there. So I've got my little copy right there. I'm just gonna copy that out of there, paste it right there. And here's where I'm gonna go when I apply the attributes and just do a really quick copy and paste. And I wanna center this inside the cell. So I can either select the cell or just select the copy, and go in here and say, center, right there, center it right there, center it up and down, so I've got that same with here. Center that, center that. Looks like both of them and I can adjust the size 'coz I can select as many columns as I want, or rows, and adjust the copy just like I normally would. Like I would a text container. And I filled those with something I didn't want to. I wanted to set the Type here, so that's the color. So this is going, and there's Type, it's going to be red, there it is. This is going to be green, there it is. And now as I go through, I can simply copy, paste, paste, paste, paste, paste, paste. Works good. So that's nice but I wanna go through and make this a whole lot easier. So if I wanna copy sections of this, here's what I'm gonna do, I'm gonna copy all these cells, I'm gonna do copy, I'm gonna select all these cells, I'm gonna hit paste. Copies from one, puts it right into another. And it's like, I mean, that's so easy. I can just go down the line here and I can say, okay, paste, but it's like, why didn't that work? Well here's the trick, I copied six cells worth of information, and I only selected five. It won't let me paste too much information because it doesn't know what cells it's going to paste it in. So if I'm gonna do this, I would need to go back in here, and select the five, select the five here, and copy. That would be paste, actually, not copy, copy, paste. And I could select the four, copy here, past that into there. And you can see how this works really well. Instead of having to retype all these, I just simply copy what I want, paste in, just like I'm pasting into a text container because that's exactly what these are. So this is looking pretty good. I can move this off to the side, bring it on there. Copy this, paste, paste, copy this. Actually I'm gonna go in and I'm going to paste it in here. Now do you see what happened there? It's pretty awesome. I had two that I had copied here. I can paste a smaller number into a larger number. I can't paste a larger number of cells into a smaller number. So if I go in and then I just simply hit paste, it goes in and I can simply paste each at a time, and it puts it in and it's like, okay, that's awesome. Check out what just happened here. I paste that in, and now what's happened? Is it has pasted a table inside a table. Gotta watch out for this folks. Because we went in and we selected multiple cells, as long as you select that multiple of cells or more, you're going to be able to paste each cell content into each cell content. But here because we only selected one cell, it then pasted it as a table inside a table. This gets really tricky, okay. And if you do that and you don't know how to get rid of it, you can select the entire table, and this is a table inside a table, you can then go under your Table, delete, and you can actually delete the table that you have selected in there. Doesn't happen often but sometimes you do want a table inside a table simply because you may have a cell that you wanna break up into multiple sections. So, copy, paste, again, copy, paste, you get the whole thing right here. And I know it's not matching what we're doing exactly here, I get that, but I wanna show you how this works. There it is. So we can have our content right there. We go back, and we can put in the areas where we went ahead and messed up, not messed up but clearly went in and had our content different. There it is. One, two, three. Awesome, okay. So there is our entire table. Done and happy, I'll snap to it. If we wanna make this whole thing bigger, now we have to go in and resize it. Well, to resize it, if I hold down my shift key with my Type tool, I can shift and pull down here, and it will increase the size of it all. Shift and pull over here, it'll increase the size. If I wanna do it both ways, I can hold down my shift key, and pull from the lower right-hand corner which will allow me to make it bigger if my text container is bigger, and it allows me to make it smaller over all without doing both the top and the left-hand side at once. It's like, okay, this works pretty good. So if we look at this, go to preview mode, that's what it looks like, and it's like, oh, yeah, you know, the borders are way too heavy around this. So what I'd like to do is I'm gonna go and I'm gonna set the borders here so they're gonna be a lot less. So do I want all of them to be less? If so, I will select the entire table, then I have to go to my little diagram here, and I have to select every single exterior border, top, bottom, left, and right, and then any interior divider, and set that to be the size and the color that I want it to be. If I would like to go in and I would like to set the border around the entire box to be higher, I would then just do the exterior of this, and then set whatever color I want there, there you go. If I wanna do all the internals right here, I could select everything, and then I could go in, and even though this is the border here, this is the border of what I have selected, this is no longer the border of the box. It's really tricky 'coz it's all based on what you have selected. Now this is somewhat easy to read, but another way that it would be easier to read is to go in here and color each alternating row. And I could do that one by one, by selecting the row or the column here, and then filling that with the color, remembering what the color was and applying it to the next one. Or I could go in and and I could select my content, go under the Table, under my Table Options, and I can do row strokes or fills right here. So I'm gonna do alternating fills. So I would like to have every other row filled, and I can turn on the preview here, and I can see, and it's like, oh, it did these rows here, and it's like, but why did it do this? I wanted it to start here. It's like it won't start with the first row. But I don't have to. I could go in and I could have it go in here, and so I could say, okay, do all these other rows, but I could skip the first few rows so that it's going to start where I want it to go. When I do it, then I could go in and say, okay, do start with the first row, and then do the next row as we go, and we can see that turned on and off. Well, what color do we have? Well I can choose a color here and I'm gonna do it in black but I'm gonna do a tint of black at 10%, and I'm gonna click OK and click off this, so we can see and it did that all. Why did it do this? Well, the reason why it did this is because this used to be part of this row right here. So even though this now looks like a column, it is separate cells all merged together. So it actually lives here. It's like, boy, isn't that confusing? Yes it is because as you divide things and merge things together, you tend to get kinda this weirdness, and it always reverts to back where it actually started to begin with. So I could select this cell and I could go back in and say, okay, make it red. But what's interesting is because it was a 10% tint of black, when I choose red, it's now a 10% tint of red, then I have to hit red again, and then it goes back and puts it in where I want it to be. So I can do fills or strokes. So this was alternating fills. But I could also go in and do alternating strokes as well if I'd like. So instead of doing fills, I could go in and do alternating strokes. Same concept is doing the fills. It's just that we can stroke thick, thin, thick, thin, or turn on, turn off. Basic set up, there we go.
Ratings and Reviews
Student Work
Related Classes
Adobe InDesign