Light Painting: Color And White Balance
Lesson 9 from: Capturing and Processing Night PhotographyTim Cooper
Light Painting: Color And White Balance
Lesson 9 from: Capturing and Processing Night PhotographyTim Cooper
Lesson Info
9. Light Painting: Color And White Balance
Lessons
Class Introduction
01:47 2Safety And Scouting
01:28 3Photo Pills App
03:45 4Civil Twilight Image Prep And Test Shots
12:40 5Setting Intervalometer And Capturing Cityscape
04:04 6Light Painting: Equipment Overview
03:20 7Light Painting: Composing The Scene
03:14 8Light Painting: Setting Sky Exposure Ambient Light
08:06Light Painting: Color And White Balance
05:12 10Light Painting: Mixing Warm And Cool Light
14:58 11Review Cityscape Library
02:01 12Opening Images In Lightroom And Moving In Photoshop
19:29 13Cityscape Image: Layers Theory
07:56 14Cityscape Image: Selections And Mask Theory
05:48 15Cityscape Image: Selection Using Color Range
08:27 16Cityscape Image: Altering Masks
05:36 17Review Light Painting Library
03:01 18Light Painting: Opening As Layers In Photoshop
11:00 19Light Painting: Layer Masks
12:05 20Light Painting: Edit Review
07:59Lesson Info
Light Painting: Color And White Balance
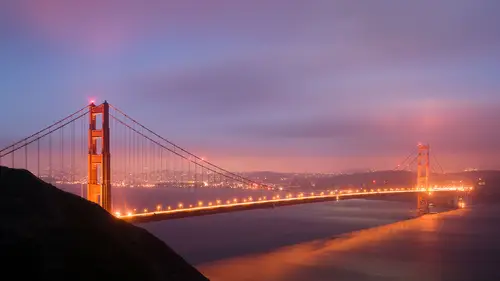
I have the choice of making the sky a more natural blue color or I could leave it that orange color. And I think what I'm gonna do here is I'm gonna let the sky go bluish and I'm gonna try to warm up the foreground so that we have a little bit of color contrast in addition to the lighting contrast in the scene. So, I'll go here to my white balance. I can see that I am at 3, and that's where I was shooting down by the bridge. Now, if I go down in my white balance, I'm going to be making the sky cooler and cooler and cooler. If I went up from 3, and I went in the direction of say 5, the sky would get warmer and warmer and warmer. So I decided I wanted the sky a little bit cooler, so from 3,800 I think I'll take it down to, let's say, 2,800 and see what that looks like. Now, here's a little trick for ya. I was shooting at one minute, at F8. At this point I really just want to test the sky color. So what I'm gonna do instead, is I'm gonna open F8 to 5.6, that's one stop and then go from on...
e minute to 30 seconds. And if I don't wanna wait that long, what I can do is raise my ISO up. Alright, now I can shoot it at 15 seconds. Alright, so that's gonna greatly take some time away from our testing. So a lot of times we'll test at higher ISOs or wider apertures just so that we can move through the testing process relatively quickly, rather than waiting minute, after minute, after minute just to test the color. All right? So, as we can see now, we actually have a blue sky. And that's looking, I'm liking that color, I think that works pretty well. That was a good guess. Normally I may have gone down to 3,200, but we went a little bit lower so it's a little bit more blue. All right. So now to get back to where we were. And you could always use your metadata on your initial frames to find out what your settings were. So, I've changed everything for the test shot, but literally before I was at ISO 250, F8. So, ISO and F8, and then just one more check to be sure that we're in a good shape here. We'll go back and review that image again and it was at 60 seconds so that means I have to set my camera back to bulb and use my intervalometer which is set to one minute. So we've got our exposure set and that is set and based on the ambient light. We then checked our white balance and said all right, we want it a little bit more blue, so we went from 3,800 down to a white balance of, what did we set here? 2,800. All right, now, once again to review, the white balance, we have many different types of white balance settings that are just kind of pre-canned settings for daylight or cloudy or fluorescent or tungsten. And we can definitely use those, but what I've done is I've just gone into the K setting, and that K stands for Kelvin and you can run that Kelvin temperature anywhere from 2,000 up to 10,000. 2,000 will make your scene very blue. 10,000 will make your scene very warm. We chose something closer to 2,000 at 2,800. That's why we're turning our sodium vapor orange sky into a more realistic looking blue sky. All right, so what's our next step? Well, we've gotta add some light in. And this is the thing about light painting, and students ask this all the time in our workshops. They'll say well how long do I shine the line on to the subject? And the answer is always really simple: I have no idea. And the reason is because every subject is different. Rocks my reflect more light than grass. Dark wood of say an old cabin may absorb a bunch of light. How bright is your flashlight, right? How dim is your flashlight? There are so many different considerations to think about and so what we need to learn to do is just get out there and do it. I have no idea how long I have to paint this for, I'm just gonna walk out there and paint it and I'm gonna come back and look at my exposure and say hey, I added too much light or I didn't add enough light. So, when it comes to light painting there's a lot of guesswork, and of course over time you're gonna start to get the feel for things and you'll have a better idea of how long to paint, but when you first get started just get to experimenting. Don't even worry about it. You're gonna end up with a ton of overexposed frames, you're gonna end up with a ton of really dark frames, it's all part of the process and part of the fun as well.
Ratings and Reviews
Phillip Ziegler
This course, along with the others by Tim Cooper, are outstanding. His demonstrations and explanations are so clear and easy to follow. I've been out doing long exposure night photography using what i learned from Tim and and delighted by the results.