Cityscape Image: Altering Masks
Lesson 16 from: Capturing and Processing Night PhotographyTim Cooper
Cityscape Image: Altering Masks
Lesson 16 from: Capturing and Processing Night PhotographyTim Cooper
Lessons
Class Introduction
01:47 2Safety And Scouting
01:28 3Photo Pills App
03:45 4Civil Twilight Image Prep And Test Shots
12:40 5Setting Intervalometer And Capturing Cityscape
04:04 6Light Painting: Equipment Overview
03:20 7Light Painting: Composing The Scene
03:14 8Light Painting: Setting Sky Exposure Ambient Light
08:06Light Painting: Color And White Balance
05:12 10Light Painting: Mixing Warm And Cool Light
14:58 11Review Cityscape Library
02:01 12Opening Images In Lightroom And Moving In Photoshop
19:29 13Cityscape Image: Layers Theory
07:56 14Cityscape Image: Selections And Mask Theory
05:48 15Cityscape Image: Selection Using Color Range
08:27 16Cityscape Image: Altering Masks
05:36 17Review Light Painting Library
03:01 18Light Painting: Opening As Layers In Photoshop
11:00 19Light Painting: Layer Masks
12:05 20Light Painting: Edit Review
07:59Lesson Info
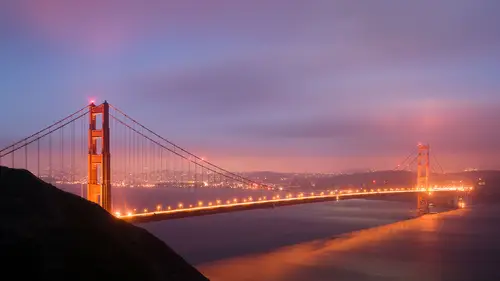
Cityscape Image: Altering Masks
We are going to alter our mask. So I'm going to grab my paintbrush by tapping by B key, and I'm going to go down and tap my D key for default colors, and then tap my X key to exchange these colors; when black's on top, that's what's going to be painted, when white's on top, that's what's going to be painted. I want to paint with black, oh I'm sorry I'll paint with white, and fill that area in. So that X key is very very handy. Now, I'll flip it by tapping the X key, and I'll paint in this area because I don't really want that to be affected. Alright. Now, what we can do with our curves is, we can increase the contrast in the sky. I like subtly darkening some areas, and lightening up other areas, and adjusting our curve. And what that also does, is it increases the saturation of the sky. Alright. So we can do something like that. Now I don't like my shadows being super dark in here, so what I'm going to do, is I'm going to click on my mask and use my paintbrush, and I'm going to make my...
paintbrush nice and soft. Let's see, the hardness is already at zero. And I'm going to make it nice and soft. And I'm going to paint with black so it removes some of that adjustment from there. But, I'm going to do it at about 50%. Tapping your one key, will make it 10% opacity. Tapping your five key makes it 50%. So, I'm going to go in here and just sort of, paint with white for ground color. Or I'm sorry, black for ground color, and just kind of paint that in a little bit. And I'll do it again, and again, and again. And you can see how I'm painting black on that to eliminate this adjustment from coming through. Now I'm not really loving that effect of the curve, so let me show you what I'm going to do. I'm going to go back in time a little bit, and I'm going to readjust this curve, by bringing my shadows up a little bit, and you can see how I'm raising the shadow area, this is getting lighter. And maybe for now, that's where I will leave that. But this part, I still want more contrast. So I'm going to create another curves layer, and go ahead and darken this one down, and now I'm going to fill this layer with black so none of that change comes through. So I can go edit, fill with black. Alright. Now if I want this curve change to come through on the image, I grab my white paint brush. And again, I made my brush really soft and really big, and sometimes I make my image kind of small, and my brush really large. That's going to make that super soft edge, just kind of paint that in. And you can see I'm starting to get some more of that color through there. And you can see what it looks like on the mask. Alright. And so I'm just kind of painting a little bit in there, and that's the shape I've created. And now, when we readjust our curve, we can start saying ah, do we want that darker or lighter, whatever we want, and we'll just kind of make that a little dark, we're starting to add some color in there. And maybe a little contrast. And what we can do is even change that blending mode to get rid of that color, if we don't want. We can change that blending mode to luminosity. That makes it a little bit more natural looking. If you like that color addition, you're going to go in and keep it at normal. Alright. Now I think the image needs just a little bit more overall contrast, so I'm going to create a curves layer. And, bring this shadow point down a little bit. And, I think that's looking pretty good. Alright. Maybe that bridge is a little hot, but I think I'm going to leave that for now. So, once again, what we're trying to do is trying to increase the detail in the lights themselves, while keeping the brightness in the sky and the brightness in the shadows. And we did that by starting off with these two images. And working them through, by bringing them into Photoshop, creating layers, and then working on individual layers. Alright. Lemme do one other thing before we go any further. Let's say that I wanted to make the sky even a little bit more blue or a little bit more warmer. Maybe I wanted to make these lights more warm. What you can do is create an adjustment layer over that layer. So I'm going to go to, let's say color balance here. And this color balance layer is only going to adjust what is below it. So at this point, this is the sky layer. So if I go to my color balance, and I add more blue in, it's only happening to the sky itself. You can see that. It's not happening to the bridge, because the bridge is mostly in this layer on the top here. Let me just show you that. Close that up by double clicking, and the bridge is mostly up in this layer. So it's not as affected. So by adding in this one color balance layer and making some more blue in the sky, we've really added some drama to a relatively overcast, kind of drab sky. Alright. So let's go and close this out, so I'm going to hit save and close.
Ratings and Reviews
Phillip Ziegler
This course, along with the others by Tim Cooper, are outstanding. His demonstrations and explanations are so clear and easy to follow. I've been out doing long exposure night photography using what i learned from Tim and and delighted by the results.