Lessons
Lesson Info
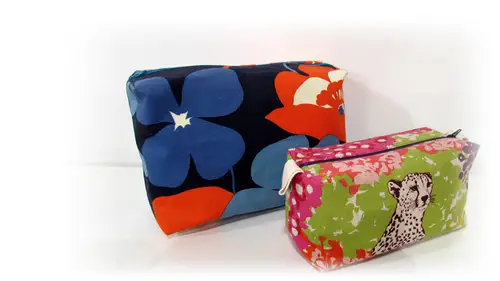
Sewing the Bag Together
So for the top box corners of this bag, you can choose to add pull tabs, this is optional. So if it's not a look that you like, you can skip it, but in this sample we're going to make the pull tabs so I have a quarter of a yard of one inch wide tool tape, and I'm going to fold it in half, and I'm going to cut it, so I have two pieces that air of equal length, but I'm going to fold each of these raw edges together, and I'm going to do a stitch forward and backwards across this edge here, about a quarter of an inch in from the edge of the fabric just to secure these two edges so they don't fall apart while we're sewing our corners same thing to the sky, and now we can see where the box bottom corners were really good practice for these top ones. So now we have a zipper in the middle and we're going to be sowing the lining on one side and the outer fabric on the other side. What we're going to do is pretty much exactly the same thing we're going to take these corners and pull them apart, ...
and I'm going to set up. To have this be sewn through all the layers on one side of the zipper like so and on the other side of the zipper with my lining. So the trick here is to get everything tow line up, these edges of the fabrics all have tow line up with each other, and I'm going to hold it just like this for a minute. Now that it's kind of the way I want it because I want to slide the pull tab in between the zipper and my outer fabric this is what's going to make it stick out when we're finished, so I'm going to slide the top of my little pull tab in this hole here and I'm gonna line my stitching right up with the edge of that fabric I want to try to get that is centered on my zipper as I can, I'm just going to kind of move it around until it looks nice and even and then I'm gonna pinch all of these layers together, trying to spread open my seem allowances on one side and my seem allowances on the other side like this. Now this is super thick, so be careful with your pins you want to try to pin through all the layers, and I'm pinning quite shallow, meaning I'm not sticking my pin in. Straight through the fabric like this and then trying to turn it in pinned down I'm trying to just grab a cz much fabric as I can and then tilt it so my pen pushes through I'm gonna put one more pin on either side like this toe hold these edges in place now I'm going to sew through all of these layers starting at this edge and stitching down to here this is going to be at my one centimeter or three eights of an inch seam allowance so move all the stuff out of the way that you don't want to so through and here's my seem allowance this's the side that has the zipper stopper on it so that if you remember is about a half an inch away from where we're sewing if you get close to this and you want to use your hand wheel too so that's totally fine a lot of layers better safe than sorry so there's one edge and I'm going to do the same thing on the other edge this one could be a little sloppier because we don't have that metal pole we've just got our thread so I'm gonna start out exactly the same way on this side, getting my edges lined up and trying to get the seam is close to the center of the zippers I can get it same thing on this side pulling the corners apart and really smoothing that fabric out of the way we don't want it to fold on itself straight like uh, so if you hold all of these edges together, then you can lift this apart here to slide your taping just down like that I'm trying to make sure it stays even with your zipper even like this and even centered on the zippers when I'm talking about then all of these edges get pinned together so we can stitch them this side there's no zipper pole or zipper stopper to worry about through all the layers but your pins do all your work for you holding this all together we're going to do a straight stretch if you might because of this stoppage is going to get pulled on a lot with these poll towns if you like now you can switch your machines years exact stitch and to his exact stitch right over this edge is well through the zipper and through the poll tabs that's going to give a little bit more strength to this edge. So if you do a lot of pulling on the pull tabs, they're not going to pull out, so I'm going to set up for him medium sized exact stitch on my machine I'm just going to so right over where I stitched my straight stitch in the seam allowance that's just going to make it a little extra stronger and then I can start trimming off some of this extra fabric and extra zipper. Use your shears to cut off that extra stuff on the other side.
Class Materials
Bonus with Purchase
Ratings and Reviews
Jaime Baggett
This was such a fun class and I felt so confident once I finished the box zip bag! I just bought the class last week and I've already finished two larges. I had been wanting to learn how to sew a zipper for a while and this class was a perfect choice. I love the instructor, she's easy to follow and doesn't use weird, hard to understand terms. And she defines things that might be unknown. THANK YOU, SHAERIE!